With
What to put on a poster for spelunx!
Three guidelines for making a poster:
- Pictures should stand out
- Text as bullet points
- Give context, content, and future work in three sections.
For Spelunx, we decided…


With
Three guidelines for making a poster:
For Spelunx, we decided…
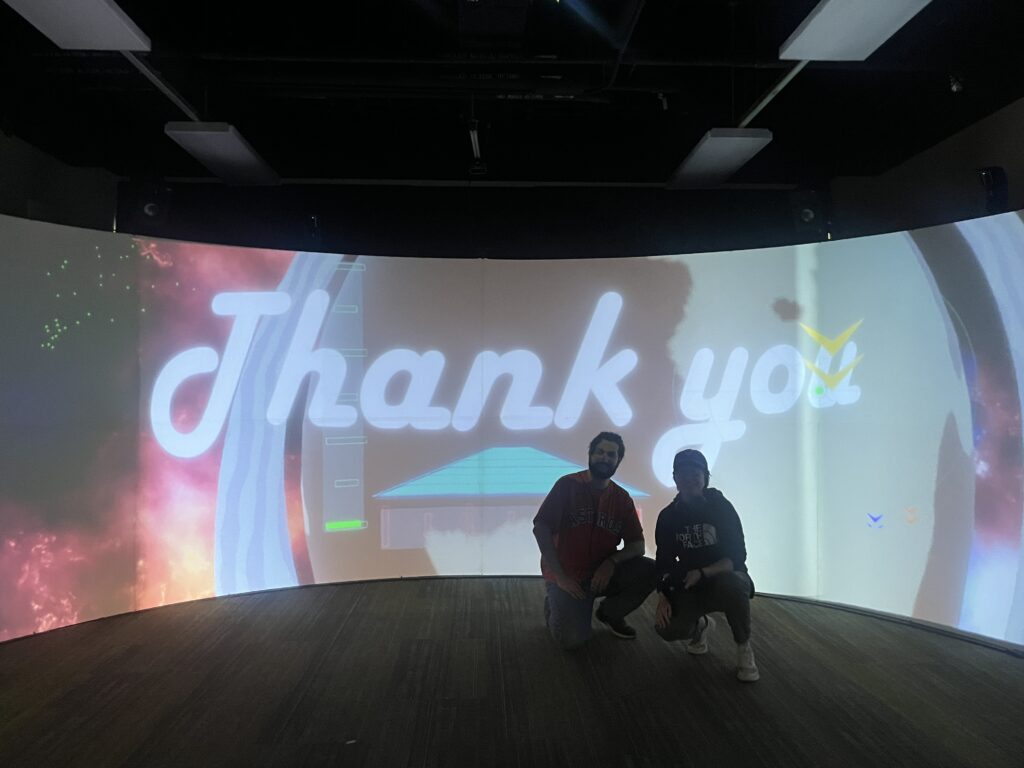
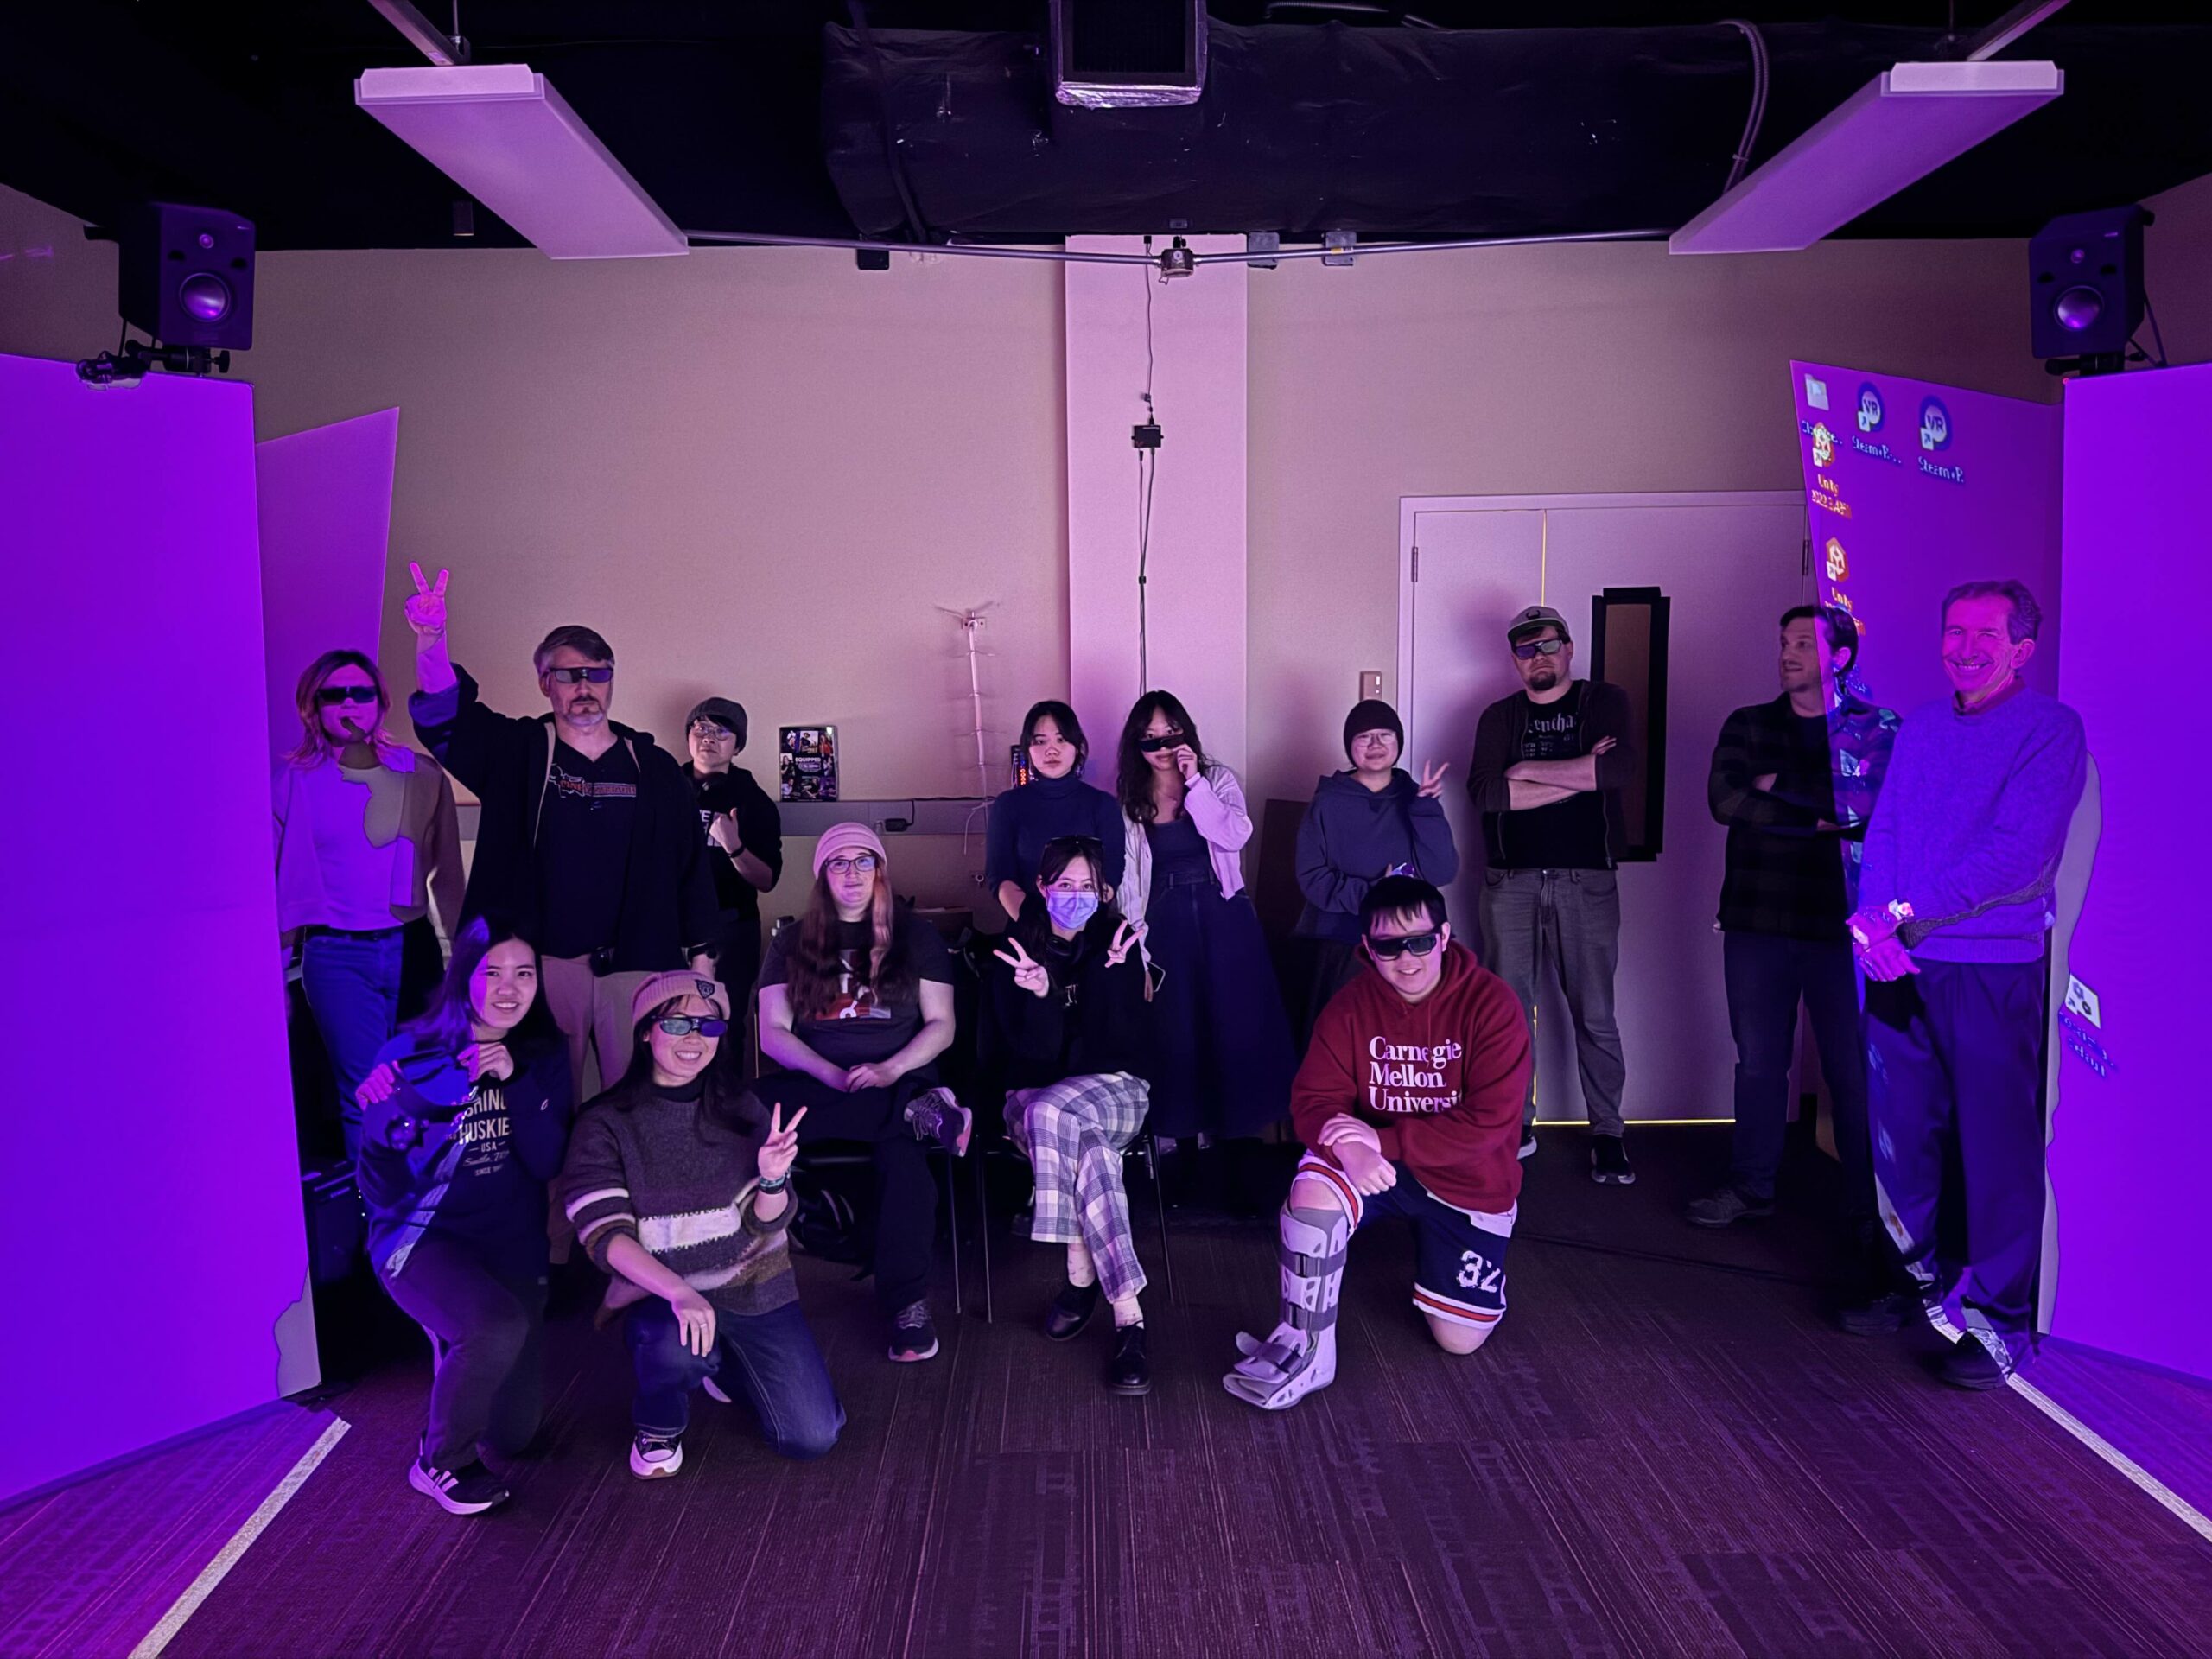
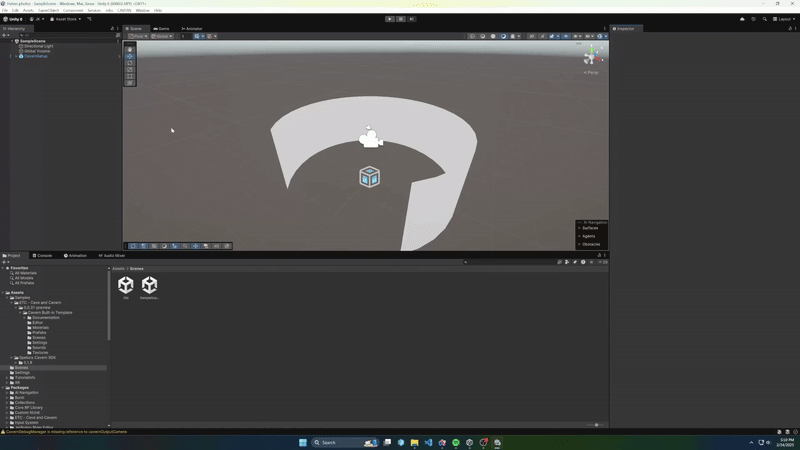
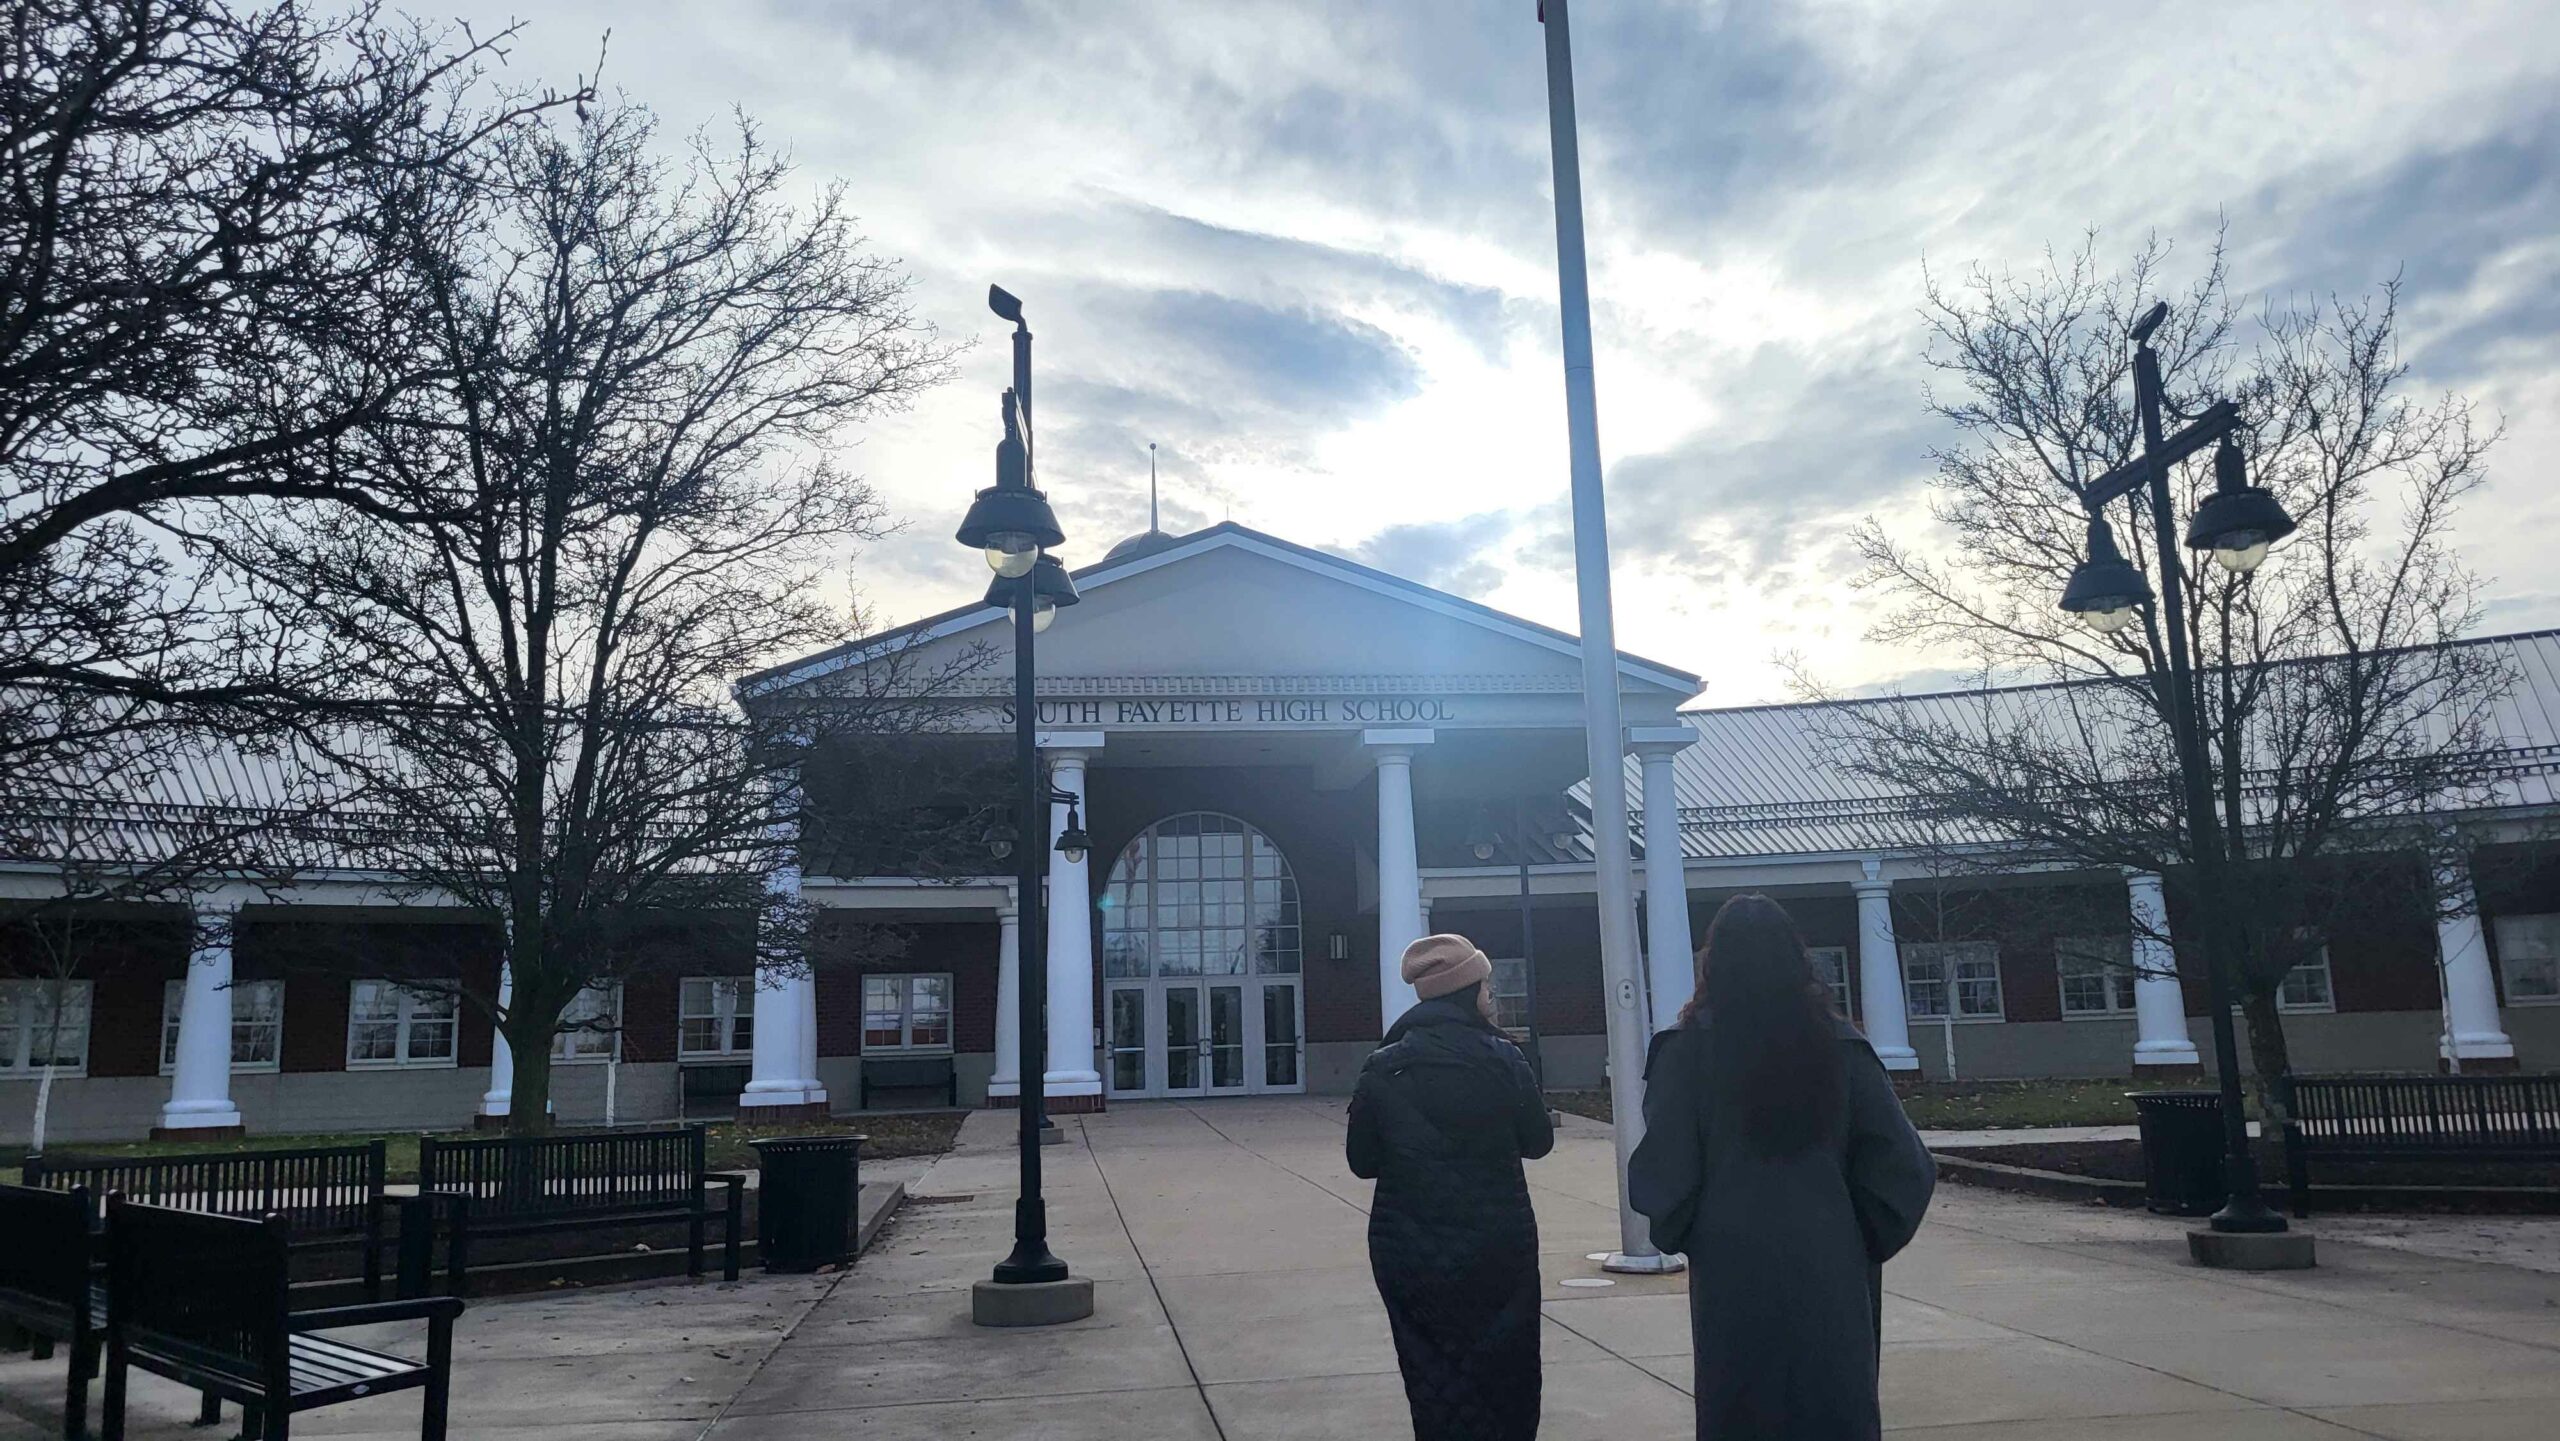
Both in the final presentation on Monday followed by open-house on Wednesday, we received immense praise from the community. The South Fayette High School class came to the presentation, and we were able to show them around ETC, and of course the CAVERN. All the jam 2.0 projects had the opportunities to shine, and we are ever confident that more experiences that we might not have imagined will continue to grow and flourish here — This is our initial goal, isn’t it. We also published our final version of the toolkit (waiting for new developers in the future), integrated the best practices into our official documentation, and bundled up more sample scenes into our repository.

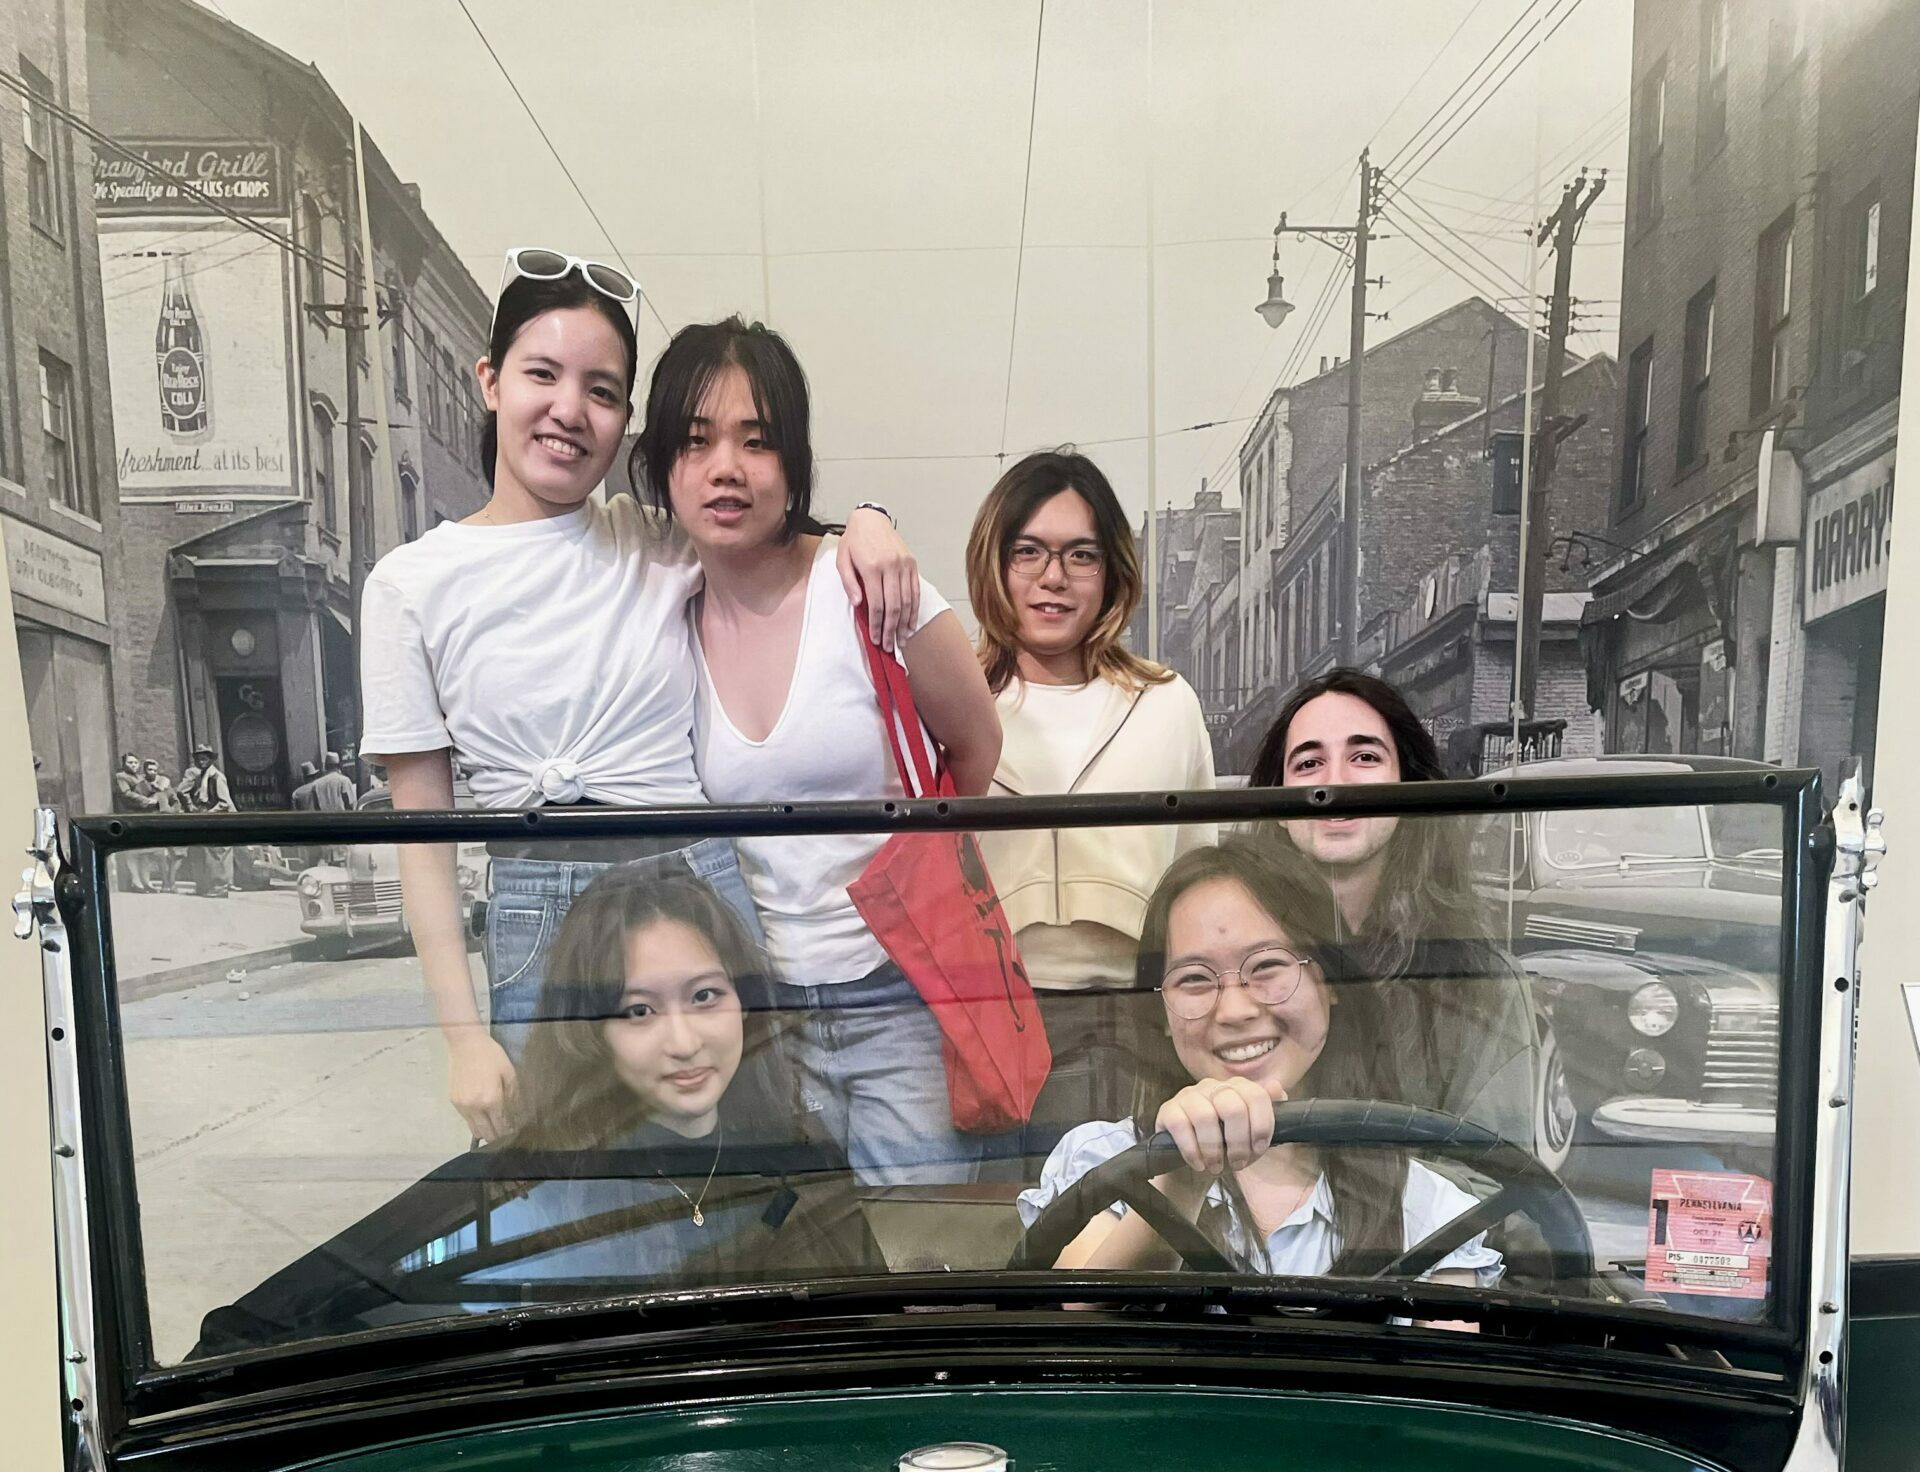
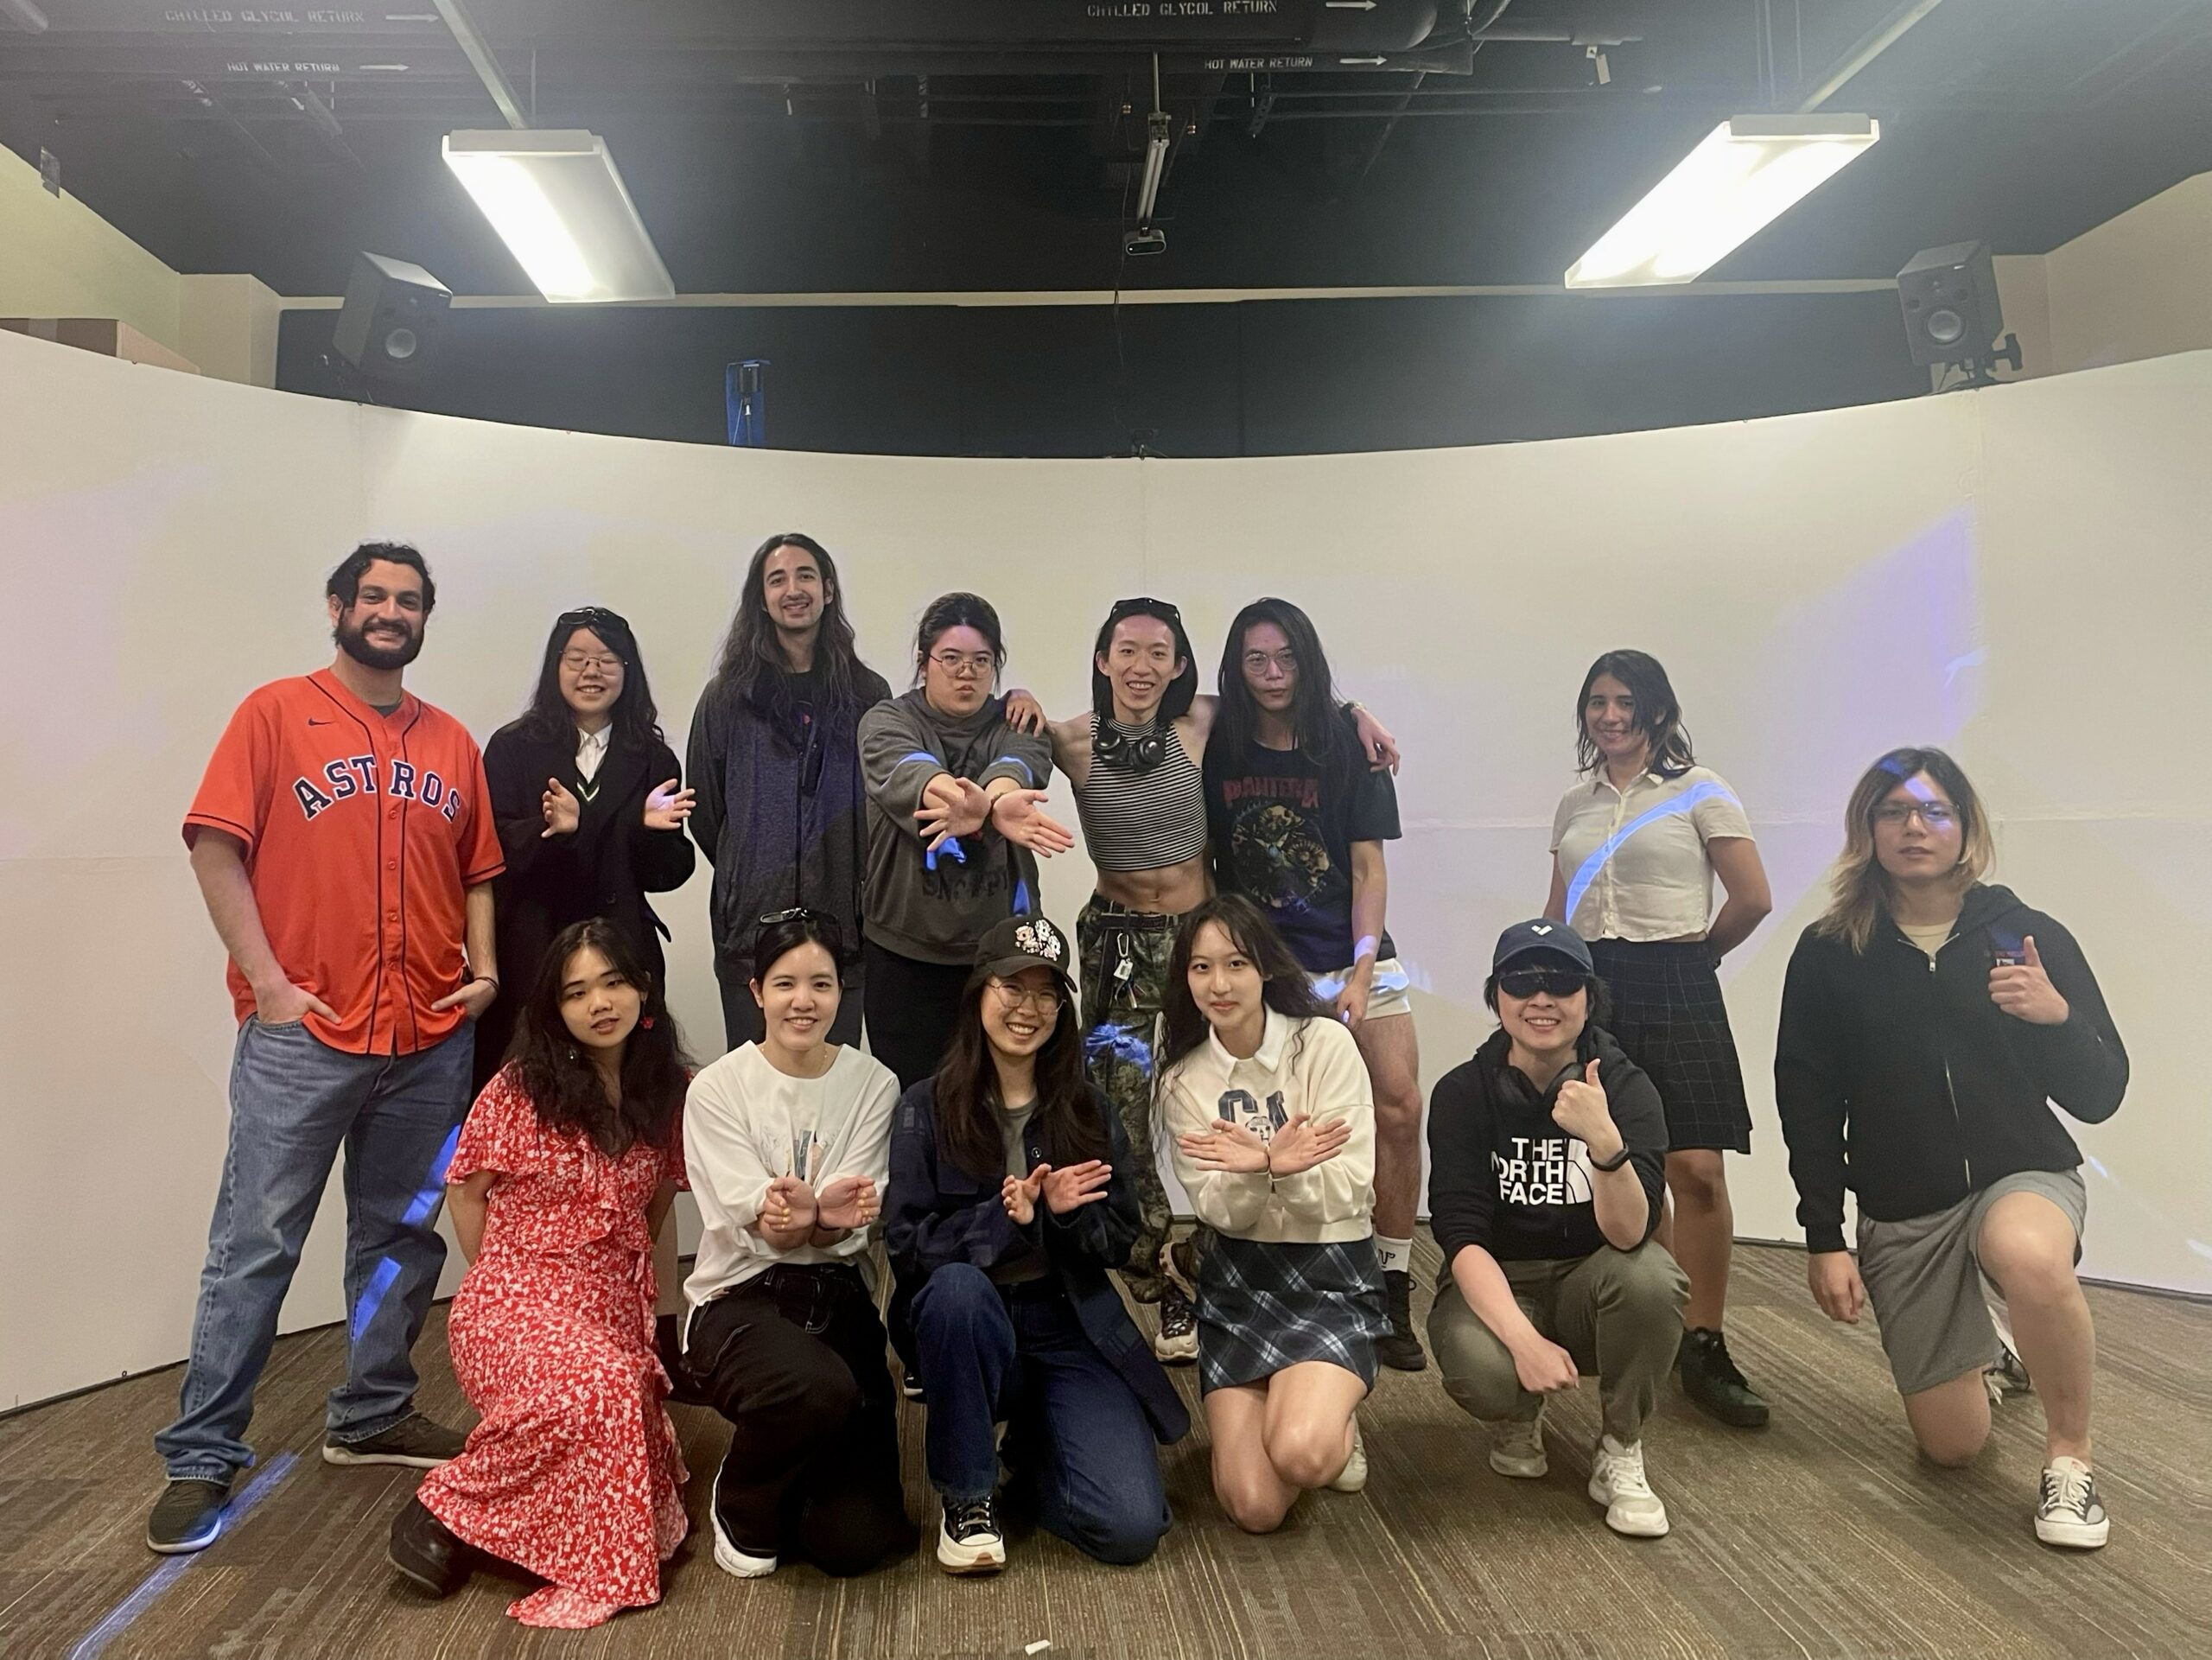
Our group also went to Frick Park for a brunch and a casual walk for a final group celebration.
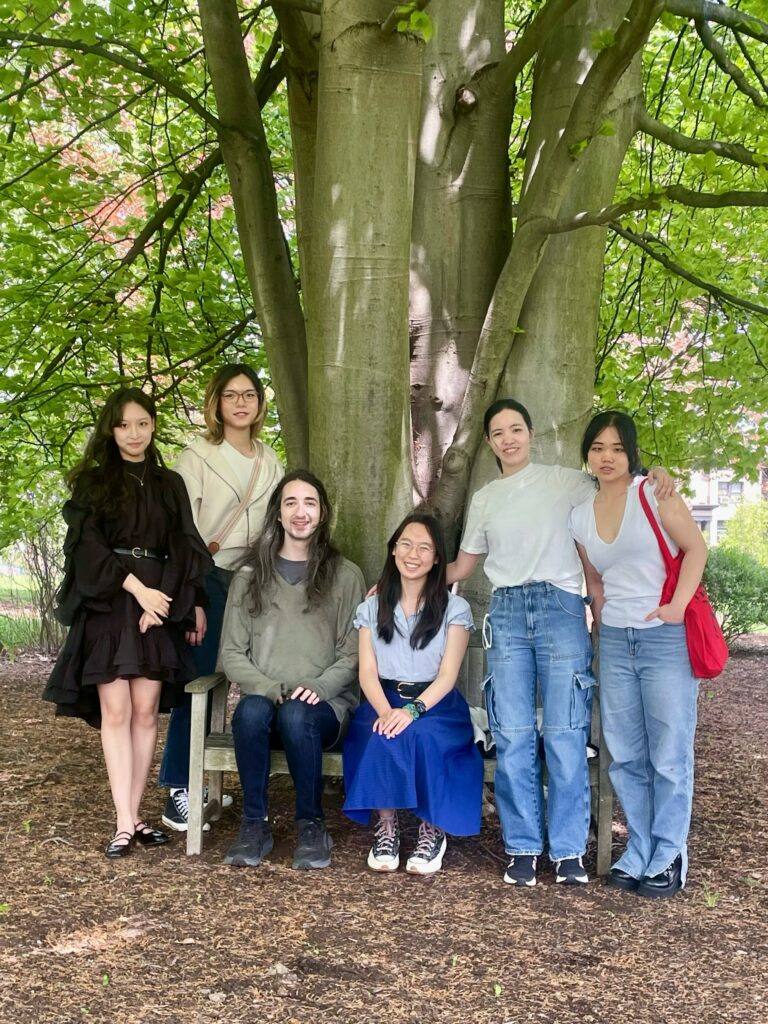
Hi everyone, we are Spelunx! We are a group of six interesting people.
This was how we started our presentations, from pitch, to halves, and to finals. We are a bunch of enthusiastic group of friends who love tackling a difficult and impactful problem using technology, art, sounds, along with user-centered design thinking along the way.
As the blog-post person for the semester, I was so fortunate to be documenting this wonderful journey of this wonderful group of people, but since it’s now at the end, I’ll let everyone share their reflections. (In order of height — haha just kidding, it’s in order of last name. Or is it?)
It was great working with the people on this team. Everyone brought their own strengths to the project and we ended up with something we’re all proud of. I’m happy with many of our technical and quality of life improvements, and I think the artists did a great job with the sample scene. I also thought that showing off the CAVERN as often as we did for tour groups and demos was both good practice for presentations and good opportunities for best practice user research.
I’m really proud of product, but most of all, I am proud of our team. The CAVERN Toolkit is something that truly belongs to us, it was something we pitched, and we poured our heart and soul into this semester. Not only did we achieve our goals, we exceeded them. None of this could have been possible without all the insane amounts of dedication and teamwork of Spelunx. I’m glad I got to do this with y’all.
It is my greatest honor to be a part of this wonderful team. Can’t believe a game engine interest group turned pitch team created a new SDK for a proprietary platform, and supporting multiple stakeholders internally and externally at the same time. I admit, at the start of the semester, I was in a career identity crisis, not sure about SDE, UX Research, technical audio, or project management. However, Spelunx people gave me endless support to try each of the above in different ways. To have such friends allowing for an environment to explore opportunities when I am so confused about my career, is the greatest blessing I can think of. I’ll always remember this extraordinary team who all become my lifelong friends.
The project is over, but we hope our toolkit goes the long way, just like the friendship we gained.
Thank everyone for a wonderful semester~

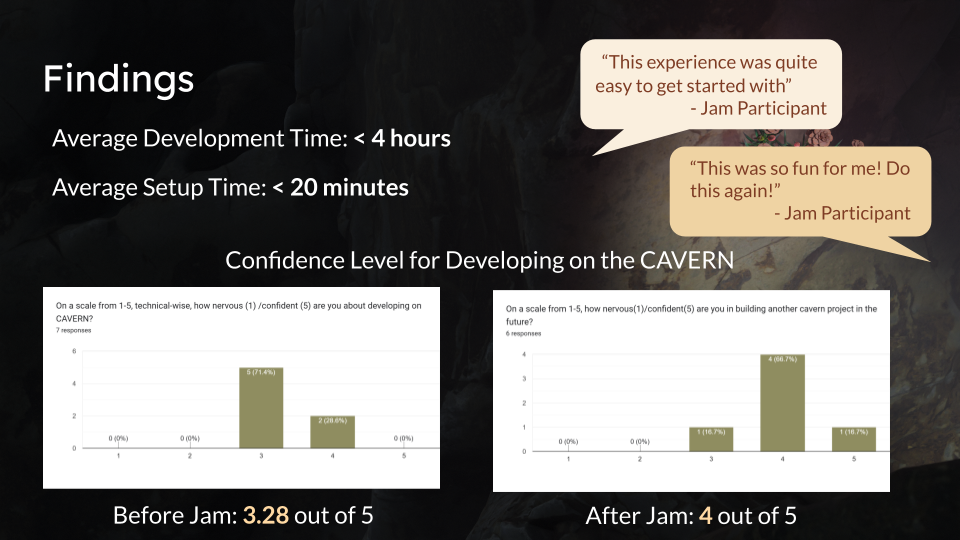
We compared the pre-survey to the post-survey and got really great feedback! Not only did the mental barrier decreased, we were so happy that many jammers felt inspired to create things that are ambitious and beyond what we initially imagined! That’s the best dream a toolkit project could have, right?

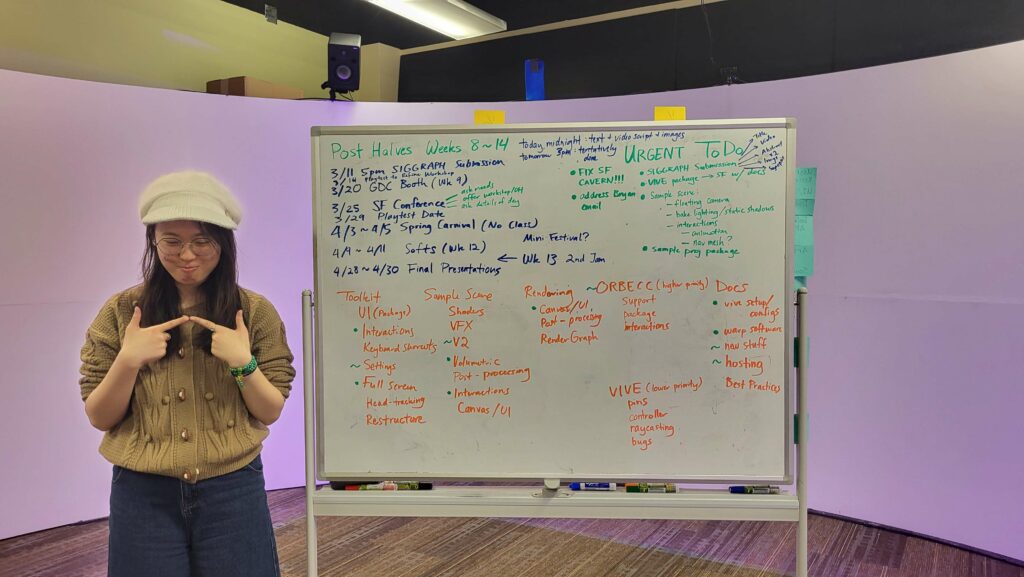
This is the final week of the semester. The first and foremost thing to do is setup a time for code freeze, so that our workaholic team members won’t continue pushing updates until the semester ended. (That was the plan, but we continued to push even after finals haha).
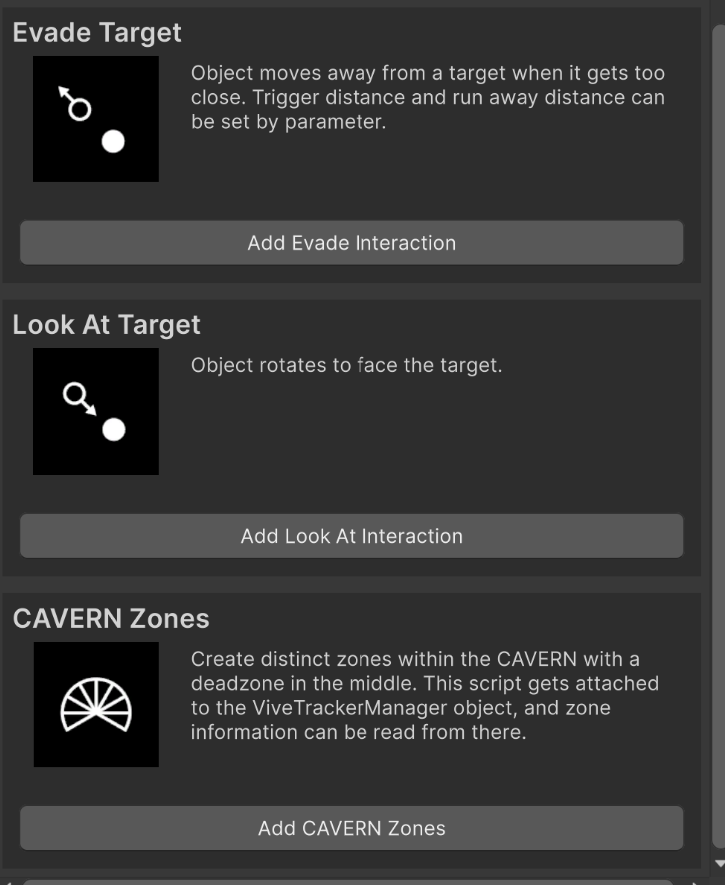
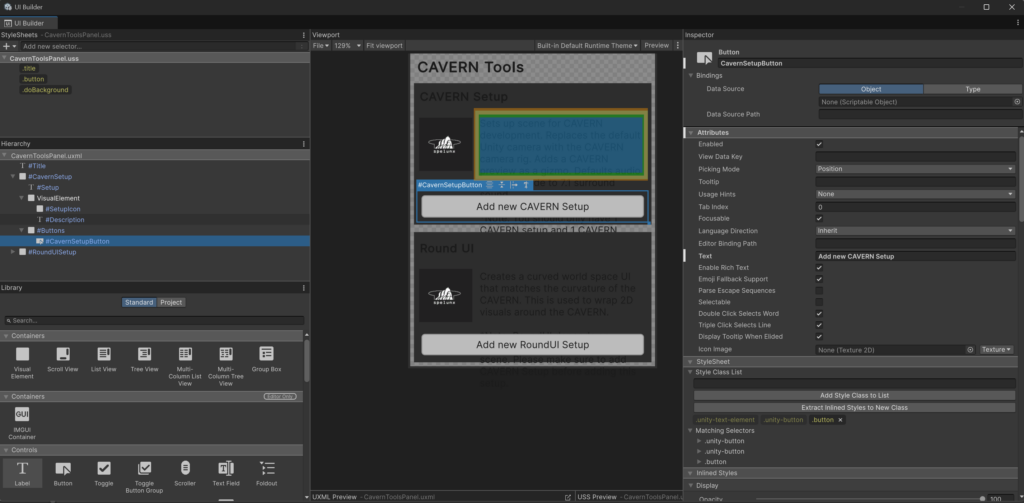
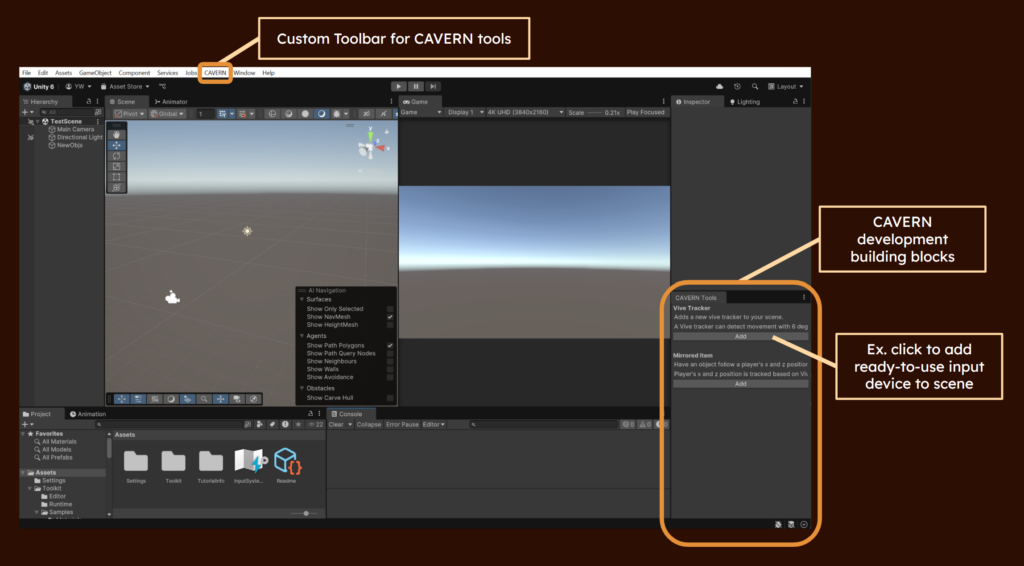
A good toolkit requires good UI. This week, Yingjie created the final UI via UXML and USS (HTML and CSS in Unity terms), with the icons Mia designed for every feature in the toolkit, and we have the following updated UI!
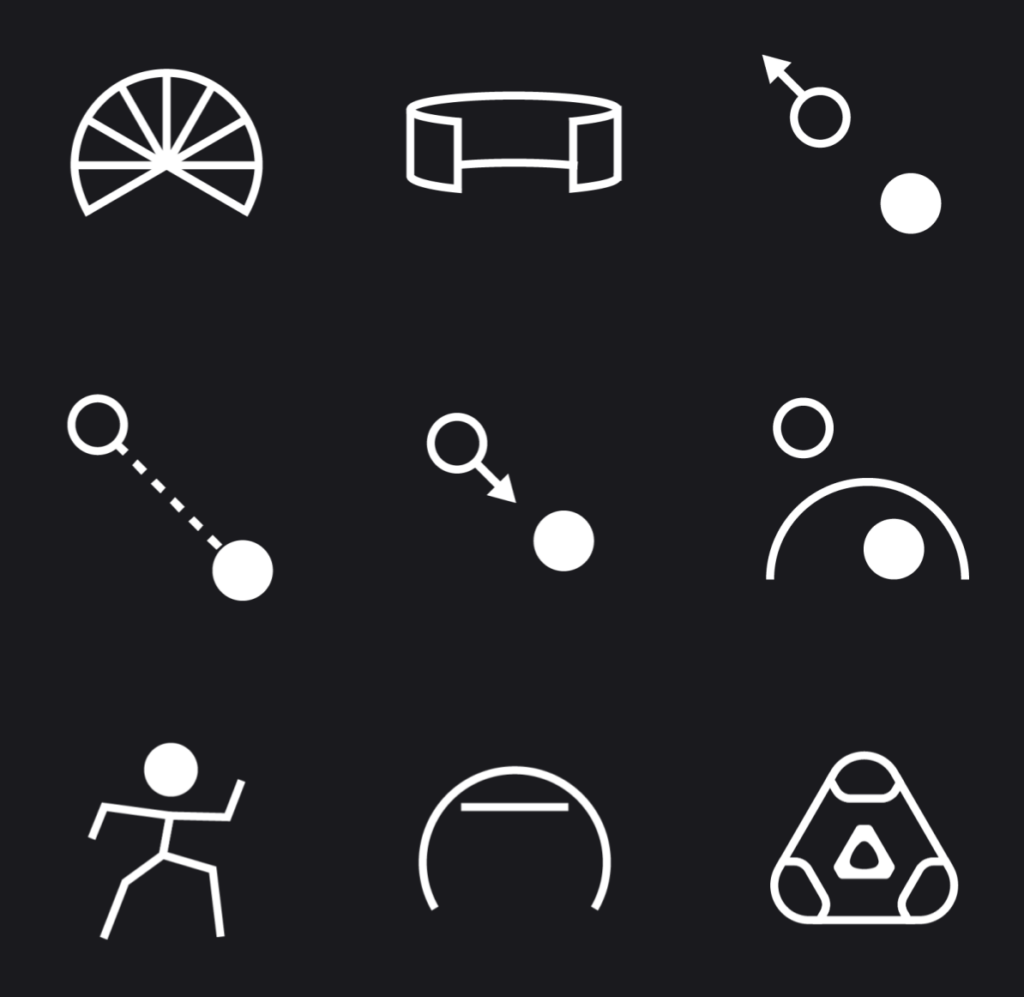


And even for the interaction building blocks!

Starter scene

Tester scene

Sample scene
We also recorded the final video that would be promotional on the ETC website.
This week, the artists compiled a list of best practices they have discovered throughout the semester, and added them into the user documentation. Here are some crucial ones:
Works well in CAVERN

Not so obvious in CAVERN

Within vs. outside

Near vs Far
There are still many other points, and they are all well-documented in the user documentation.
The final week of the semester, everyone’s busy with elective final preparations, and also pushing the final updates and creating content for the presentation. Stay tuned for the post mortem and final presentation recap in the next week!
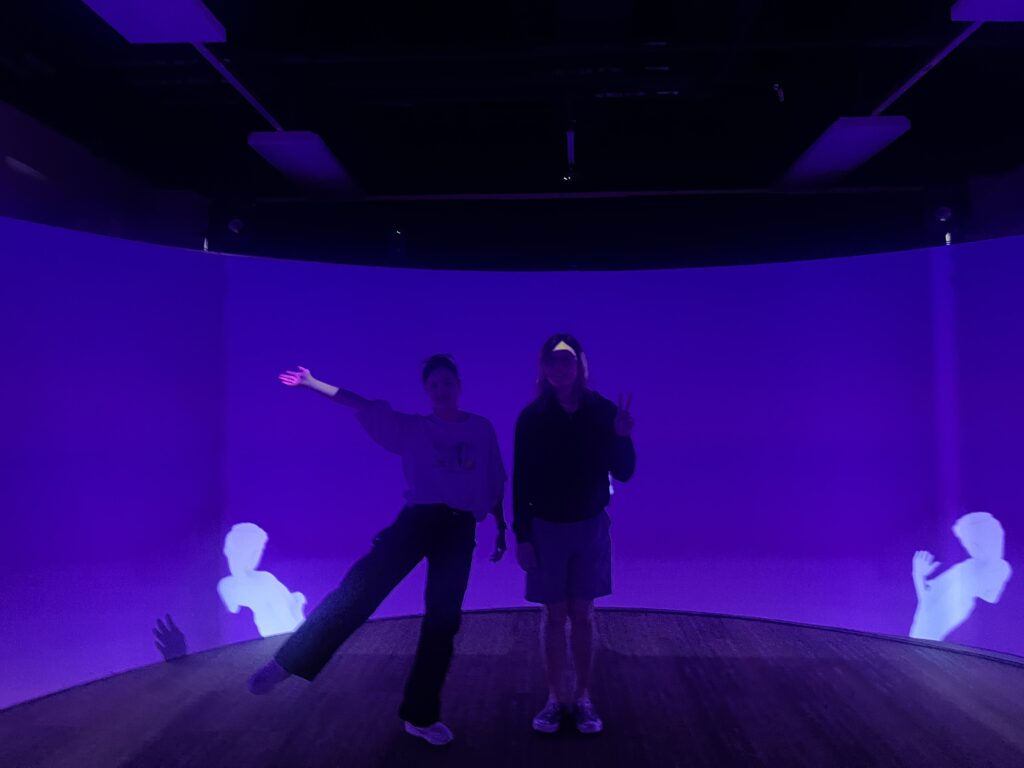
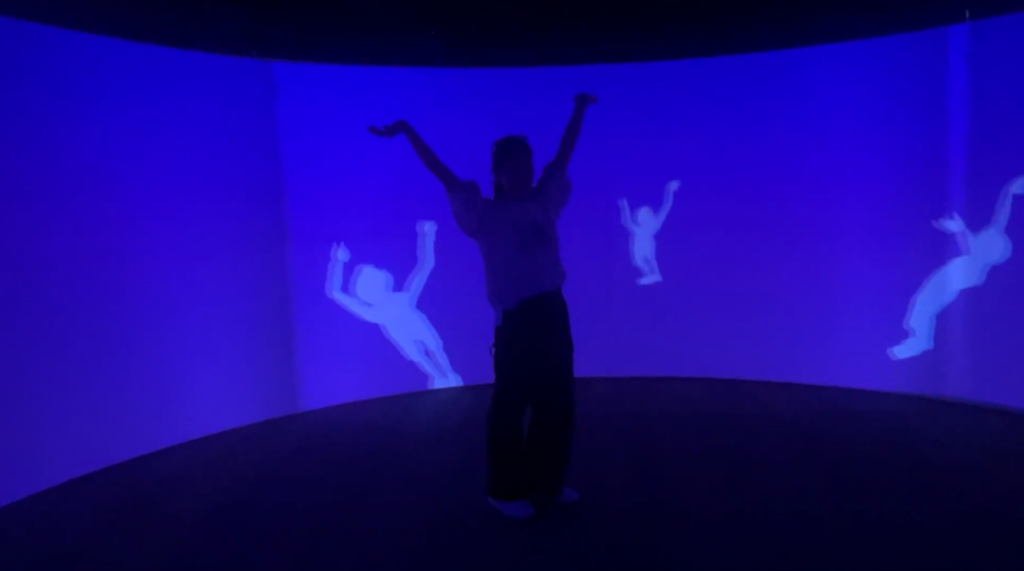
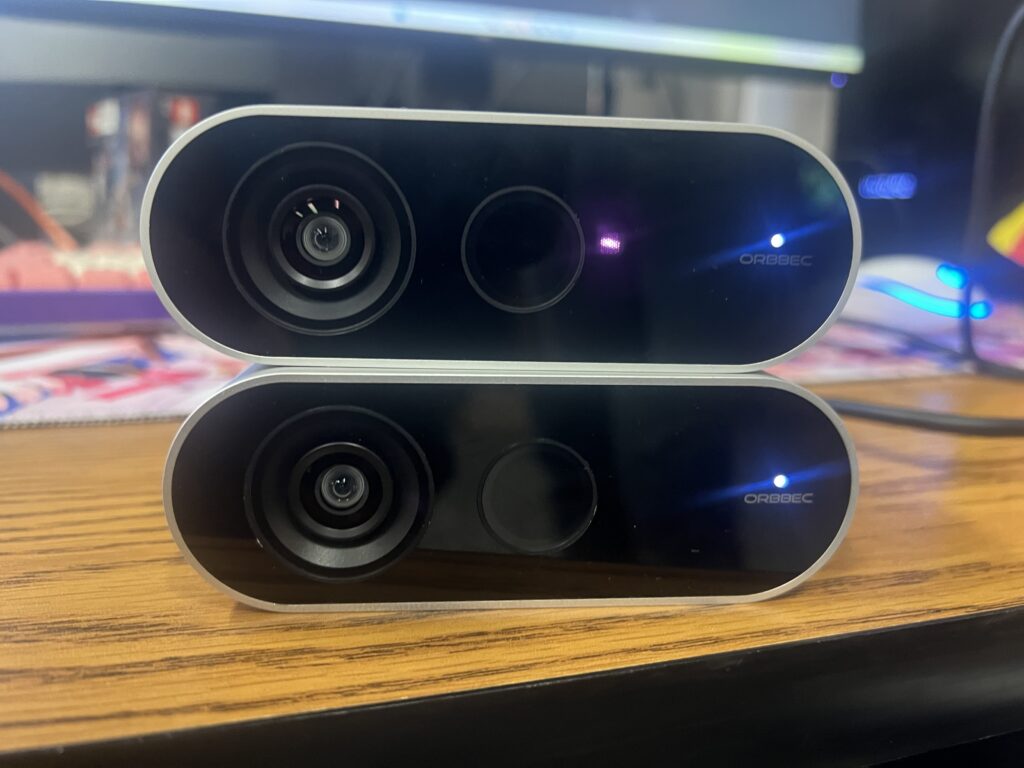
This week is CAVERN Jam 2.0! Great experiences were made during Jam 1.0 that this time even more people signed up, resulting in 13 jammers and 8 worlds! At the same time, Terri and Winnie continued working on Orbbec Femto Bolt integration into the toolkit, and it was finally released into the package on Friday noon, just in time to create a final jam world for the CAVERN showcase! Also, we continued to playtest and researched CAVERN space by introducing and showcasing many CAVERN worlds to all the guests that arrived through the week. (A Disney Imagineer came!)
While we focused on testing toolkit onboarding time during Jam 1.0 as well as basic interaction through Vive Trackers, this time, our main focus was to see how our documentation and range of features supported as many creative usages for a special space like the CAVERN.
In addition, through many playtesting sessions since the start of the semester, we realized that people wanted to see a world that guests can freely interact and influence. (“I want to be able to touch this flower, and the water underneath it will ripple”) Therefore, our final jam theme was “Reactive Worlds” with interaction input (Vive Tracker encouraged but not mandated).

Before the event started, we made sure to update all new features as well as design considerations into the user documentation. We added the 3 types of UI (and the ways to think about CAVERN as a space), design practices for surround audio, and helper tools such as gizmos and debug keys. We also replaced old Vive Tracker setup instructions and removed the mandatory need to install OpenXR through a tar file.
* small hiccup of events: while our original plan was to have the showcase on Wednesday after 1.5 days of development, ETC building water pipe brokage delayed the whole timeline. In the end, after countless rescheduling, we had the showcase on Friday afternoon, right before an official ETC outing to watch a Pirates Game.
Now, let us introduce the wonderful participants and their worlds of CAVERN Jam 2.0! This time, 13 participants formed 8 teams. Out of the 13 people, 2 were faculty, 4 were artists, and the rest are programmers and technical artists.
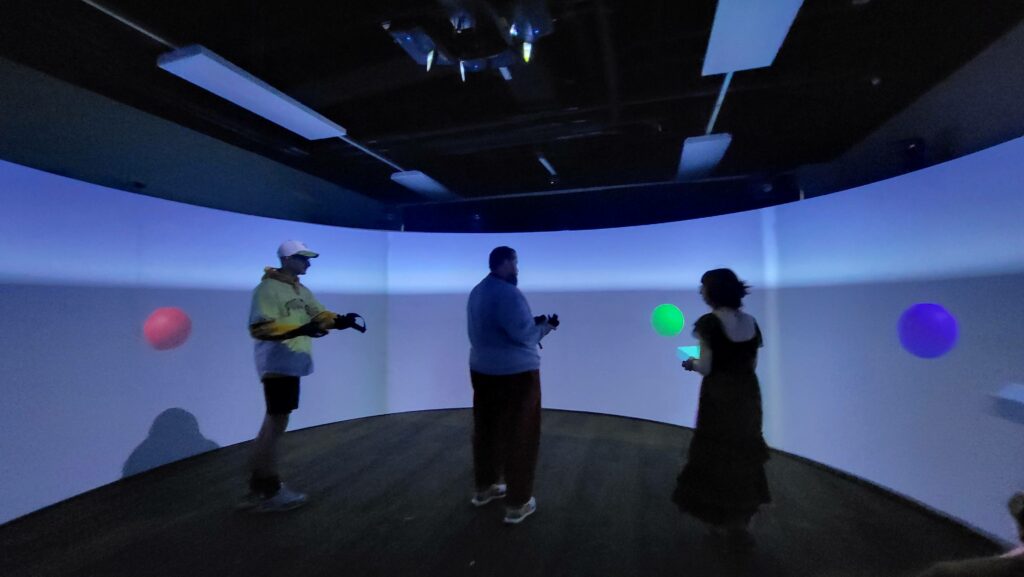
Mike and Bryan: Multiplayer Puzzle Game
Mike and Bryan are faculty! Mike was our project consultant, and Bryan was the research engineer at ETC IT department. Both of them worked with the previous and current CAVERN teams many times, and they were especially interested in trying out our documentation. At the end, they created a collaborative puzzle that plays surround sound! 3 players would each hold a Vive Tracker controlling a colorful sphere. Observing the other spheres in the world, players would physically move to and communicate with other players to find the right mix of colors. Upon success, a tune will play from each sphere, showcasing surround sound in the space.
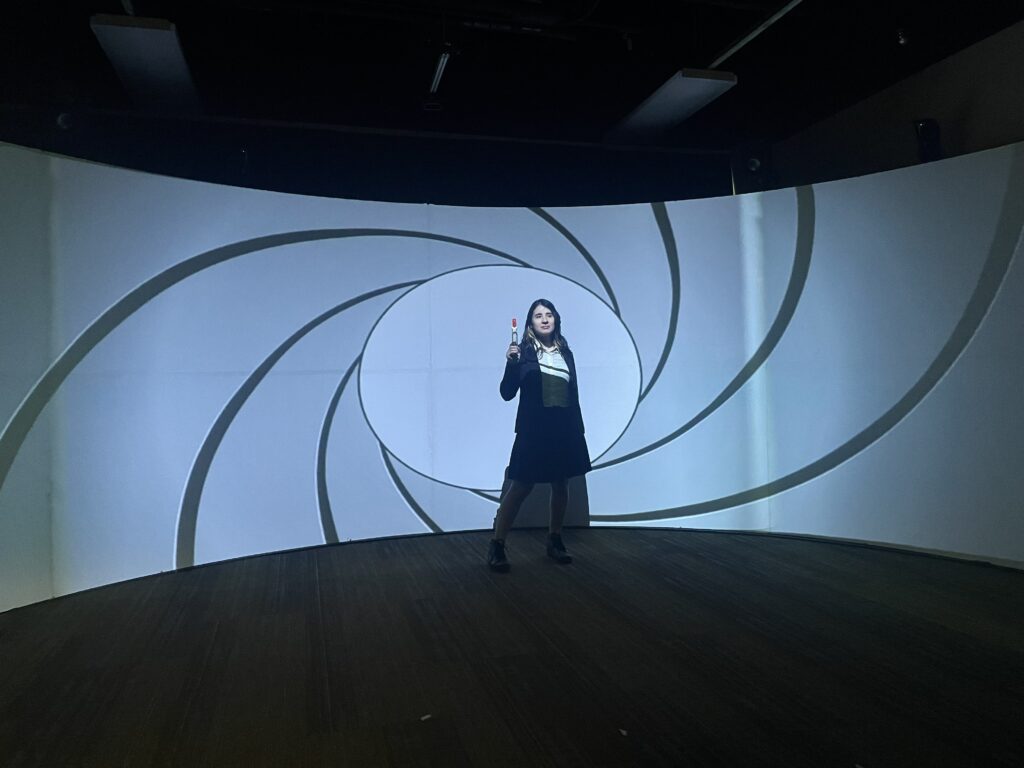
Grace: Orbecc James Bond Cinematic Experience
Grace is the programmer of the other CAVERN team, Anamnesis, a project using Orbbec sensors to create an interactive live action film for the CAVERN. Grace also joined Jam 1.0, and this time, she created a James Bond experience. As our version of Orbbec was not yet integrated into the toolkit, and the Anamnesis team worked with a paid asset for Femto Bolts throughout the semester, Grace used that as she was most familiar with it. In this experience, the Femto Bolts would track her body, and when she walked to a certain place, a subsequent animation will follow, and with the immersiveness given by the roundness of the space, along with cleverly designed visual attention direction and music, this was a really cinematic experience that is somehow also like a performance!
Jing and Jose: Head-Tracked Space Exploration Game
Jing, who joined the previous jam as well, and Jose, who is the cinematographer in Team Anamnesis, collaborated and made a space exploration game. With a UI guiding players on where they are in the vast space, players control a Vive Tracker to get closer to a destination point on the map UI. One important thing to note was that, as we did not clearly explained the usage of head tracking within the documentation, they decided to move the entire world when moving the character in the world. This was the problem that HyCave faced last semester which resulted in large CPU consumption. Fortunately Jing and Jose’s world did not cause any lag, and we also learned a lesson to put head tracking tutorial on the documentation.
Yuhuai: Slenderman Horror Game
Yuhuai is a multi-talented person, a technical artist, programmer, and sound designer. He created a horror game with Slenderman. Controlling a Vive Tracker attached on plastic stick, it served as a flash light within the game. If you successfully shone the lights where the Slenderman was standing, they will not continue forward to you. If unsuccessful too many times, it will jump at you for a extremely scary jump scare (which due to stereoscopic nature of the space, even people at the edge of CAVERN, were hugely startled)!!

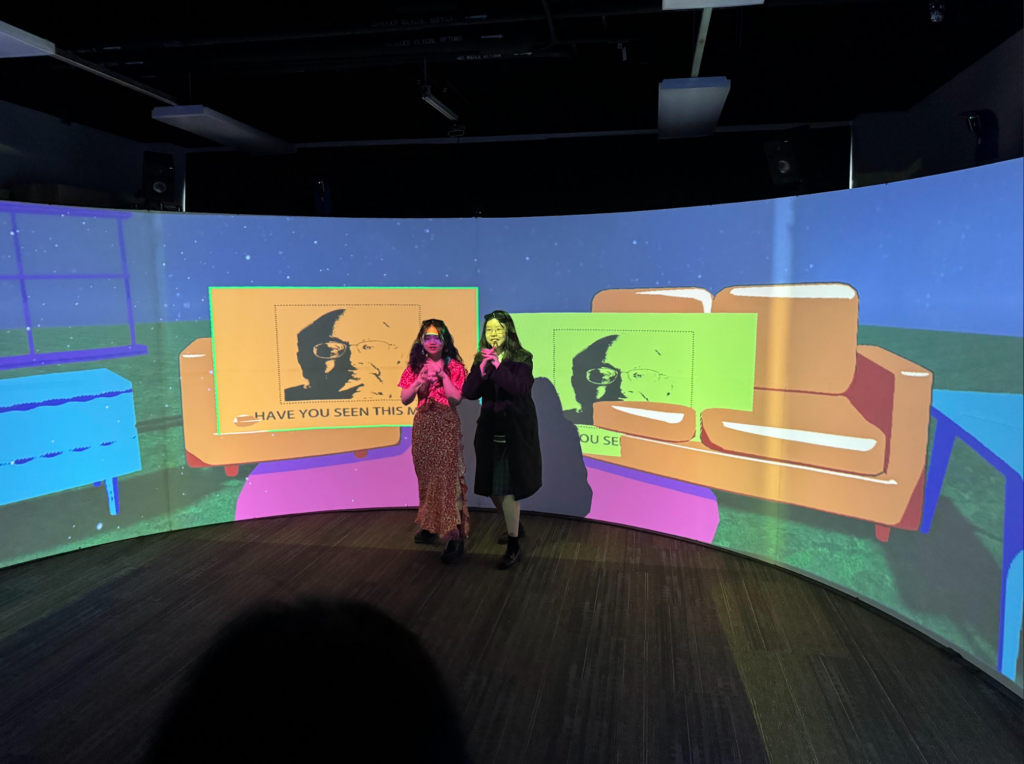
Mia and Jinyi: Screen Space UI and VFX Experimentation
Jinyi is a programmer who also created a Unity tool package in a previous semester, and Mia is Spelunx’s beloved 3D and VFX artist. They created a world testing the screen space UI, where you can select ETC faculty Chris Klug’s photo on screen, drag it to a TV, and here a sound recording of him speaking. In addition to testing the UI feature, they also discovered that small particles like snowflakes works exceptionally well in CAVERN, not intruding guests’ physical space but also giving an immersive feel.
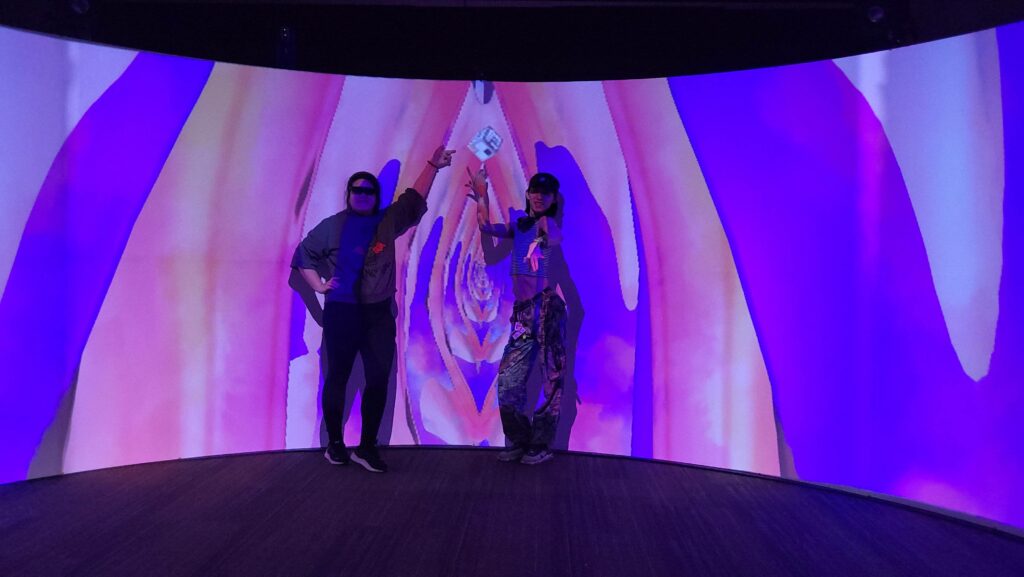
Skye and Enn: Doppler Effect Performing Arts
Skye and Enn are both artists. Skye had an additional CS degree, so he was the programmer of this team. This is an extremely cool project playing with doppler effect in the CAVERN. Wearing a Vive Tracker hat, as you get closer a flower petal, your speed within the world will also increase. The background music playing from the second repeated petal in the flower, will then show doppler effect, where pitch is changed because of frequency changing with respect to time. In addition, this space is artistic and fun (playing to the music: ), that people simply start dancing and making different movements just to play with the sound changings. This eventually became a performing art piece!
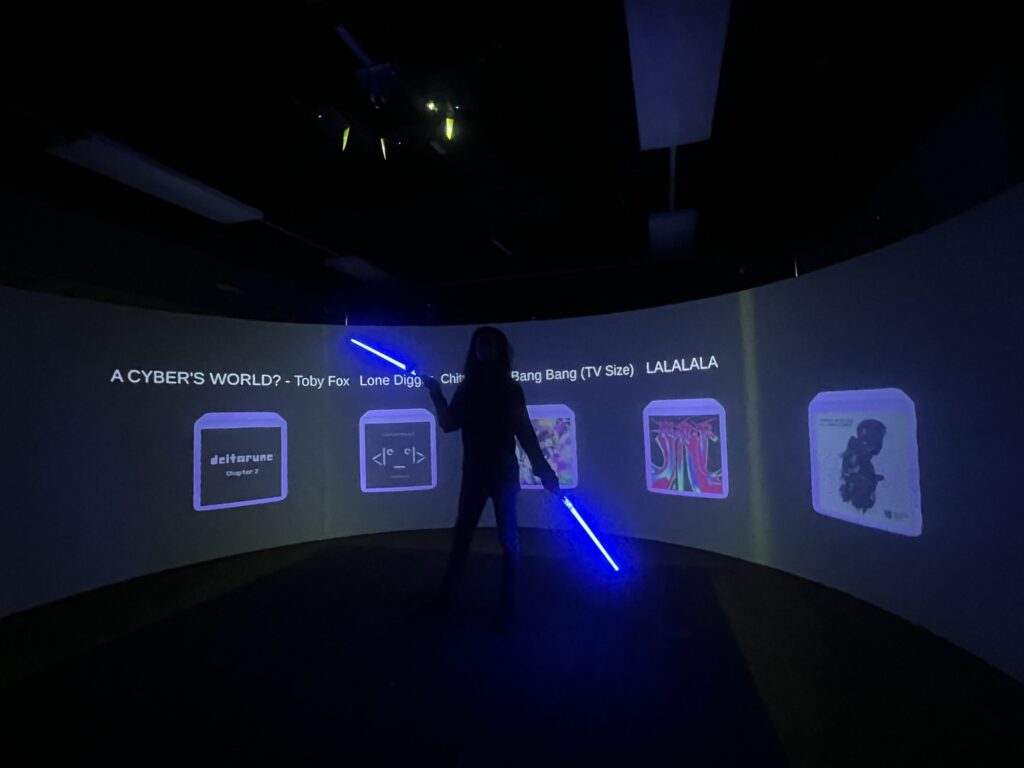
Josh: Ported Beat Saber to CAVERN!
This time, our programmer Josh, decided to port Beat Saber into the CAVERN. While processing the beat map was challenging for this short amount of time, the main challenge was actually creating physical props that the Vive Tracker can be attached to that would map to the game world while preserving the feel of moving in the physical world, so that the two world’s are merged seamlessly. We had very cheap light sabers, and after countless testing, Josh attached the Vive Trackers to the base of the light saber, and in Unity, created an offset box colliders to interact with the cubes flying at you, so that slashing in the real world, resulting in correct slashing in the virtual!
Winnie and Terri: Barbie 12 Dancing Princess Orbbec
Orbbec was still in integration mode when Jam 2.0 started. However, by Thursday night, a core Orbbec support is almost completely done. Therefore, Winnie worked on a simple gold spike to test the workflow. Inspired by the opening of Barbie’s Twelve Dancing Princess, where several silhouettes follow the same movement, the gold spike was simple. Only that it is not as simple! Turned out, that since the cameras were skewed, looking down at the space at around 45 degrees, each camera had to be carefully calibrated to a certain rotation as well (usually 180 – the angle it look down at), and fine-tuning at the CAVERN is necessary.
In all, the showcase was a huge success, drawing more than 30 people in and out, and everyone had a joyous time celebrating each other’s creation!
As Friday was our feature freeze deadline in case more refinements were needed before the semester ended, instead of supporting a full suite of interactions just like how Vive Tracker has building blocks, for Orbbec, we decided to simplify integration into the project.
As of now, the CAVERN toolkit supports the following features for Orbbec Femto Bolts:


This Thursday, it would be Soft Opening day, where faculty rotates around projects to learn about what’s almost done! For our project, we decided to showcase Sample Scene 2.0 in the CAVERN, and walk faculty through our toolkit in our project room.
We fixed all the bugs that from Playtest day, and the following showcases a full run-through of the sample scene interactions.
The goal of the sample scene is to evoke a sense of immersion for stereoscopic rendering and surround sound, demo the interaction building blocks we created, and prove the performance of our camera through various technical art features.
There are 4 states of the creature, each showcasing different aspects of the sample scene.
We walked through faculty how how our toolkit works, along with documentation that supports it. We especially spent time on describing and showcasing how our UI makes it intuitive for users to add a CAVERN setup, add Vive Trackers, add interaction building blocks, auto configuration of 7.1 surround sound, the live preview gizmo, and the debug keys.
The following is the how the final UI looks at the end of the semester.
The good news is that faculty felt that we were exceeding expectations, and they really liked that we’re doing a second jam (we set a record by having documentation and 1 game jam by halves, and now we’re doing a second one!).
In addition, they encouraged us to update your toolkit and documentation frequently. They stated the needs for tutorials to help start up and how common ways things can go wrong and ways to troubleshoot. These are all currently in progress, so we’re happy to discover that we are indeed on the right track.
On the other hand, Orbbec Femto Bolt tracking is still under development, we decided to adapt the open source Azure Kinect body tracking sample to an Orbbec one that will work in CAVERN.
There were many obstacles to overcome:
We are tackling them one by one. Stay tuned for updates in the following weeks. But firstly, next Monday would be CAVERN Jam 2.0, and getting everything ready is our other main priority.

Playtesting ended last week. This week, we continued with all the features development for our toolkit that were halted previously to prepared for Playtesting both at South Fayette and ETC. This week, our main focus was starting on Orbbec Body Tracking integration, continuing RenderGraph, as well as wrapping up on keyboard shortcuts. In this week, we will also give an overview of all the little but crucial improvements we’ve made during the hectic testing and demoing schedules in the previous weeks in the hopes of informing a more comprehensive list of toolkit feature plan.
Because the original CAVERN Previewer is a mesh that is generated by the camera, when baking lighting details to the scene to optimize performance, errors will show up. (This happened in Alex’s Flesh Wall made during the first CAVERN jam). This is why, we migrated this previewer to a gizmo!

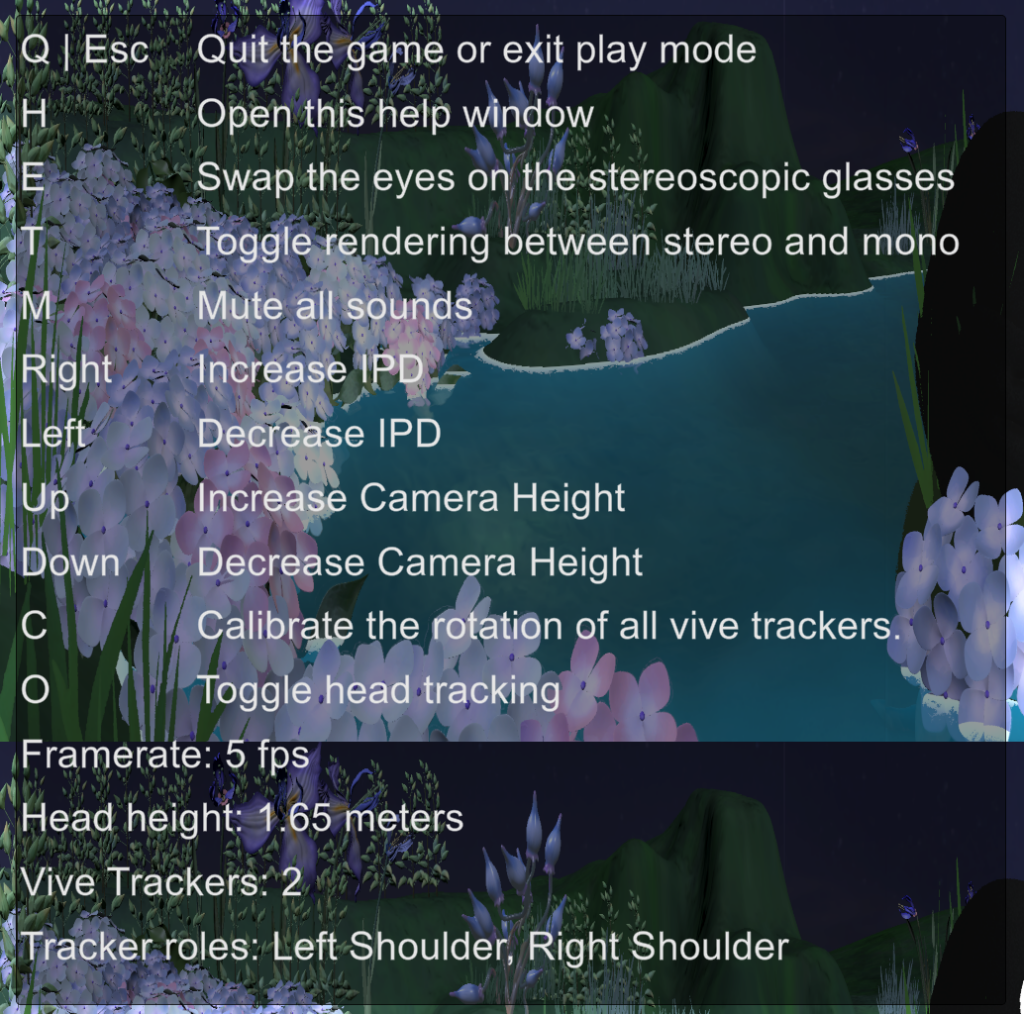
People have requested hotkeys so we can “toggle stereo and mono views”, “change to headtracking with a button click”, etc. And we made that happen. Now, when you press “h” during play mode, you’ll see the available debugging keys as well as frame rates and tracker statuses.
Fullscreen On Play is a really useful tool when you are testing on the CAVERN directly in the Unity Editor without building — it lets you see the true views of the scenes without the view being interrupted or disrupted by the Unity Editor GUI.
However, at the start of the semester, the asset that was used was a paid asset from Unity Store, and it continuously caused crashes when exiting play mode on the CAVERN computer.
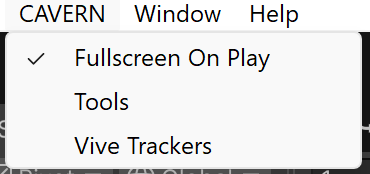
Fortunately, Ezra, our technical consultant, was able to create one for our purposes, so now we have a Fullscreen On Play feature that developers can toggle on and off during development.
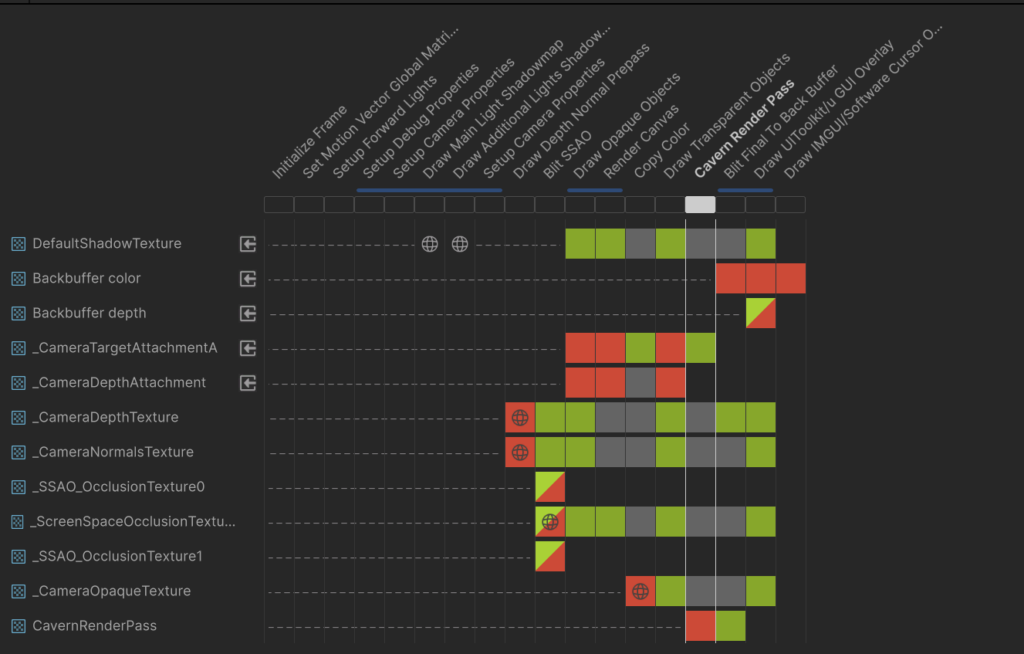
RenderGraph is Unity’s new system for customizable render pipelines. Since we are using Unity’s default camera and bliting onto the screen via our own rendering code, we defined our own Scriptable Render Passes called Cavern Render Pass and specified it to be within the RenderGraph.
We discovered there are two ways of thinking about the CAVERN: as a screen or as a window. Depending on which view you’re using, your user interface needs change. Because of this our toolkit supports three methods of creating in-game UI.
Flat world-space UI is best when treating the CAVERN as a window, since it ignores the curvature of the CAVERN. On other hand, while it can be rotated to face the center, it will always look like a flat plane.
Round world space UI fixes this issue by wrapping a 2D plane around the CAVERN, so everything faces you. This is best when treating the CAVERN as a screen. Both of these options support object occlusion and proper stereoscopic 3D.
Our third option, screen space UI, always appears on top of everything and doesn’t fully support 3D, but avoids the overhead of our camera system. This is best when creating 2D experiences, or trying to display videos.
What says a finished and polished toolkit better than an intuitive and beautiful UI? For achieve that, we changed to use the UI Toolkit for our editors, and this allows us to customize the design through the UI Builder, as well as through code (UXML, UXX – HTML and CSS for Unity). We are also working on icons to add that final polish feel!
Finally getting to another crucial tracker built into the CAVERN systems, at the start, because many other projects at ETC also used a Femto Bolt, we couldn’t access or test with one. That is why we started with the Azure Kinect DK, a predecessor of Femto Bolt, and one that Orbbec has built their body tracking sample wrapper upon.
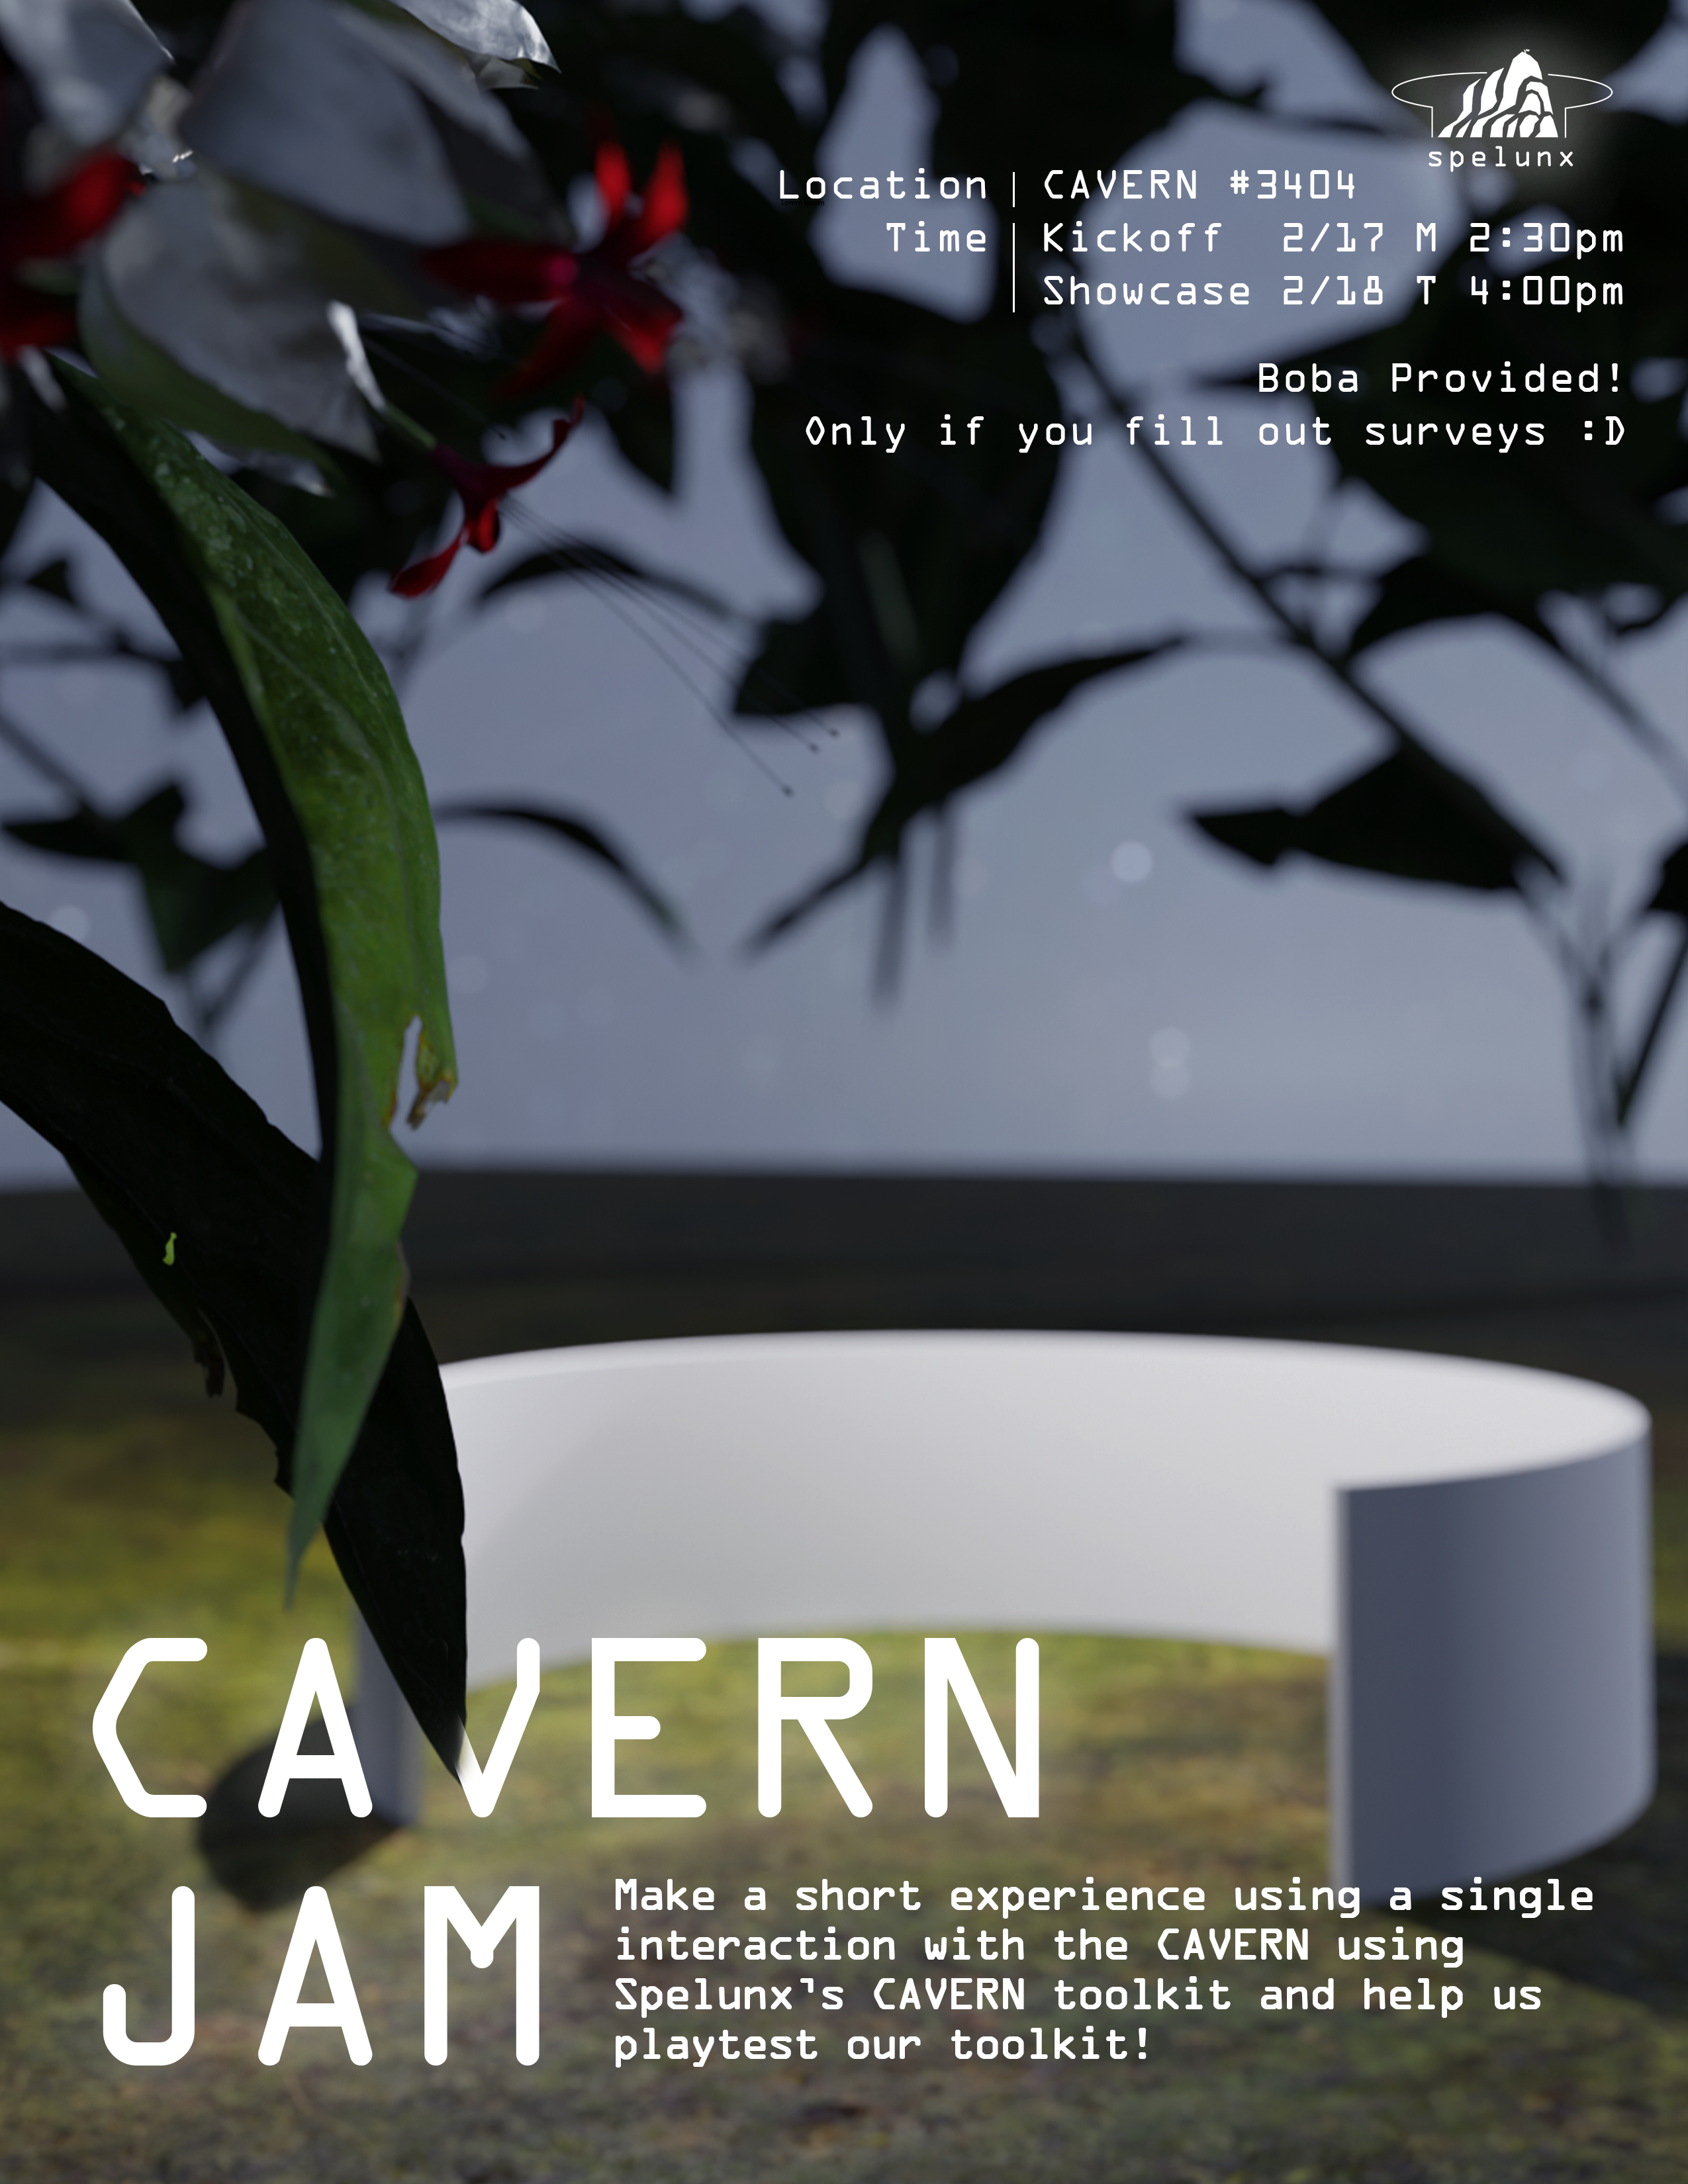
We have finalized our budget for the jam. From last time’s experience, we’ve learned that providing a meal for jammers will be both an incentive for people to join, as well as a deserved reward for everyone who will be spending time playtesting our toolkit.
This time, instead of simply ETC people, with official reach to high schools and greater university community, we hope to invite jammers from a broad range of groups, not only to show more people our project, but also diversify the experience levels of our testers to provide us with more insights for different people:
This week, we created the poster and sign up sheets, as well as reached out to people. Next week, we are ready for new jammers and new worlds. Stay tuned!
It was a hectic week! Starting from the AASA (American Association of School Administrators) showcase at ETC on Monday, Digital Promise on Tuesday, small showcases for guests at the ETC, and preparations for the big Playtesting Day on Saturday, this week was shaped with demoing and playtesting!
Digital Promise was a rocky day, but we managed to work around all the unexpected problems and tried our best to create still a fruitful experience for all the visitors at South Fayette. We got up early at 6am, in order to get to South Fayette by 7:30 to tech check everything for the conference that would start at 8am. However, an unexpected power outage the night before caused the remote desktop software that connects their computer to their CAVERN computer to break. In addition, some time in the previous week, a fourth monitor was plugged into the CAVERN computer, which broke the warping software’s configuration.
More familiar on the software side of the platform, our team spent a considerable time trying to fix these issues before Steve, the CAVERN builder, was able to run a custom script to fix everything after the conference ended. In the meantime, while Digital Promise was still happening, we adapted our showcase agenda to start from outside of the CAVERN, giving an overview of the platform and talking about our project, and then showcasing our sample scene that was partially warped incorrectly. Fortunately, the detailed oral walkthrough with the aid of Matt, South Fayette’s innovation director, also the person who incorporated CAVERN into the school, as well as the sample scene that despite incorrectly warped, still created an immersive scene that filled audiences’ minds with wonder and inspiration.
In particular, we met many groups of educations that provided us invaluable insights into how the space can be used.
In sum, although met with challenges, Digital Promise ended with us learning a lot from not only how to fix things on the hardware side, but also future application potential on the software side!

In preparation for the Playtest Day on Saturday, we’ve decided to update our sample scene so that it has serves the following newly identified needs:
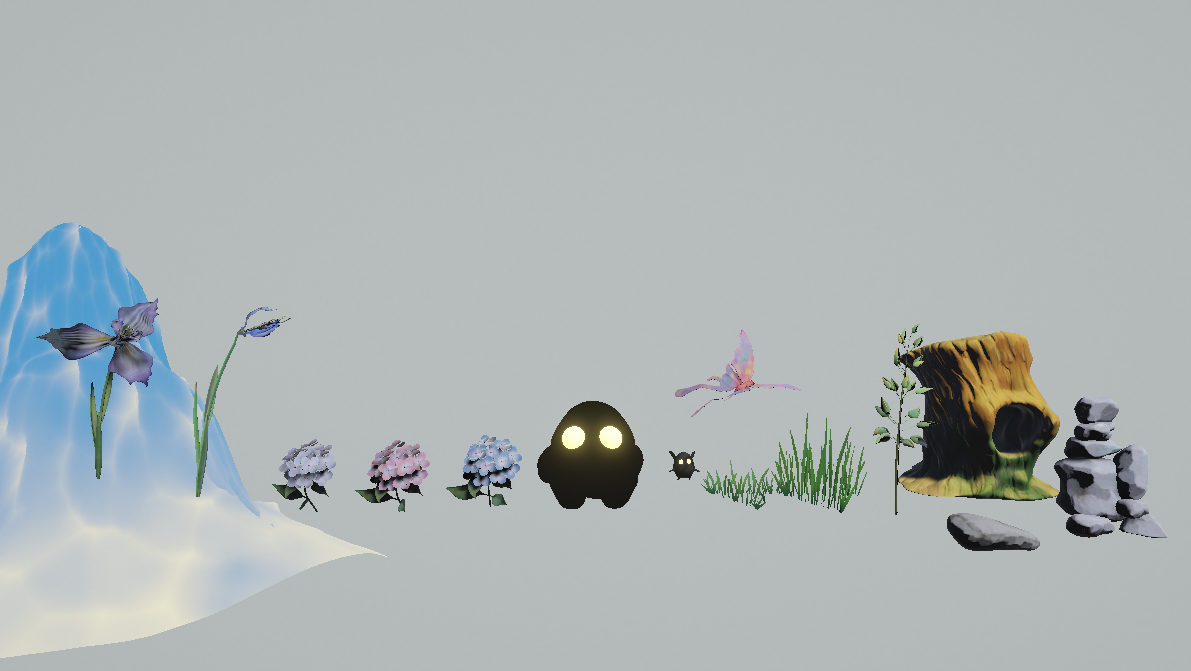
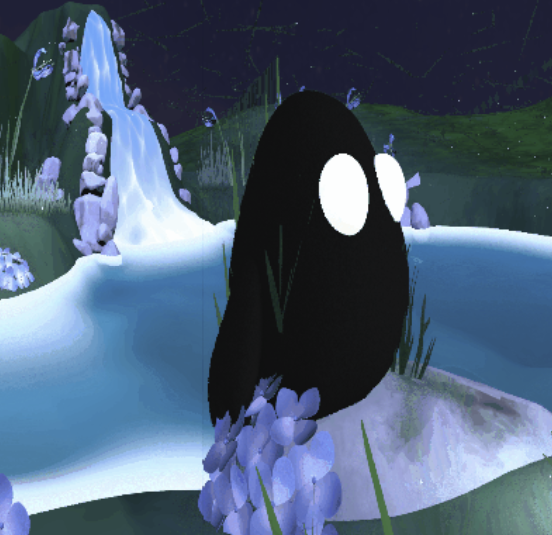
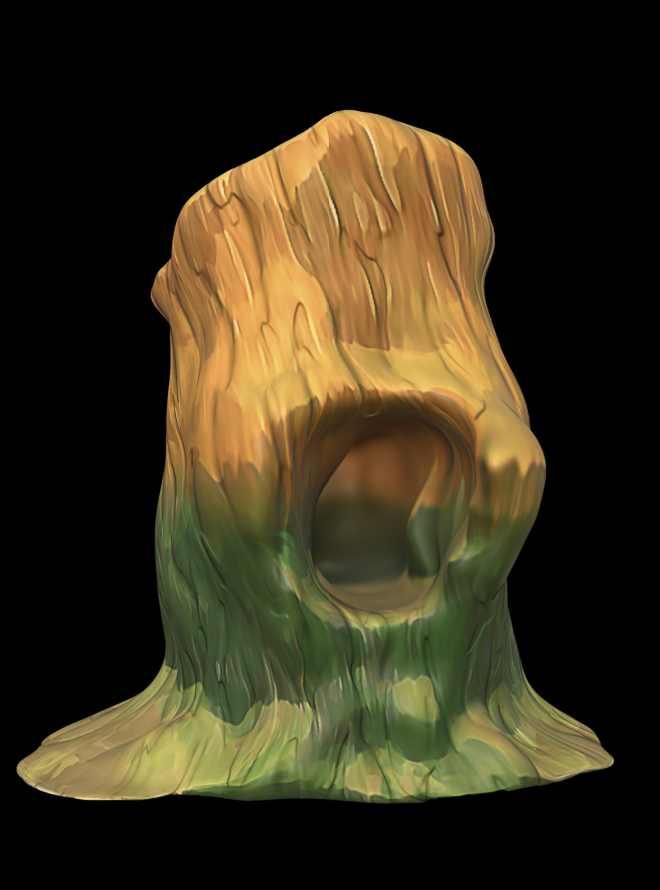
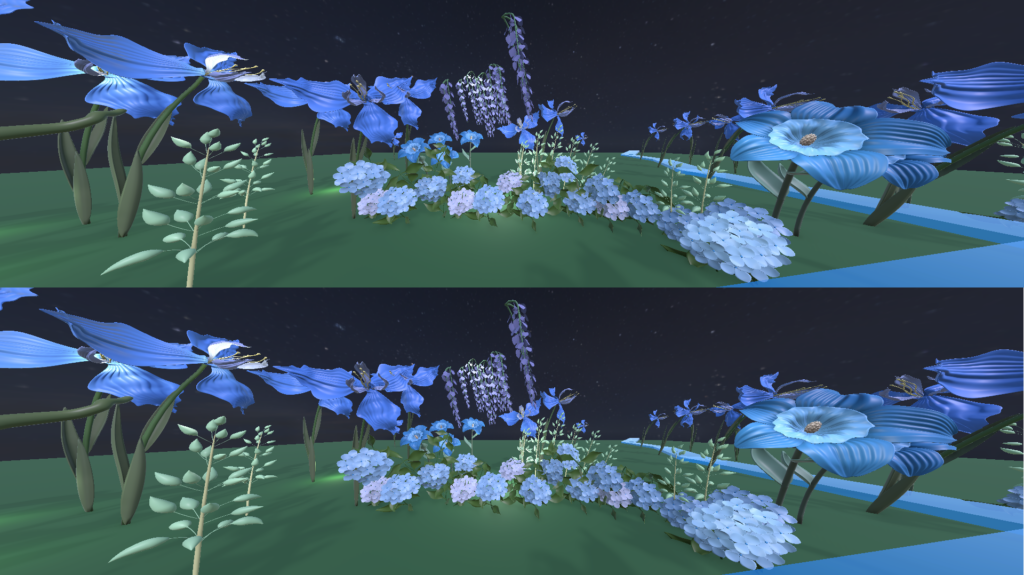
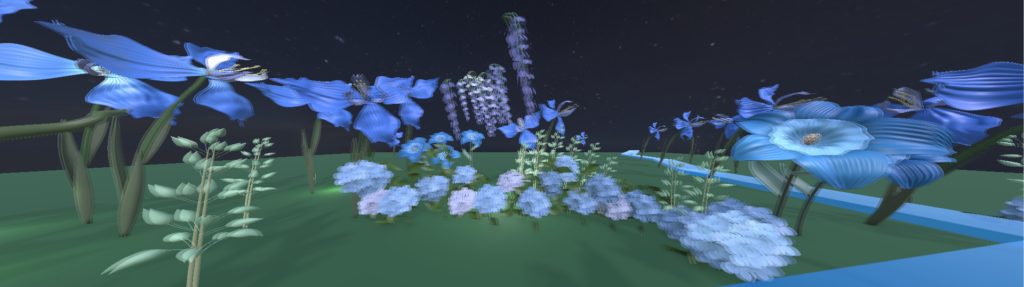
Therefore, we brainstormed a new scene, where the little creatures made earlier in the semester but not present in the first sample scene are now the main characters. In the new sample scene, players will follow the little creature that spawned from a hole in a tree to explore the space. After that, they will in turn guide the little creature to meet with a big creature in the middle of the scene, to trigger a heartwarming hug event!
All of us are strong advocates of modular and extensible code (which is why we pitched the project in the first place). Therefore, to support a smooth game development experience, Terri created a custom finite state machine system for Winnie to build the gameplay events, which will also potentially be included in the future releases of the toolkit. Before Playtesting day, the new sample scene with interactions are finally created.
After meeting with our advisor Drew, and Consultant Mike, we decided to split our playtesters into two groups: those with Unity experience will be brought to our project room to follow a simple tutorial to play with our toolkit, and see it built on the CAVERN immediately. The other group of people are those who simply want to experience the space, in which we will showcase our sample scene and other demo projects to learn more about the space.
Because each group will only have 20 minutes to playtest, and we also wanted to build up to the CAVERN jam that will happen two weeks later, we created a form to collect contacts of people who are interested in come back and try more features, even potentially creating an experience themselves.
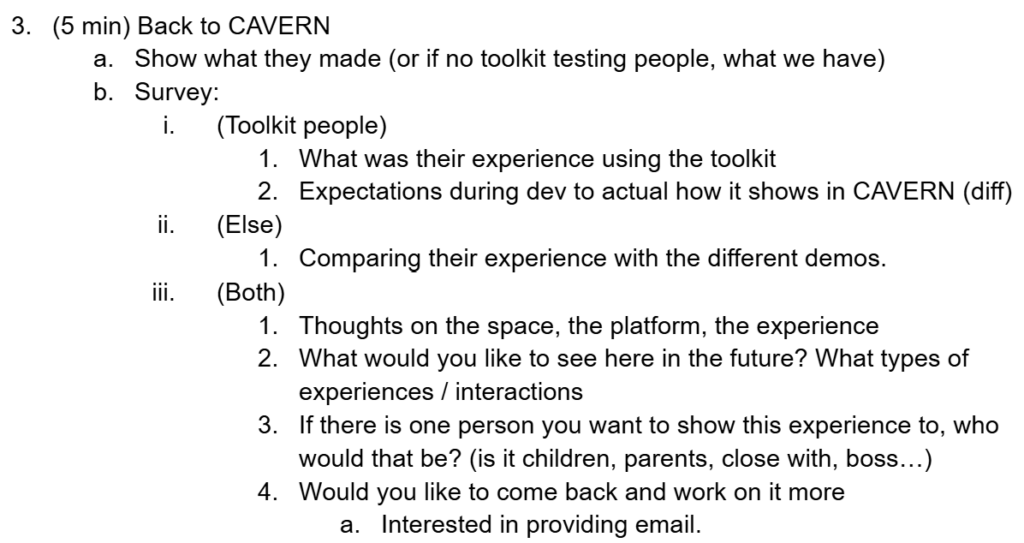
At the end, out of the 6 groups that came to playtest our project, 3 groups got to test our toolkit, and 3 groups experienced a full range of experiences built on the CAVERN.
20 minutes is not enough!! We learned immensely from every person, and we hoped to talk more. Here is a summarized feedback.
This week started out slightly bumpy due to the unexpected issues at South Fayette. However, we wrapped up a week full of learning from our experiences and also learning from our users with Playtest Day. Now we are excitedly marching towards a new week of refinement to put in our softs presentation, as well as prepare for CAVERN Jam 2.0 on the week after softs.
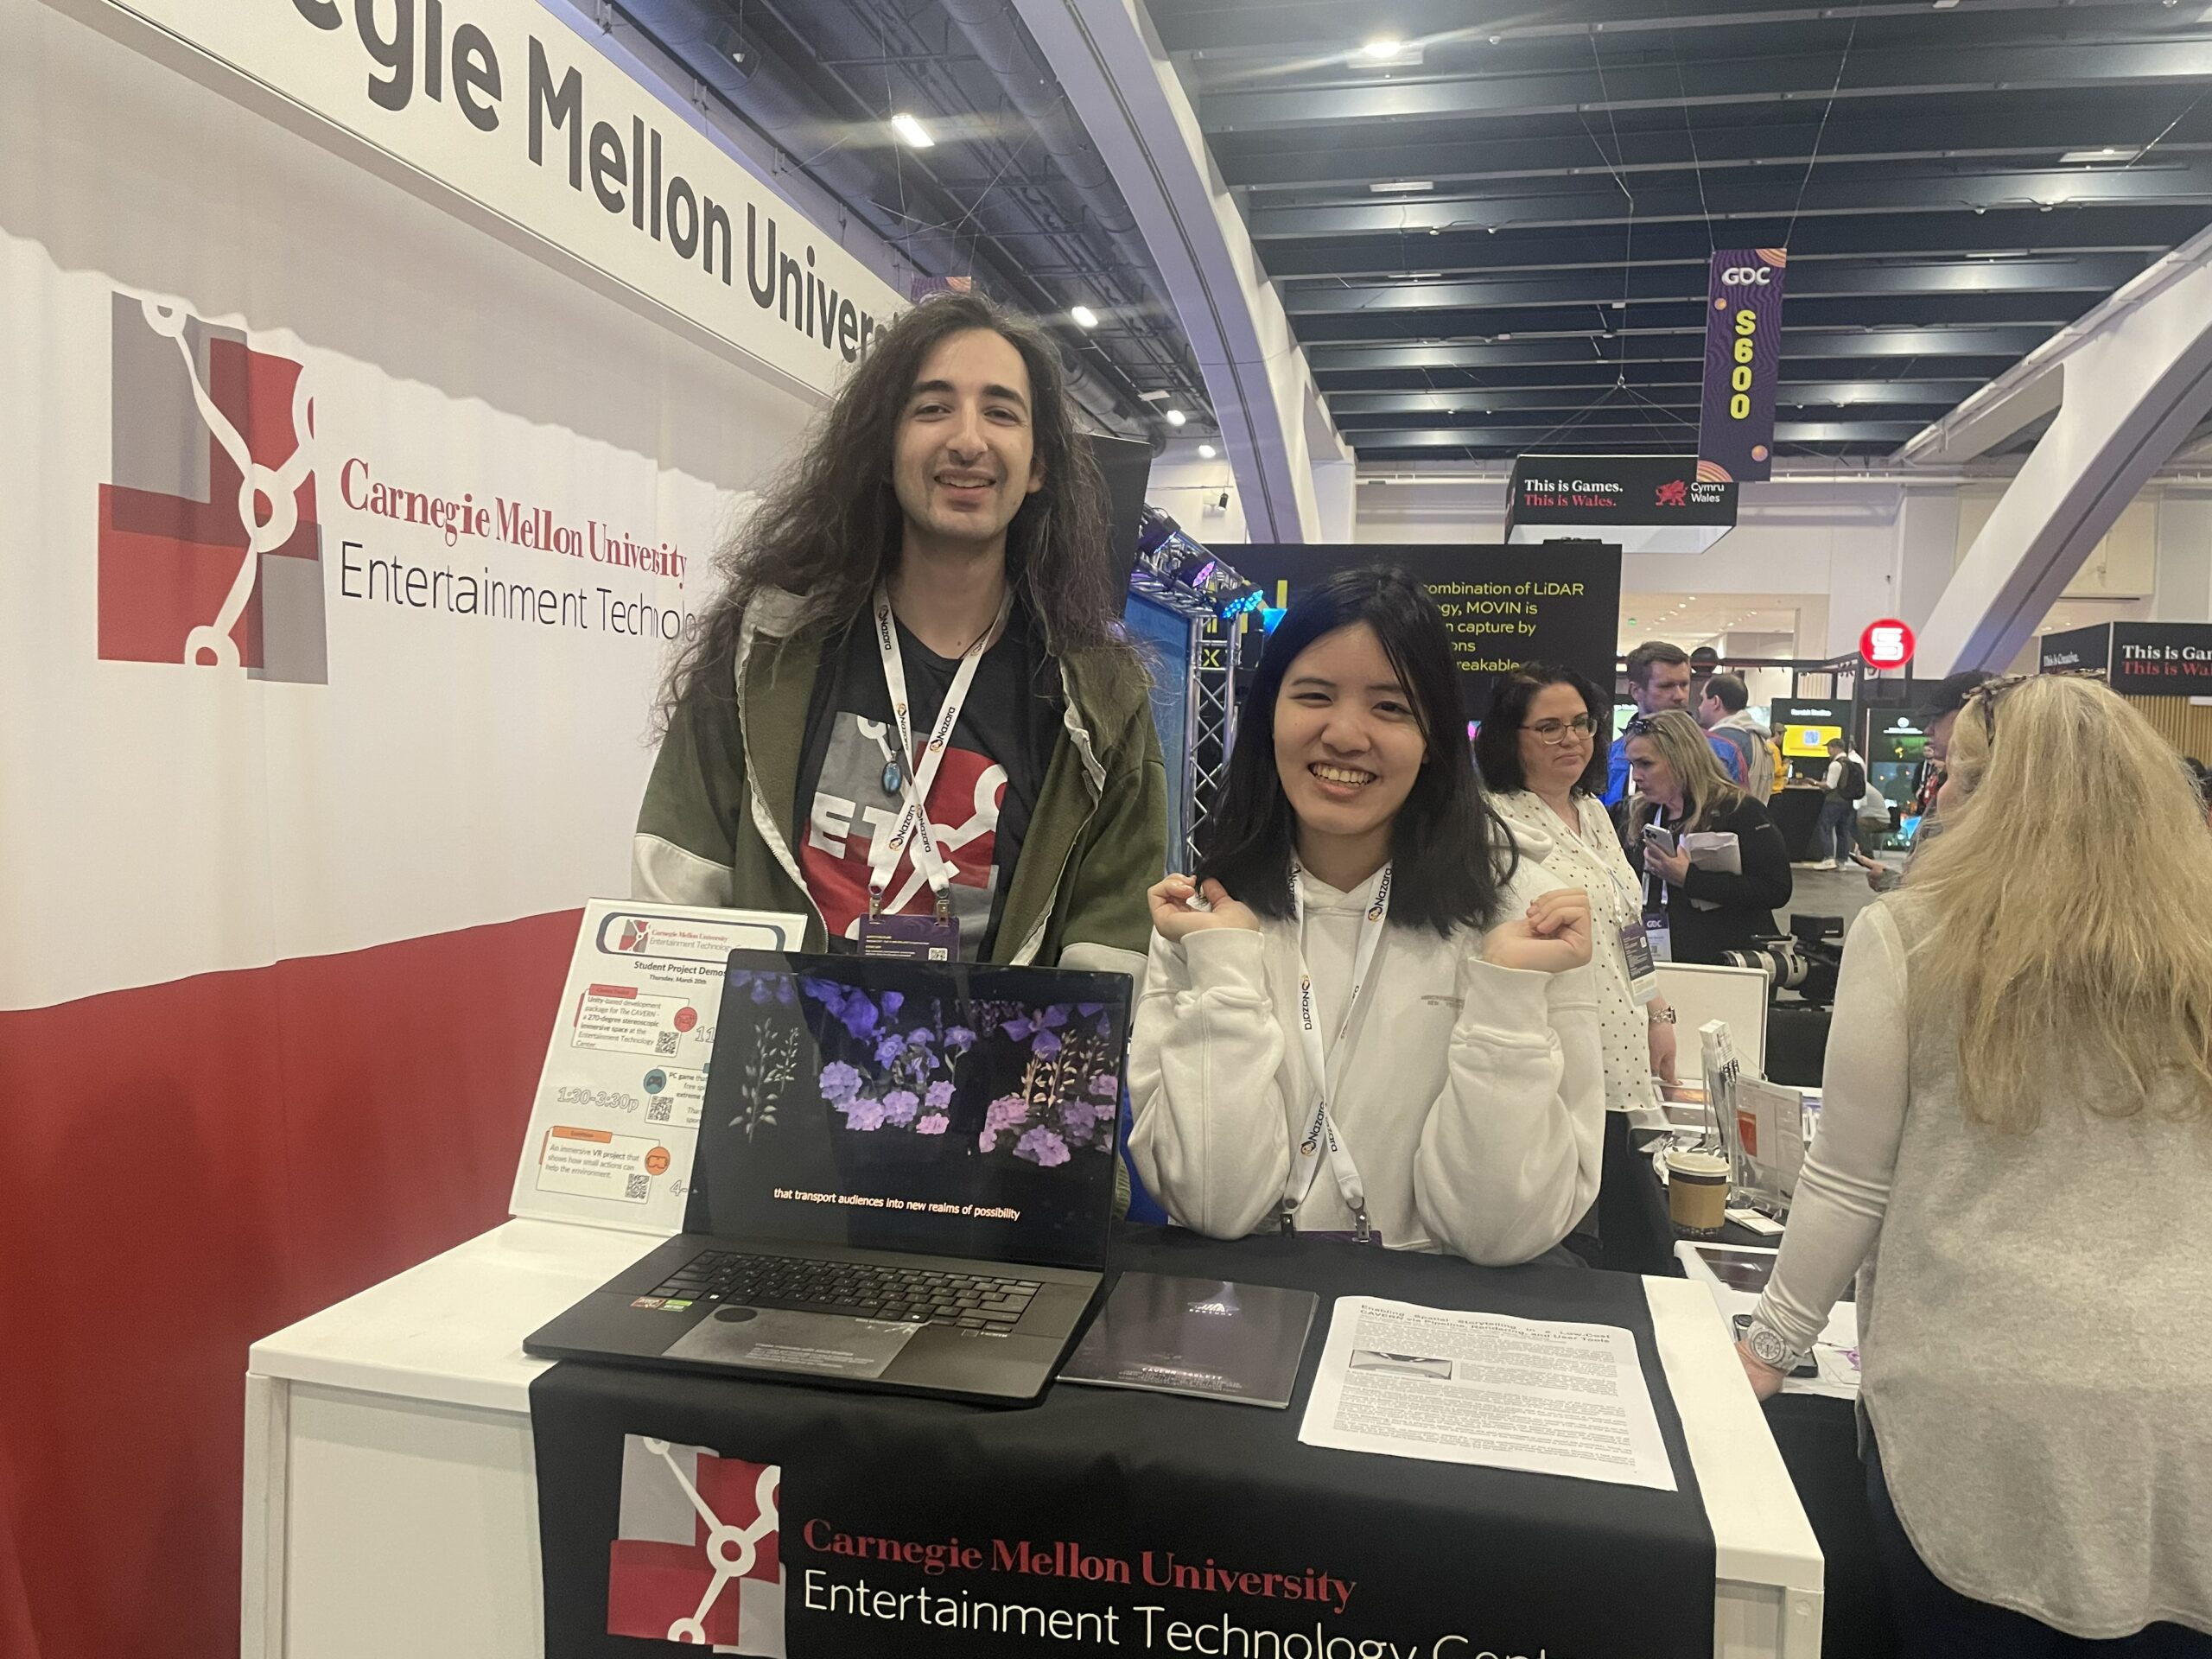
This week will be a short blog, as most of our team flew to San Francisco to attend GDC (Game Developers Conference) 2025, where also showcased Spelunx at the ETC booth. In addition, our Producer Yingjie stayed in Pittsburgh and coordinated with South Fayette in preparation for next week’s Digital Promise Conference there.
Since CAVERN is huge, and cannot be brought to GDC to showcase as experiences on other platforms, we focused on showcasing our toolkit introduction video that we submitted SIGGRAPH and included our extended abstract summary on the side as a handout for people who are even more interested in learning the technical details. Overall, we gauged the interest of experience design professionals, as well as educators across all levels.
Digital Promise, in partnership with the American Association of School Administrators (AASA), will be happening at South Fayette on Tuesday. It is an event that will bring educators and school administrators from across the United States to Pittsburgh to learn about the innovations happening in the school, and CAVERN will be one of the core showcases South Fayette will present on that day.
In addition to the Tuesday event, ETC’s Outreach and Engagement Networking Coordinator, Anthony, informed us that around 20 AASA visitors are scheduled to visit the ETC on the day before Digital Conference to learn about our department as well as our partnership with South Fayette — Spelunx will again be a core part of the tour!
Roadmap of Learning
Earlier this semester, as part of our collaboration with the Game Development Course at South Fayette, we sent a Unity + CAVERN Roadmap of Learning, which we spent time refining during spring break, as a base where the teacher, Stacey Barth, will further extend into a complete curriculum to share with other future schools that installed a CAVERN system.
This week, while other teammates were away at GDC, Yingjie walked Stacey through the roadmap, as the students at South Fayette are also eager to build simple experiences on CAVERN that they can also showcase during Digital Promise. In the process, a package bug was caught and fixed.
While GDC slightly halted the development this week, we are still ever prepared for the next week, which will eventually be called the week of demoing and playtesting, as it contains not only Digital Promise, but also ETC’s official Playtesting Day that will happen at the end of the week.

Coming back from spring break, we immediately hit the ground running! On day 1, we discovered a new SIGGRAPH submission category that fit our project so perfectly that we decided to still try to submit it before the 24 hour deadline. At the same time, it was the time to process feedback from Halves presentation and refine our long-term plans beyond simply toolkit delivery. In addition, most of our team members would attend GDC the next week, and we would need to prepare for showcase on the ETC booth. Finally, with South Fayette’s March 25th Showcase approaching, we also had to ensure our software as well as their hardware are well-tested and ready for presentation.
On Monday afternoon, we stumbled upon a new SIGGRSPH session called Spatial Storytelling. It celebrates realtime XR technology and emphasizes showcasing not just the cool and fun graphics but also the process of enabling or developing that technology. We immediately realized that this was the best place for our toolkit to shine.
However, there was a problem: it was due the next day at 6pm. Luckily, with halves just past, we had enough content to rapidly compile into a submission, including the very detailed mathematical derivation of the camera that Terri wrote before halves. We also decided to create a video even though it was optional, as we knew that without it, CAVERN capabilities cannot be shown best.
In the 24-hour sprint (less if counted sleep and elective times), some of us did video shooting, video scripts, and some of us did extended summary, abstract, and overview. our collective strengths came together brilliantly to clearly communicate the impact and importance of both the CAVERN as a novel XR space and our innovative solution to enable it more with our toolkit. We were also exceedingly fortunate to have our consultant Mike Christel, as well as advisor Drew Davidson to proofread our submission so many times. We finally submitted everything before the deadline, and we’re extremely proud to have it at the best quality we could have created in such a short timeframe!
The following showcases everything we submitted:
Synopsis
The CAVERN Toolkit is a collection of Unity 6 software tools and supporting documents that enables students to create immersive XR storytelling experiences for a low-cost multiplayer CAVE. With improved rendering capabilities and user-friendly tools, the toolkit creates a comprehensive foundational pipeline that minimizes technical overhead and expedites onboarding.
Abstract
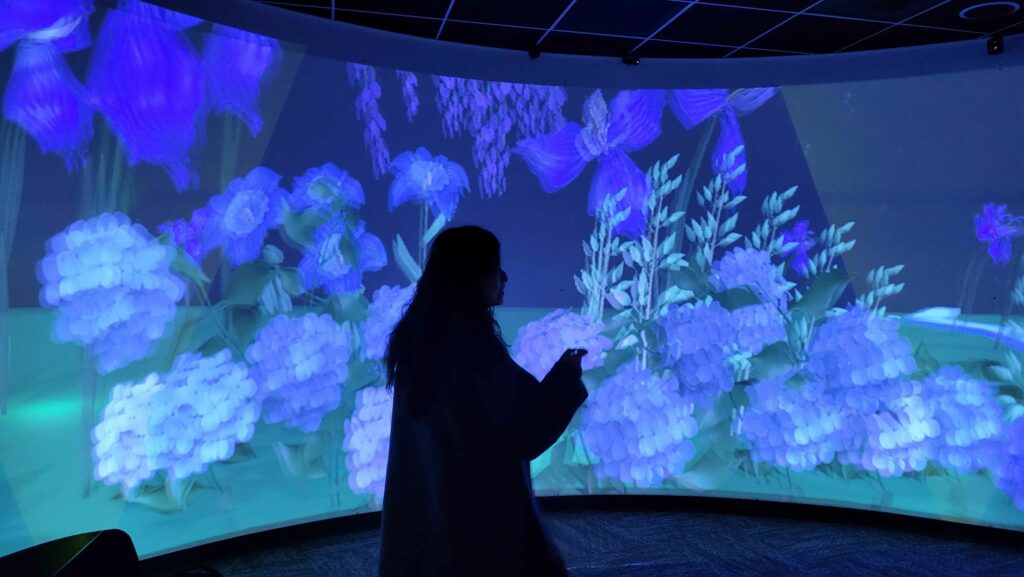
The CAVERN Toolkit is a collection of software tools, Unity packages, and supporting documents that enables students to create immersive XR experiences even with little to no prior XR background. The CAVERN is a low-cost multiplayer CAVE with a 270° curved screen, 3D stereoscopic projection and a 20-foot diameter play area located at Carnegie Mellon University. These unique qualities of the CAVERN allow for multiple guests to physically explore an XR world together.
Previously, the platform was underutilized since the development pipeline was confusing, had poor rendering performance, and posed a steep learning curve for student developers. Grounded in user needs, the CAVERN Toolkit creates a comprehensive foundational pipeline that is modular and extendable. With this new pipeline, the onboarding time for the CAVERN development was reduced from several weeks to under 30 minutes.
The toolkit includes a new rendering solution that supports head-tracked stereoscopic rendering in all directions. A system was made to abstract away the previously tedious process for incorporating motion-tracking devices for interaction input and configuring spatial audio for immersive sound design. To increase accessibility for students and beginner developers, a simplified interface was implemented within the Unity 6 editor, enabling setup with a single click. Additionally, several sample projects were created to serve as inspirations and jumping off points. All of the above are bundled into modular packages hosted in the Unity Package Manager (UPM) and accompanied by extensive documentation and tutorials.
The CAVERN Toolkit significantly reduces the technical overhead of the CAVERN and allows developers to focus on what matters most: exploring creative spatial storytelling that blur the digital and the physical, giving everyone from high schoolers to experienced professionals the opportunity to make polished XR experiences that transport audiences into new realms.
Video Submission
Extended Summary
Mathematical Derivation of the camera
Our halves feedback was extremely positive, with around half of the faculty stating that we exceeded expectations, as we were the first ever ETC team to have a playtesting session as large as a game jam arranged before halves. In fact, instead of simply asking what our next step for the toolkit development within this semester is going to be, faculty are asking questions about “How does the toolkit remain useful after we leave, and how can other users outside of ETC utilize it?”. This is a huge milestone for us, as it showed that our project was not a one-time thing, but recognized as living, growing, and extendable beyond just us, and even beyond just ETC!
Our purpose was clear: make Spelunx toolkit sustainable while testing extensively with as many different kinds of users as possible. In addition to fully supporting South Fayette, we also decided to reach out to main campus students who are interested in CAVERN, and have another game jam, with our next step features enabled.

By the end of the week, we shifted focus to back toolkit updates. We added the interaction building blocks scripts where users can easily one-click add a Vive Tracker interaction with the simple building block scripts we created. This currently includes: Follow motion (GameObject directly follows Vive Tracker), CAVERN mirror (a GameObject mirrors Vive Tracker as if CAVERN screen is a mirror), Evasive motion (a GameObject shies away from the Vive Tracker). This interaction building block kis in addition to our currently one-click Vive Tracker setup for users to quickly test and prototype simple interactions. The choices of interactions came from hearing the requests of experiences in the CAVERN, as well as insights from previous developers, who we conducted interviews with earlier in the semester.
In addition, to support South Fayette during Digital Promise conference on March 25, the first toolkit refinement was to support different CAVERN sizes, as South Fayette’s CAVERN is larger than ETC’s.

With SIGGRAPH behind us and faculty confident in our direction, we’re now entering a new phase of development. We have more features to add, more documentations, more user testing, and all will be showcased and demonstrated in various demoing opportunities and cavern jam 2.

It is now week 7, and it is time for Halves Presentations! In addition, we hosted an official half-semester showcase within ETC and also demonstrated CAVERN’s capabilities to educators across K-12 in South Fayette, showcasing how CAVERN can be used across different contexts, and how our showcase is a great tool to enable those. And of course, our team went to a celebratory brunch at the end of the week to end this half-semester before going into spring break.
Because so much of the CAVERN development is technical work that happens under the hood, it is crucial to communicate our impact thoughtfully, especially in way where even non-technical audiences can also understand clearly. To do so, we decided to start off the presentation by highlighting the success of the CAVERN Jam, followed by introducing our problem solving process and results of our works on rendering, Vive trackers, editor workflow, and sample scene, with emphasis on our comprehensive documentation along the way.
Since our goal is to have future developers build upon our toolkit, our camera rendering solution has to be well documented and including our thought processes, so people can solve new problems that works within our system. The “Math Documentation” as our team calls it, is then born.
This document starts off by discussing the curved screen and breaks down the possible rendering solutions. It briefly explains the original 32-camera rendering solution and its tradeoffs, and then proposed our single-camera cube map solution with the linear algebra math derivations alongside. At the end of the document, we arrived at the solution of head-tracking, and why it became trivial to solve once we’ve chosen to duplicate the cube maps and treat the head.
As much of the CAVERN is better seen in person, on the day after the presentation, we invited everyone from the department to join our official half-semester showcase, where we showcased what we said during halves presentation, as well as demoing the wonderful worlds built during last week’s CAVERN jam.
On Thursday, people who were interested in seeing the CAVERN in person joined the showcase. As attendees explored the space, we gathered valuable insights into how people perceive and engaged with CAVERN environments:
On Friday, we visited South Fayette High School for the second time, where we introduced CAVERN to K-12 STEAM teachers across levels within the school, including elementary school, middle school to high school, administration, arts teachers, technology teachers, etc.
Our goal was to demonstrate how immersive environments can be integrated into education and to help teachers understand the process of creating interactive experiences in CAVERN.
During the session, we showcased:
Many teachers responded in enthusiasm as they saw potential applications in storytelling, science visualization, and interactive learning. One teacher was particularly interested in bringing ancient Rome for teaching history!

After the demo, we talked with Stacey, the teacher running the Game development course for CAVERN, and walked her through the full process of importing Unity packages, setting up scenes, and configuring CAVERN’s display. We also debugged a Blender-to-Unity 6 issue, so that students can properly import 3D models into their projects for the Digital Promise showcase on March 25th.
After the visit to South Fayette, our team ended this week with a celebratory brunch at Shadyside! We chatted about our success in development, the toolkit, reaching out with South Fayette, and also chatted about fun things we each are interested in, what each of us would be if we were fruits, etc. We are prepared to take a good rest, so we can come back after spring break for an even more wonderful next half semester.
This week was the anticipated CAVERN Jam, where our toolkit will meet its first set of users! In the two-day event, there were 8 participants bringing 6 different worlds, each exploring different ways of interactions and immersion methods in this space. While technical difficulties did emerge, overall feedback was clear: Spelunx made developing for CAVERN dramatically easier, and people are excited to make more experiences here.
Kicking off on Monday and showcasing on Tuesday, within a tight 24-hour timeframe, 8 participant (including both our team members, other ETC students, and even faculty and staff) created 6 worlds, and drew over 20 attendees in the showcase. Here we’ll breakdown what we learned from each experience.
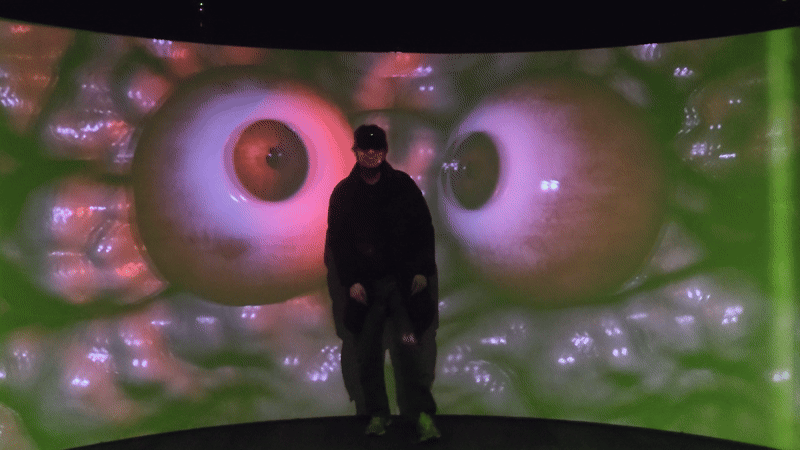
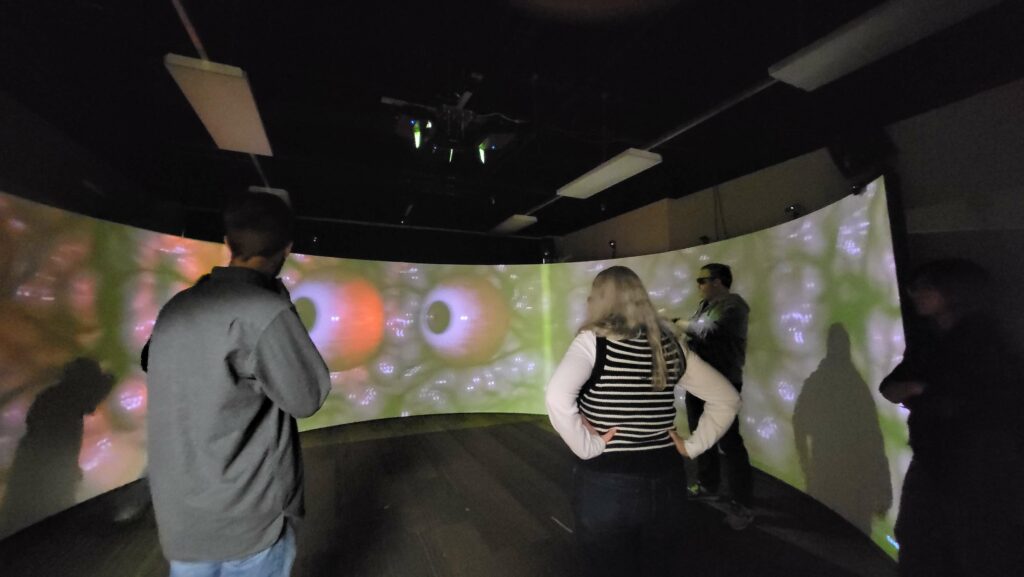
Alex, a multimedia artist in our cohort created an unsettling experience inside of a wall made out of flesh, where giant eyeballs will stare at the person wearing the tracker, creating an eerie sense of being watched constantly. Along with loud and scary surround sounds screaming into the space, the experience was very scary and very immersive, and all people gasped in excitement and fear when the experience first started. (And this is verified in every future demo we’ve done to guests that came to ETC)
Two things we’ve learned:
Alex is an artist, and the only code needed for this to work was a LookAt built-in method for the eyes to follow the Vive Trackers. She spent a total of 10 hours, with most of the time used recording sound effects and voice lines, to create the experience. In fact, the CAVERN setup took only 20 minutes! This is a huge achievement for our toolkit.

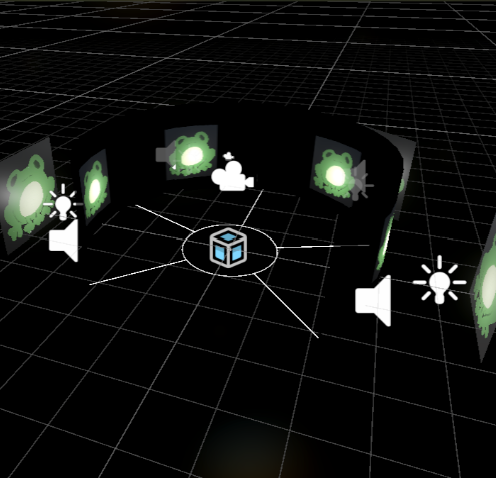
One of Spelunx team members, Josh, created a musical interaction where four Vive Trackers are used to trigger singing frogs, and the volume and pitch will change based on player’s proximity to the screen. The design naturally encouraged different play styles: players could place a tracker in one frog’s zone and leave it singing, or multiple people could move around dynamically to shift the composition. A dead zone area is carefully spaced at the center, so it is also a possible interaction when one person wanted to stay there and trigger the frogs like a conductor.
This piece demonstrated CAVERN’s multiplayer potential that utilizes physical space, which is a major difference between the CAVERN and other virtual reality systems. With all the sound and art assets, this experience was created in under 4 hours.
One of the programmer students at ETC, Jing, created a bubble interaction game where players could use Vive Trackers to repel and pop bubbles that flies towards you. While simple, the interaction was surprisingly engaging as people found joy physically reaching out to the bubbles, and even tried to compete against each other on who popped the most bubbles. In addition, because the bubble was transparent, the players were able to see both the real world as well as the virtual environment. It blended the physical and digital seamlessly.
As a programmer, Jing incorporated our sample scene as the base environment art assets, and focused on the coding side of development!
Terri, Spelunx’s own rendering and graphics programmer, created a technical proof-of-concept demo of head tracking. The scene featured a dancing anime girl that the person wearing the head tracked Vive tracker could see from different angles. This was a huge achievement, as it was a novel rendering solution that enabled simple implementation without needing to move the whole world to get the same effect (what previous teams used, which severely affects performance). This head tracking gold spike demonstrated that CAVERN is capable of enabling more complex interactions.
Inspired by a previous mixed-reality project from Visual Story course, Winnie’s world utilized surround audio along with visual storytelling to create an immersive space. The experience began with the players lighting up a candle using a Vive Tracker, and a voice circulating the space in an eerie tone. After the candle is lit and the voice lines were played through, the scene will transition into a dreamlike world with a giant whale flying around, and the Vive Trackers turn into a bubble.
Though technical issues prevented some elements from functioning (the Vive Trackers were set too low so candles couldn’t be lit, and the computer was set to stereo instead of surround sound) the core environmental design remained effective. Even without full interactivity, attendees found themselves immersed in the scale and atmosphere of the scene, demonstrating that CAVERN’s visual and beautiful music alone gives powerful potential.
As part of Anamnesis team, another CAVERN project team focused on live-action interactive filmmaking using the Orbbec Femto Bolts, Grace and Selena experimented with Orbbec instead of Vive Trackers for motion tracking. However, because our toolkit currently only supports Vive Trackers, they faced integration challenges. Still, this project shed lights on what difficulties we might face when we moved to integrating Femto Bolts.
Our consultant Mike Christel and ETC Senior Research Programmer Bryan Maher collaborated on a project featuring colorful balls shooting to you the same way a fireball might fly towards you during a space fight. While the project was halted due to busy schedules, they gave us invaluable feedback on their initial development process and documentation suggestions, such as tutorials on binding a Vive Tracker, and removing the manual Tarball installation.
CAVERN Jam concluded with overwhelming praises, not just from the attendees but also those who came to the showcase. Everyone was inspired to create more experiences on CAVERN, and this is exactly our goal.
Throughout the jam, our team was able to quickly push bug updates within a short hour because of our choice to host the package through UPM instead of GitHub.
On the development side, the feedback we received show that confidence levels for developing on CAVERN went up from 3 out of 5 to 4 out of 5, and participants quoted the documentation as well as the CAVERN previewer as a highlight that accelerated their development and testing.
On the other hand, there are areas identified for improvements:
Sound configuration 5.1 to 7.1
After fixing the computer configuration itself, we also realized that 5.1 setting does not align as well with the actual physical speaker setup. Instead, having 7.1 while disabling the two surround speakers and the center speaker is more like our intended quadraphonic setup.
Sample scene refinements
To refine the sample scene before Halves, we:
CAVERN Jam validated the strengths of Spelunx, while also highlighting key areas for refinement. With this, we are ready to present our half semester achievements to community and faculty in next week’s halves presentation. Stay tuned for more updates.
With CAVERN Jam scheduled for Monday of Week 6, this week was dedicated to preparing for this first major user test with real world external developers. Because people might interact with the toolkit in ways we never anticipated, our focus this week was to clearly define the aspects we want our users to test, and make that part of the toolkit as refined and stable as possible.
In the meantime, we had a breakthrough in Vive Tracker integration, finally solving this long-standing issue that had frustrated all the previous CAVERN teams. We also continued researching past ETC projects, where we tested performance of our camera with a high fidelity scene from Hycave last semester, and interviewed more former developers to gain insights into common challenges in CAVERN development.
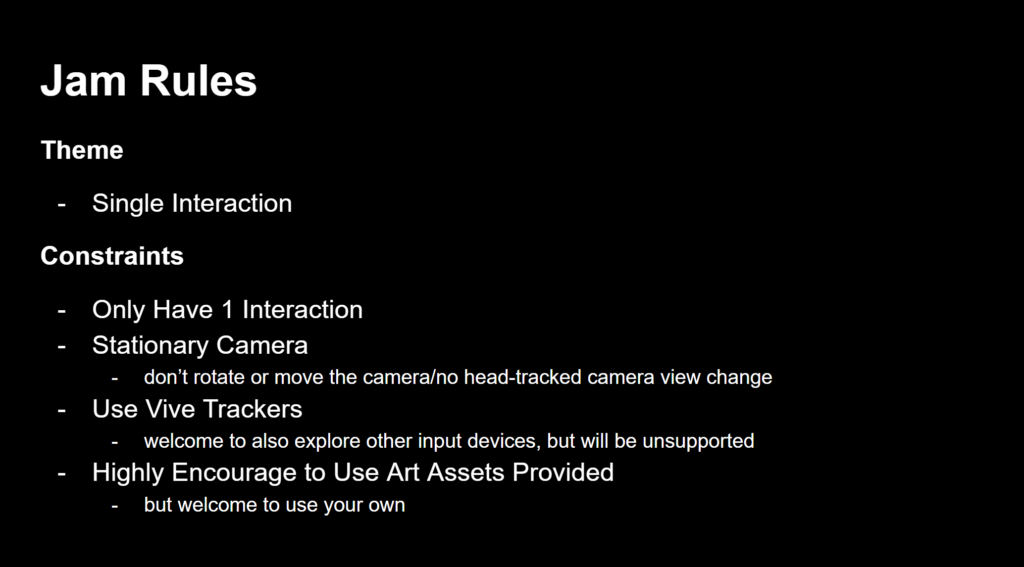
We want our participants to focus on the current CAVERN affordances and build upon that. Spelunx provides support for stereoscopic rendering, easy setup for the CAVERN space including surround sound, a preview mesh tool to see how the world renders in the Unity editor, basic Vive Tracker integration, and a sample scene. These are our half semester breakthroughs, and we should ensure we allow participants to explore these without venturing into challenges beyond the current capabilities. We then designed the jam theme to be:
”Build a CAVERN experience using Spelunx and contains one single interaction.”
To support participants, we need to prepare:

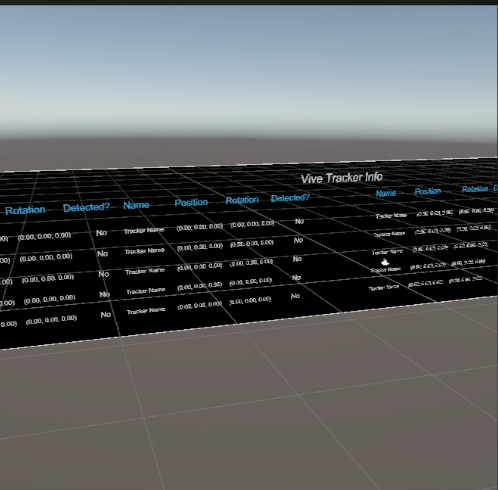
One of the biggest remaining technical hurdles before CAVERN Jam was ensuring that Vive Trackers worked reliably, so we can test this critical input system. Previous teams had struggled with complicated setup and manual configuration that is not extendable beyond the individual projects. Therefore, as a toolkit project, we aim to generalize this and make it as hassle-free as possible.
The first thing to determine was which package to integrate. Over the past three weeks, over crashes and bulky solutions, we’ve tried and switched into 5 different ones, and finally settled down with one. Here are the list of packages we’ve considered and their trade-offs:
The final result was a fully functional, crash-free Vive Tracker integration that CAVERN Jam participants can integrate with a single click.
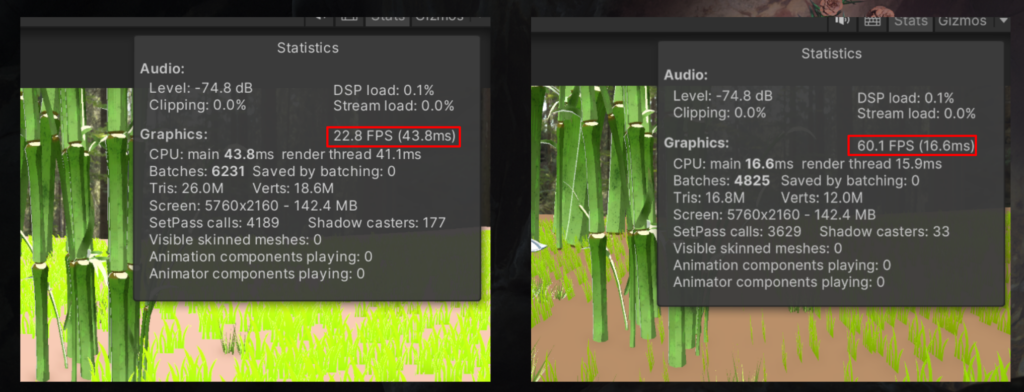
To validate our work, we also tested Spelunx’s camera rendering solution against a past CAVERN project, Hycave. They used to discard a scene with procedural generated grass due to the extremely low frame rate. Using our new camera, the frame rates tripled from around 20 to 60 FPS.
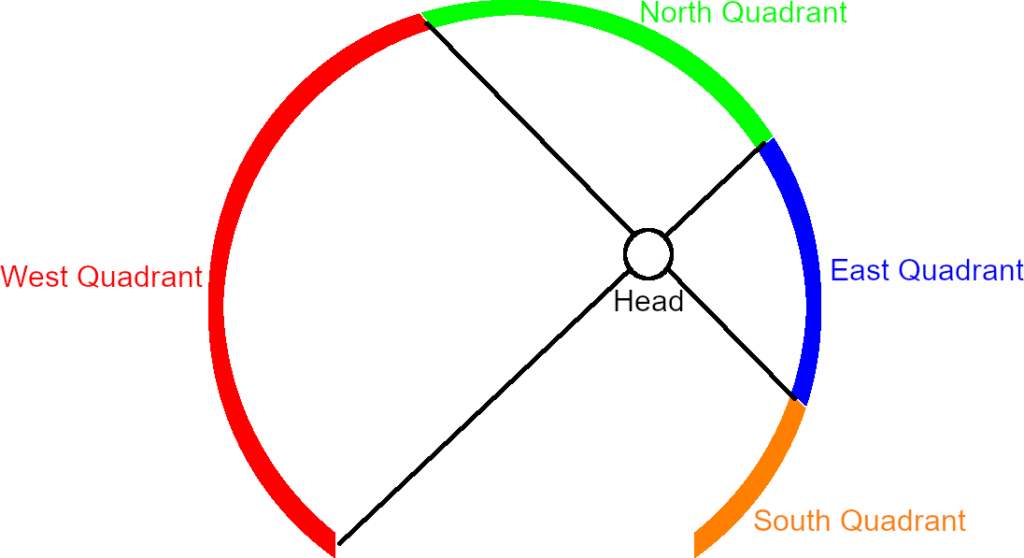
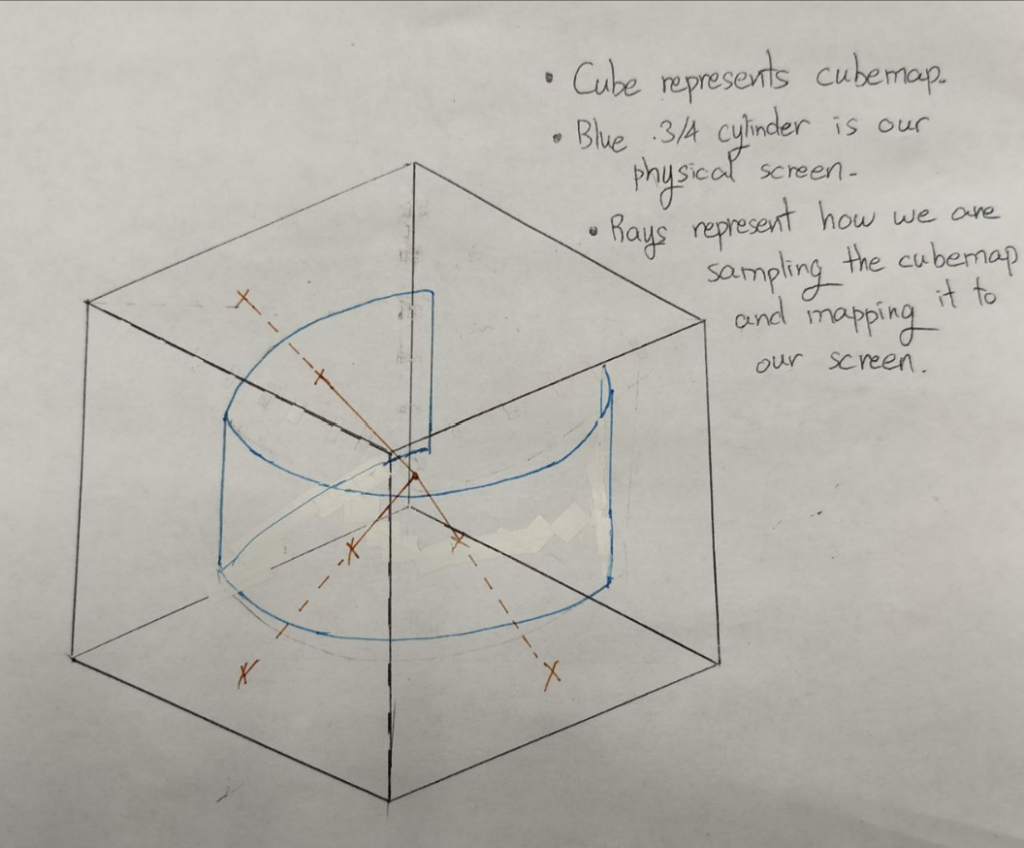
Being a physical space, players are encouraged to move about in the Cavern. The player’s position can also be tracked using accessories such as the VIVE Tracker. An example would be a game where a creepy set of eyes follow a player as they move about.
However, since the camera is currently assumed to be in the center of the screen when calculating P, this creates the issue where the perspective of the rendered image is incorrect when the player moves away from the center.
In the case of the above game example, the eyes might look like they are looking at the player when they are standing in the center of the space, but appear to be looking past the player when they walk around.
The fix is relatively simple. Rather than splitting the screen into quadrants at the center, we just split the split from the head.
Outside of CAVERN Jam preparation and technical testing, we made several key refinements:
With all CAVERN jam preparations complete, with a working Vive Tracker integration, stay tuned for Week 6 updates, where we break down our findings from CAVERN Jam!
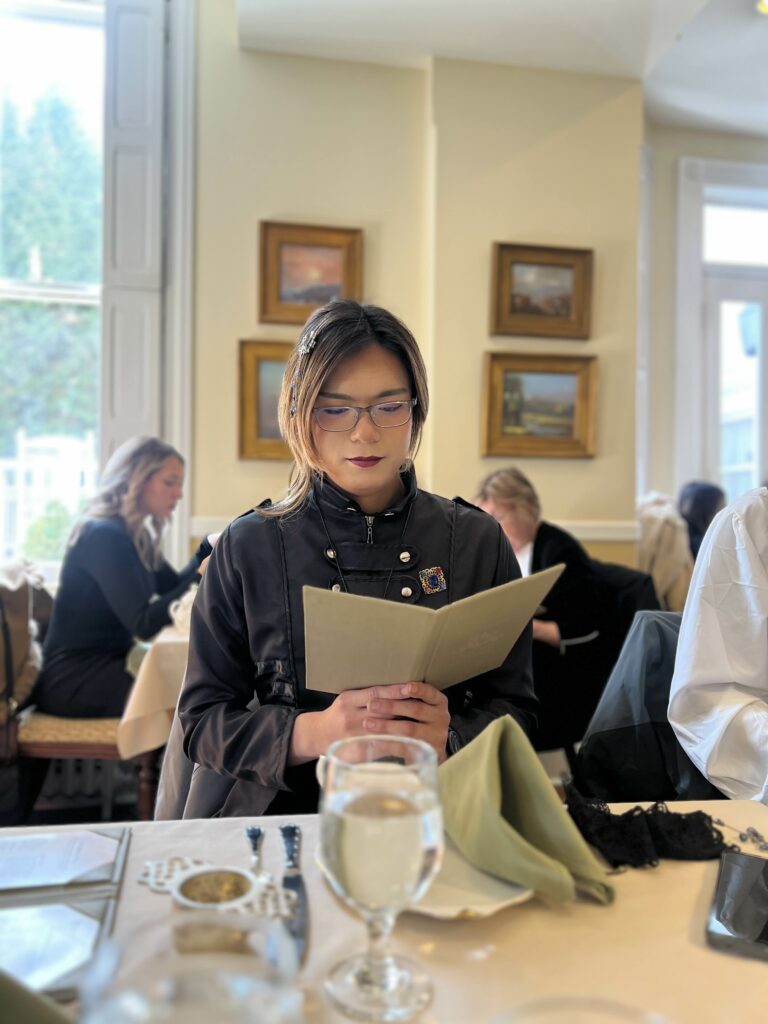
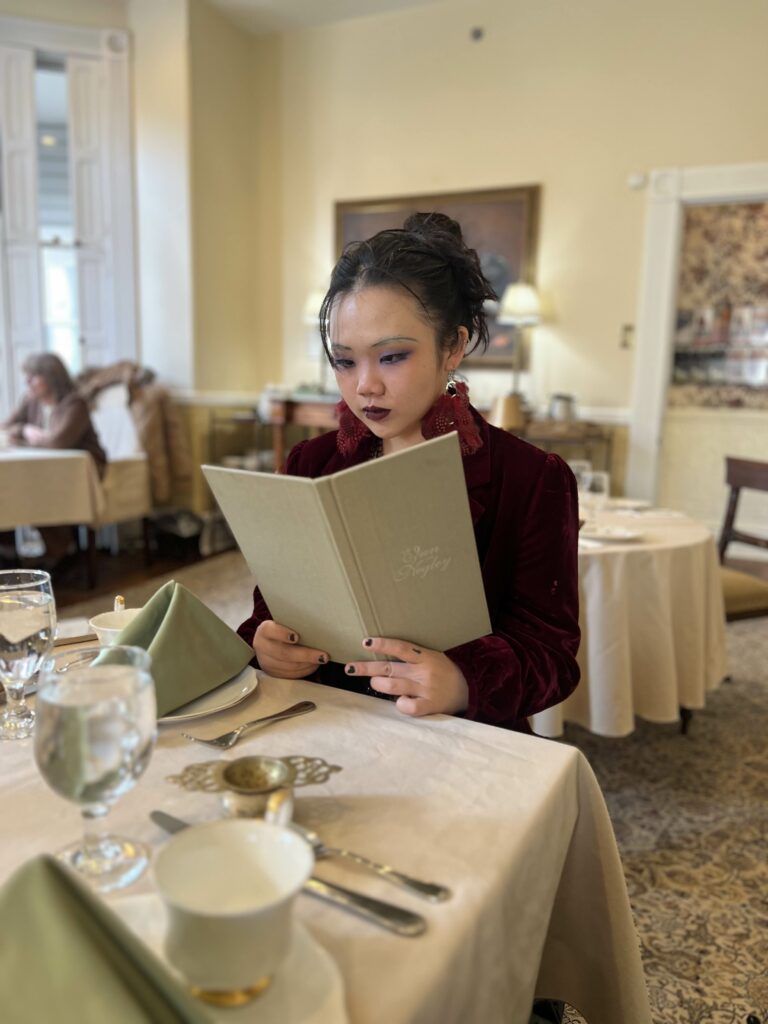
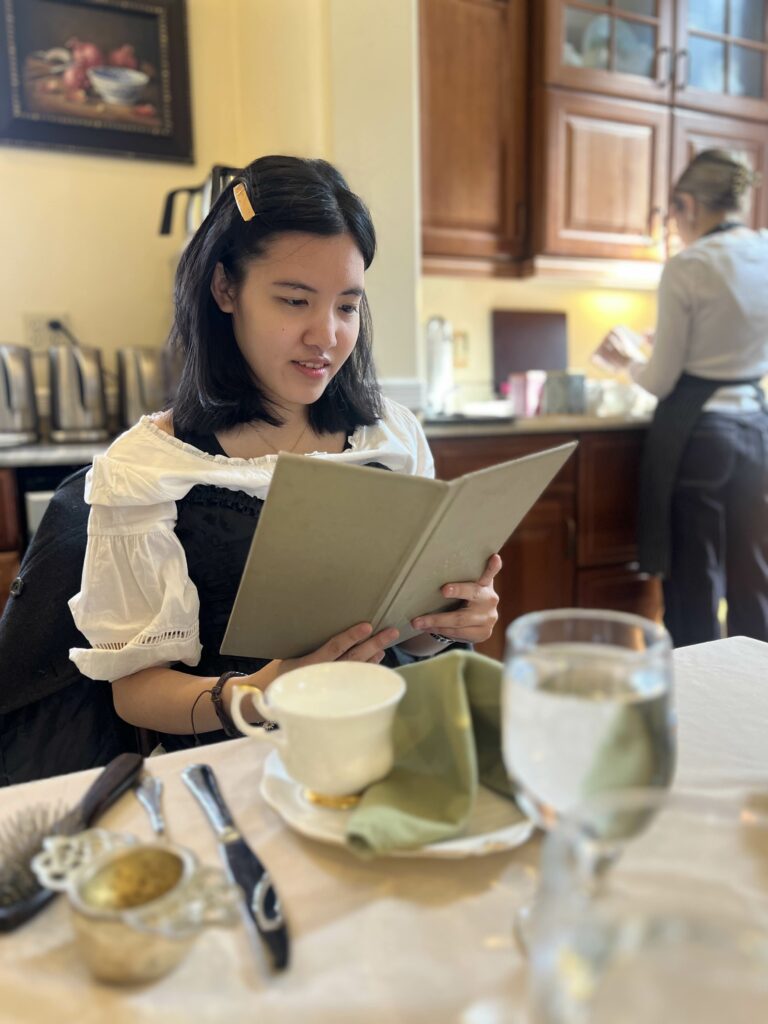
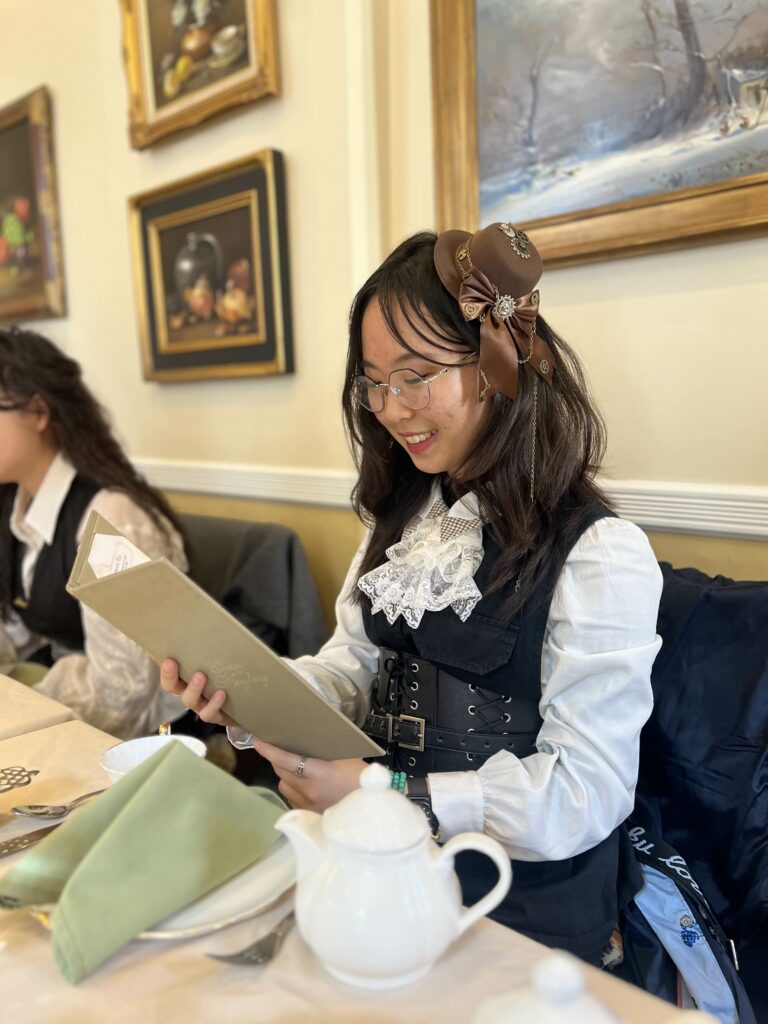
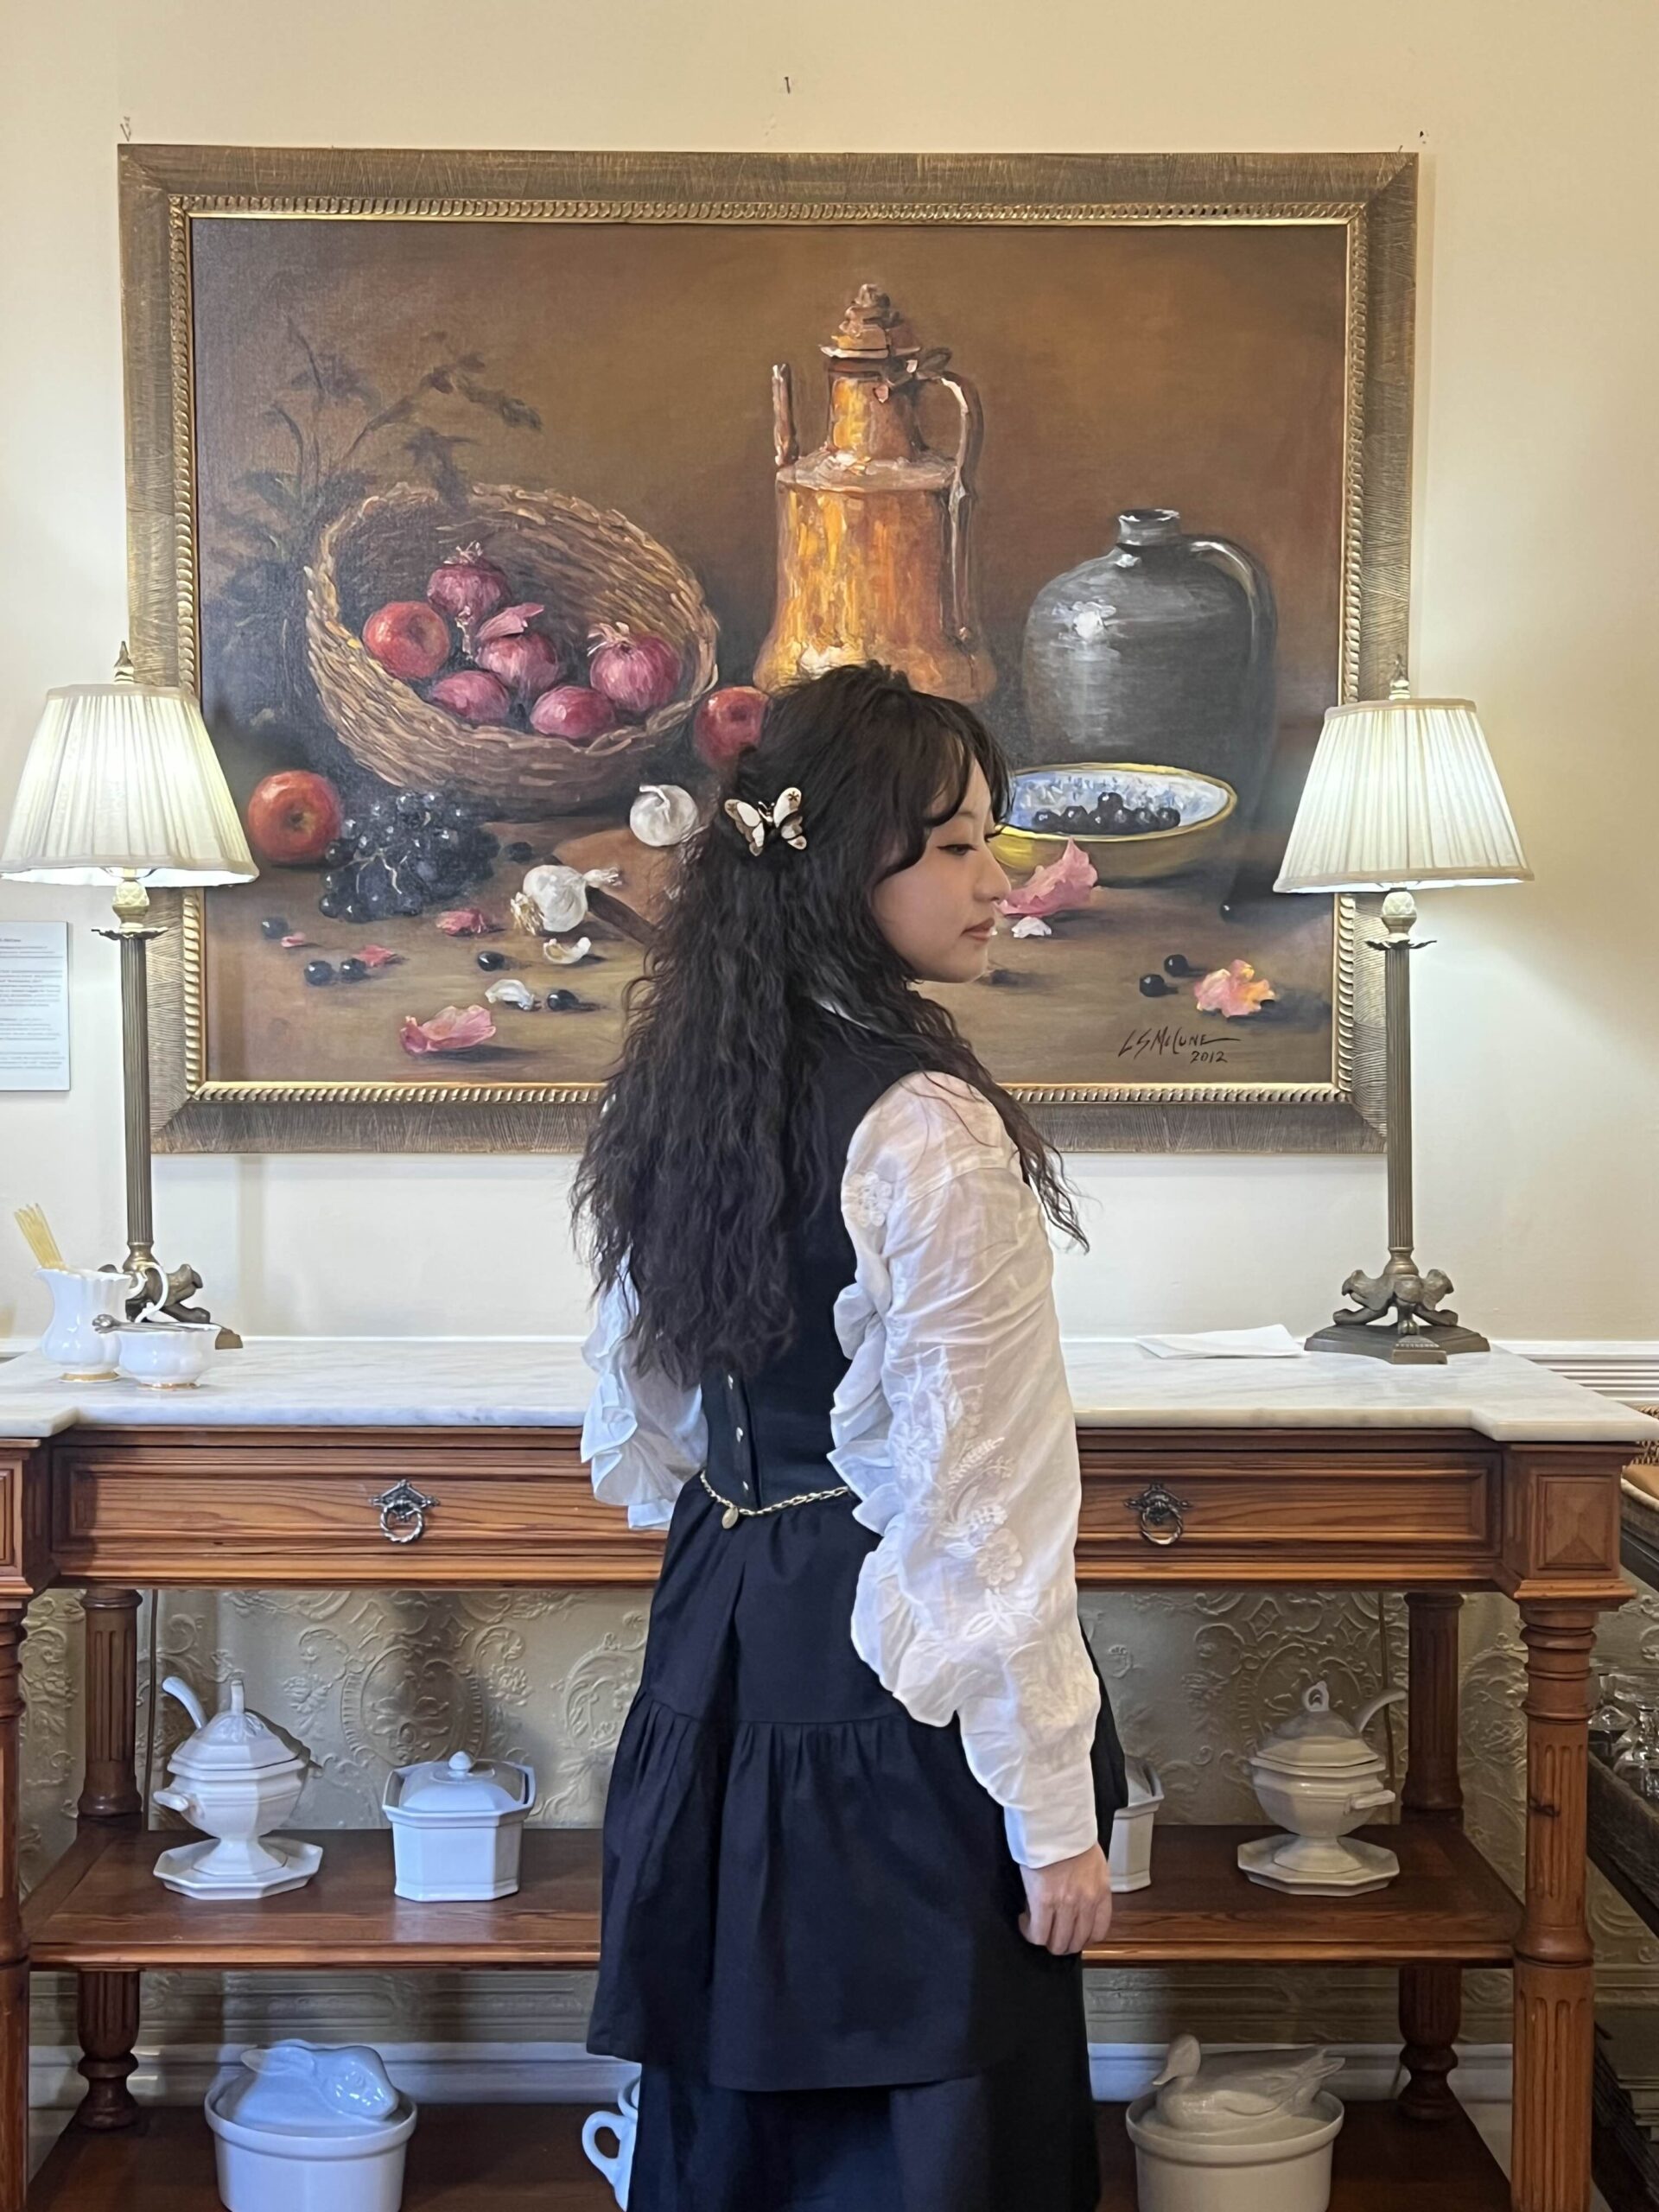
This week, we had our first visit to South Fayette High School, where we met the students who will be using our toolkit. We also reached a major milestone with Toolkit 1.0, bringing together stereoscopic rendering and our beautiful botanical garden sample scene into a fully testable and demo-able package. To wrap up the week, we took a well-earned break for High Tea team bonding, celebrating our progress before diving into the next phase of development.
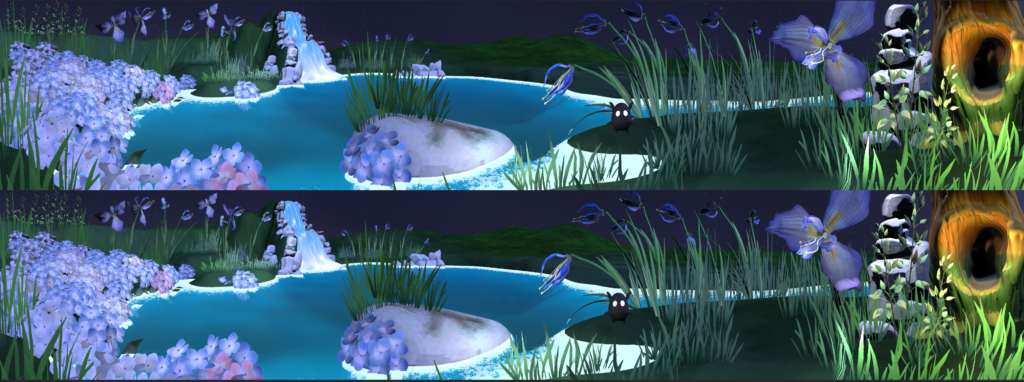
Last week, we had partial success with stereoscopic rendering. To recap the issue, notice that as the screen angle approaches 90°, the stereoscopic effect decreases as the IPD between the eyes approaches zero. Moreover, going beyond 90°, the view from the left eye is now to the right of the right eye, resulting in the depth perception of objects being reversed.
To solve this, we used four cubemaps, each with an offset in each cardinal direction. Then, splitting the screen into four quadrants (one for each cardinal direction), the left and right eye will select a different cubemap to sample from each quadrant.
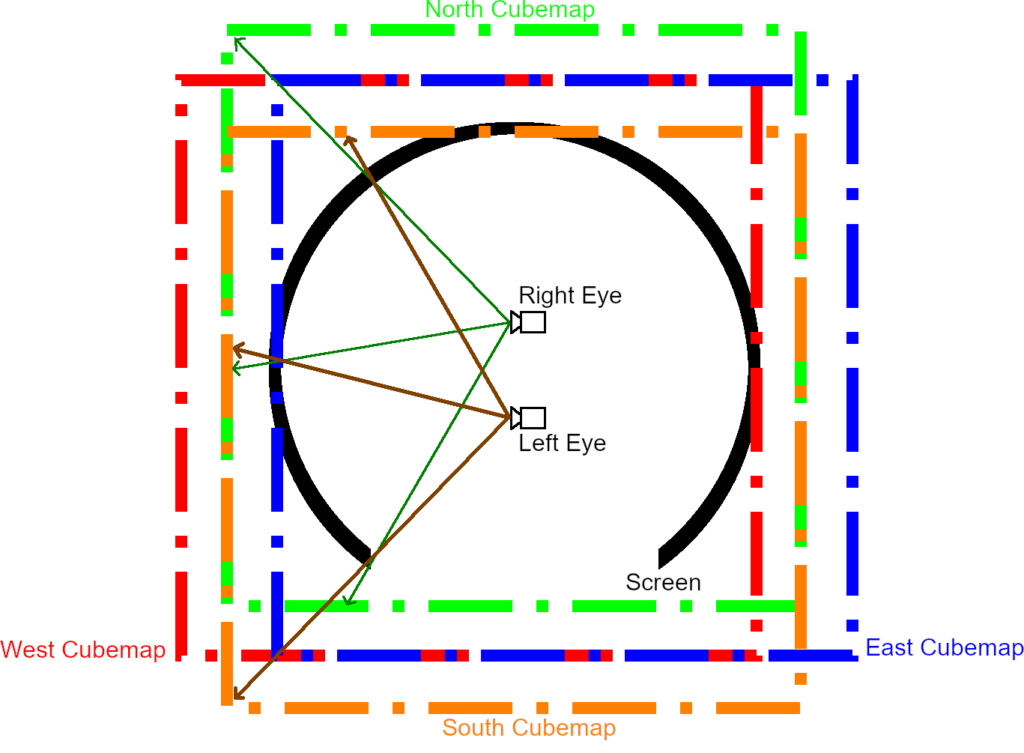
Stereoscopic rendering now works! However, a drawback of this method is that it creates a vertical seam along the lines where the quadrants meet. Despite that, during playtesting, the majority of our users who spent an average 15 minutes time in the Cavern, would not notice it unless it was specifically pointed out to them. Sometimes, a technical solution is not the most theoretically correct one, but one that works most effectively without taking all of our efforts and time!
Learning from Future CAVERN Developers
On Wednesday, we traveled to South Fayette High School to introduce students to CAVERN and understand how they engage with interactive development. We wanted to understand what drew them to self-select into this Building Virtual Worlds course, what kinds of experiences they are hoping to build, and what support they need to get started.
Students shared a mix of interests, with some drawn to programming and game mechanics, while others were excited about art, world design, and immersive storytelling. When asked what they would build if they could make anything, students imagined overgrown ruins, apocalyptic worlds, and turn-based RPGs with rich visuals.
Collaborating on a Shared Lesson Roadmap
One challenge students faced was figuring out where to start. They weren’t sure how to break down development into manageable steps, and using the toolkit through UPM (Unity Package Manager) was unfamiliar and difficult. Stacey, their teacher, suggested that if we could provide a structured learning roadmap, she could incorporate it into their lesson plan. In return, we could use their lesson plans into our toolkit for future teachers and developers.
Working with a Different CAVERN
South Fayette’s CAVERN setup was different from ours at ETC, which led to unexpected technical hurdles when testing our package:
We also released the first stable version of our toolkit! We integrated what each of us worked on in the previous weeks into a Unity package.
What is in the Package
What is still in Progress
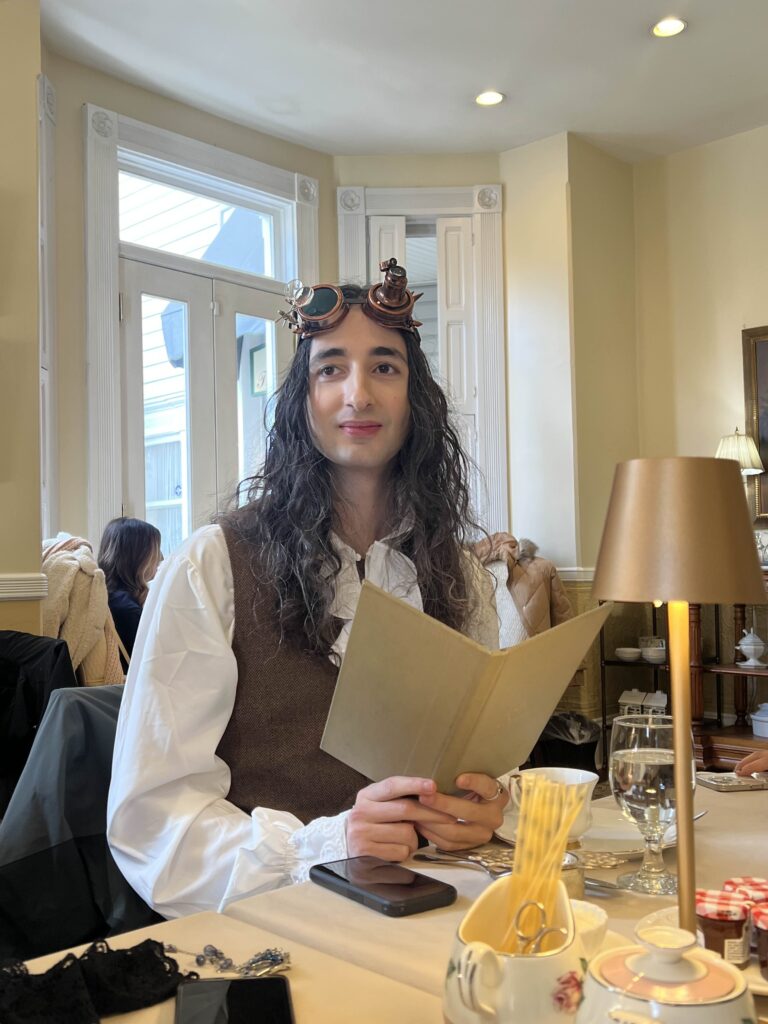
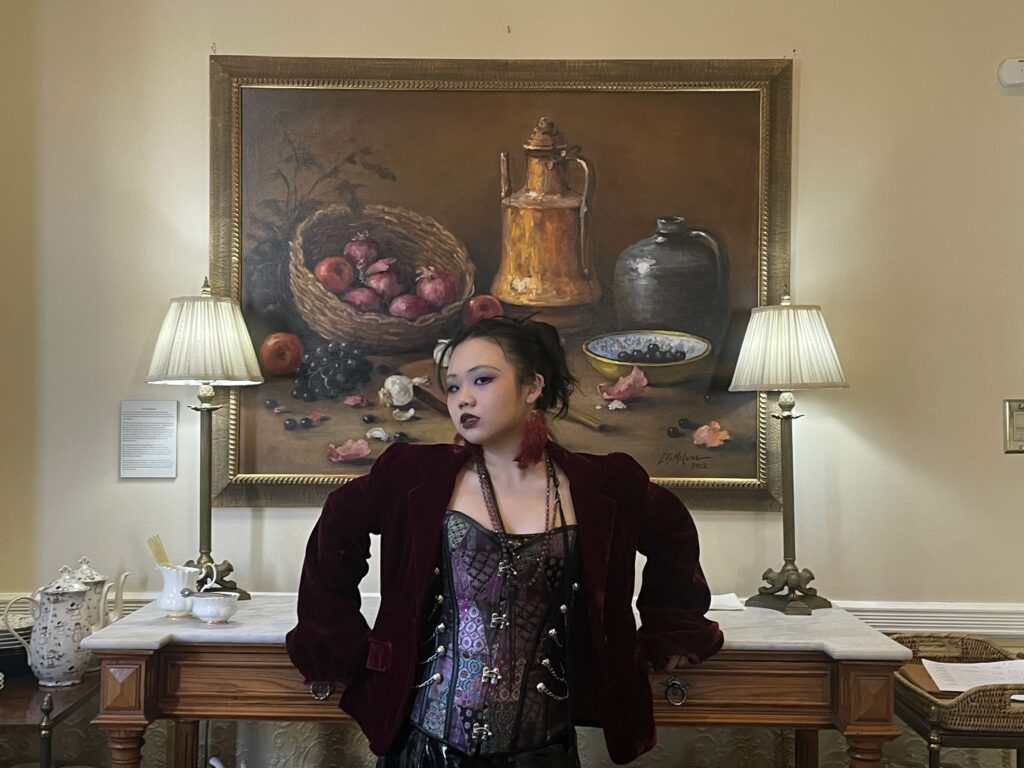
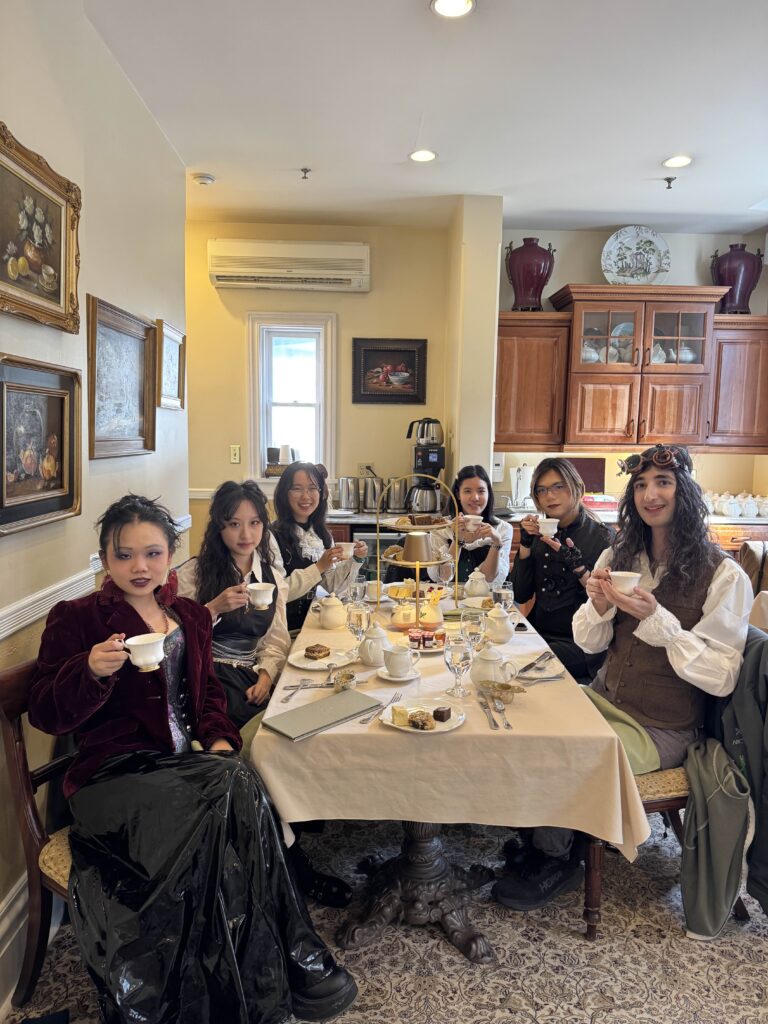
After an intense few weeks of development, we also had our official team bonding! After voting between karaoke and axe throwing and more, we settled on going to High Tea at the Inn on Negley. To immerse into scene even more, we decided to dress up with a Steampunk theme, and look at the photo! We had a lot of fun, not only developing, but also as a team.


While the South Fayette visit and Toolkit 1.0 were the big highlights, there were plenty of other developments this week:
With Toolkit 1.0 in place, our next priority is to rapidly test with developers to understand how we can improve. Therefore, we decided to host a CAVERN Jam on the 7th week. In week 5, we will polish all our current technology, such as polishing the code style in rendering, actually fix Vive Tracker integration, building a more modular sample scene, creating onboarding documentation, and planning for user testing process.
Stay tuned for Week 5 updates!
Welcome back! This week, we had our Quarter walkarounds, where faculty provided feedback to help us refine our approach to interactions and toolkit usability. A follow-up discussion with Brenda Harger gave us deeper insights into narrative design and engagement strategies in CAVERN’s environment. On the technical side, we made a major breakthrough in stereoscopic rendering, but Vive tracker integration remained highly unstable. Finally, we also planned our toolkit 1.0 for the visit to South Fayette that will happen next week.
This week, we had our first major round of faculty feedback through Quarters walkarounds. During these sessions, faculty rotated between project teams, offering guidance and helping us evaluate our initial direction. This was also the first time we formally presented our project since last semester’s pitch, which meant reassessing how we communicate our goals.
We discovered that faculty had differing expectations for our toolkit. Some envisioned a fully no-code, drag-and-drop system, while we had always planned for a toolkit that still requires coding for non-CAVERN-specific interactions. This raised an important question: How do we define accessibility in our toolkit? Our approach assumes that by designing for high school students as a less technical user base, we will also enable ETC graduate students, regardless of coding experience, to create impactful experiences in CAVERN.
Another key realization was that the term “novice” can mean many different things—a user could be new to programming, game development, or CAVERN itself. Faculty feedback helped us recognize that we need to clearly define our target audience and ensure that our documentation and onboarding process supports different levels of experience.
After Quarters, together with Brenda Harger, ETC’s professor teaching Improvisational Acting, we explored in person in CAVERN how users engage with the space and how interaction design could be made more intuitive.
Just like how interactive storytelling children’s game like Going on a Bear Hunt is fun and engaging even without any technology or props, Brenda encouraged us to consider utilizing the wide 20-feet play area CAVERN provides for opportunities for multiplayer social experience. Clapping, stomping, and following movements are all simple interactions that are beyond the digital screen or complex controls, but perfect for the space.
In addition, CAVERN’s curved wall gives potential to creating moments of surprise – objects can appear from behind, wrap around players periphery, or a sound cue could guide attention subtly without requiring direct instructions. Minimizing explicit verbal guidance and allowing players to naturally discover mechanics can make interactions feel more immersive and intuitive.
Sometimes, simple environmental cues and physical actions outside of tech solutions can be just as compelling as complex mechanics. This conversation helped us rethink how to blend physical actions with digital interactions to create a seamless, intuitive experience inside CAVERN.
With the success of last week’s monoscopic camera, this week was the time to start bringing the world into 3D by exploring stereoscopic rendering.
Stereoscopic rendering allows us to achieve the “popping out” effect that we see when watching a 3D movie. To render a stereoscopic view on a flat screen, we render the scene twice, each with a slight offset for each eye, and overlay the images on top of one each other. When the player puts on 3D glasses, it filters out the images such that each eye only sees one image, and the brain combines them to perceive depth.
The offset is known as the interpupillary distance (IPD), which is the distance between our eyes. On average, adult humans have an IPD of 63mm. In the case of the Cavern, the output for each eye is vertically stacked in the output render buffer, and specialised software is used to overlay them when projecting onto the screen.
We can also approximate the effect using multiple cubemaps for stereoscopic rendering.

Finally, at 11pm on Friday, our stereoscopic camera 1.0 was created and tested with two naive users of the CAVERN, and garnered great response – they both were able to see a cube floating mid air and outside of the screen!
However, we’ve noticed that as the screen angle approaches 90°, the stereoscopic effect decreases as the IPD between the eyes approaches zero. Furthermore, going beyond 90°, the view from the left eye will now be to the right of the right eye, resulting in the depth perception of objects being reversed. So while the solution generally works, it’s not a perfect, yet. So, quote our exceptionally hardworking Terri who’s done this much in a week already: “Oh well, I know what to work on next week then!”
On the other hand, Vive Trackers integration was met with huge obstacles. While last week we successfully integrated it into Unity via the unity-openvr-tracking package, it ran into unknown bugs that led to endless crashing of the Unity editor, as well as the entire computer upon exiting play mode.
On initial inspection, we pinpointed the bug crash being an asynchronous system function in OpenVR still being called even after exiting play mode. We tried to create a breakpoint, tried to comment different lines of code, but all were in vain.
Miraculously, on Friday, right when we were debating whether or not to include the buggy version into the demo next week at South Fayette and pushed a temporary version to the main branch on GitHub, it suddenly started working as intended! We decided to continue investigating the problem, but for now, a working version is available!
Beyond the core technical breakthroughs and design discussions, we also made progress in other areas:
Since we are visiting South Fayette next week, integrating our freshly built camera, initial solution for input, sample scene art and sound assets, all into our toolkit package will be our main priority.
Week 3 was all about refining our approach, tackling major technical challenges, and rethinking how users engage with CAVERN. With our first real playtest approaching, Week 4 will be a critical milestone in seeing how our work translates into actual user interactions.
Stay tuned for Week 4 updates!
Welcome back to our Week 2 blog post! This week, our focus was on learning and experimenting with the tools needed for CAVERN, laying the foundation for development moving forward. Since many of the features we aim to implement require a deep understanding of existing systems, this week was all about researching, testing, and iterating on our ideas before committing to long-term solutions. In addition, we set up our GitHub repository for our package, and onboarded everyone (including artists) to use git commands.
Rendering in CAVERN presents a unique challenge due to its curved display system, requiring a fundamentally different approach from traditional game rendering. Terri dedicated much of this week to learning Unity’s ShaderLab and HLSL, as well as understanding the updates to URP in Unity 6. With major changes introduced in this version, existing documentation is limited, making reverse engineering and experimentation essential in finding a viable solution.
Previously, the old camera system relies on a multi-camera system, using over 30 cameras per eye, aligned in a circle, and combined the output from the cameras into a final texture which is projected onto the screen.
While it did work, it had many drawbacks.
While there was a single-camera version in the old system, it was still a work in progress and incomplete, and was using Unity’s deprecated Built-In Rendering Pipeline (BIRP), which is deprecated in Unity 6.
Alongside this research, Terri began working on reverse engineering the old single-camera. This process was initially broken down into two steps:
However, as the old single-camera system was a work in progress, the projection of the world onto the CAVERN display still resulted in cropping errors and warping.
Taking inspiration from part of the old single-camera, rather than to convert the cubemap into a equirectangular texture, the approach was to directly sample from the cubemap. This proved to be a viable option, as it was relatively trivial to calculate the direction of a point on the physical screen from the centre of the CAVERN.
With this new approach, not only was the system simplified from over 30 cameras to just 1, it also improved rendering performance significantly, as we now only need to sample the output from a single camera rendering into a cubemap. From our tests, the performance increase ranged from 100% to 200%, depending on the output resolution.
Being a non-traditional immersive platform, creators making experiences for the CAVERN tend to gravitate towards non-traditional, immersive controls. In the past, teams have used the Orbbec Femto Bolt body trackers and the HTC Vive position trackers. These both allow creators to get information about where people and objects are located within the CAVERN. The existing CAVERN API had no built-in input functionality, so each team in the past had to figure it out on their own.
Our first goal is to integrate Vive Trackers, as its use cases seemed to come into mind most naturally. Previously, teams ran into many issues with the trackers not working or crashing, and they had to hardcode the device IDs into their code, making it difficult to switch to a different Vive tracker if one stopped working. Our initial goal was to simplify this process.
Difficulties
Beyond the core technology, we also need to ensure that our toolkit is user-friendly and accessible. This week, Yingjie focused on prototyping a custom Unity Editor panel that will eventually house our CAVERN development tools.
As a proof of concept, she developed an early prototype that allows users to click a button and change an object’s color to green—a simple but crucial first step toward a fully functional toolkit UI. This work provided insights into how we can integrate CAVERN-specific settings into Unity’s Editor workflow, making it easier for developers to set up and modify their projects without extensive manual adjustments. Additionally, Yingjie explored Unity’s package system, which will be important when we distribute the toolkit for future use.
Visual design for CAVERN is unique, given its curved projection and stereoscopic rendering. Ling & Mia spent the week experimenting with how different types of assets look when rendered inside CAVERN.
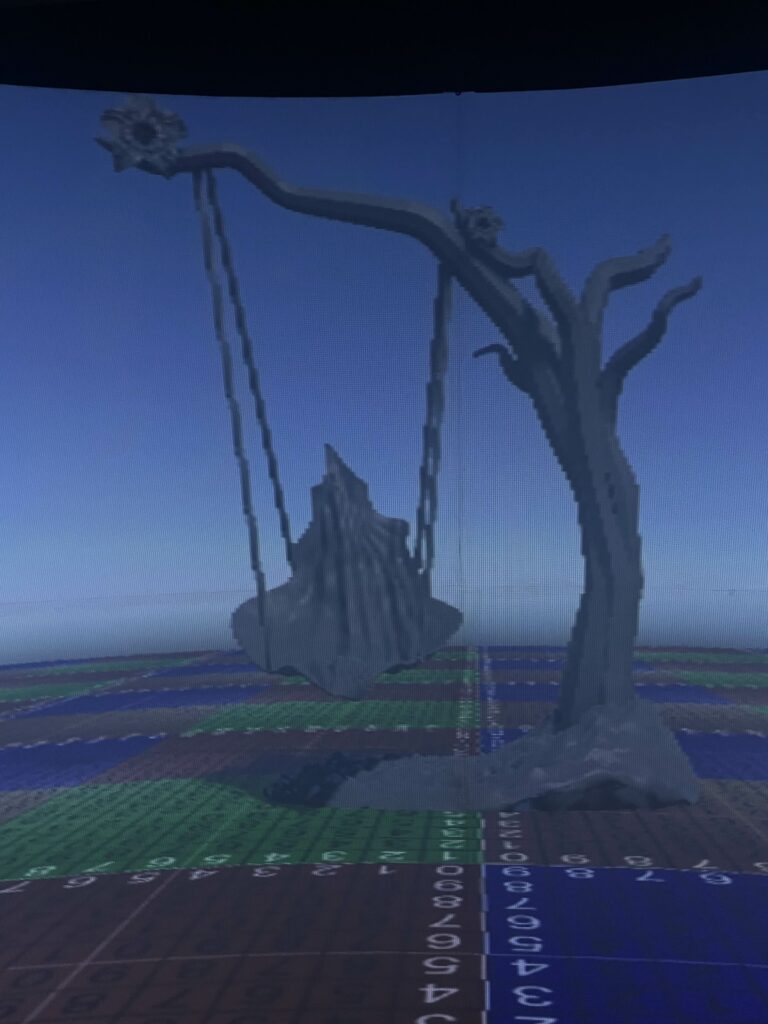
To understand how models behave in CAVERN, Ling tested with a swing asset to be used in our sample scene, discovering that because of the rendering resolution of CAVERN, diagonal visuals will be pixelated. Additionally, lower-poly models appear smoother, as crucial details of high fidelity models tend to disappear, making the visuals harder to identify and therefore not as high as a priority when making assets in the CAVERN. These findings will help optimize future models or textures, and inform how rendering technology can possibly be improved.
Meanwhile, Mia focused on particle effects, exploring how they behave in a projection-based environment. She also worked on the initial logo concepts, creating four draft versions that will be refined in the coming weeks.
Sound is a crucial part of immersion but is often overlooked until late in development. With CAVERN’s 4.1 speaker setup (front left, front right, rear left, rear right, and a subwoofer), Winnie focused this week on optimizing its use to create directional audio cues. Unlike traditional VR audio, which relies on headphones, CAVERN’s physical speakers require a different approach to spatialization.
She categorized three key types of spatial sound:
Currently, CAVERN supports standard surround sound, with its middle speaker virtualized by balancing front left and right channels at half volume. Winnie tested Unity’s 5.1 surround sound settings, finding them to be the most natural spatialization option so far. She also explored how the previous API handled moving sound sources, discovering that objects placed in the scene automatically rendered to the correct speaker. Additionally, while investigating the API, she and other team members identified an issue where the camera was flipped, causing opposite sound rendering, which has now been corrected.
While most of our research focused on technical aspects, we also explored how our toolkit can inspire and empower users. As part of this effort, we sent out a questionnaire to past CAVERN teams to gather insights on their experiences, challenges, and best practices. While we are still awaiting responses, we plan to follow up individually to ensure we collect useful data.
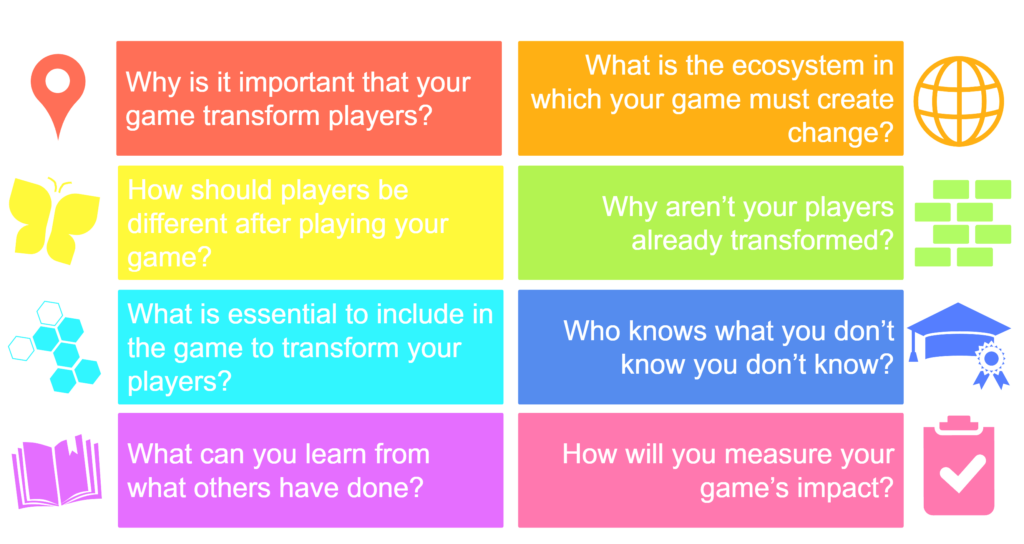
Additionally, Josh & Winnie attended a Transformational Framework workshop, which focused on designing experiences that create a lasting impact on users. While we are not making a traditional game, we want to empower users to build meaningful experiences in CAVERN. This workshop taught us how to define and evaluate good design and intuitive tools.
With Quarters coming up soon, we also began structuring our first formal presentation of the semester. Our goal is to clearly communicate our research, challenges, and early implementations while gathering feedback from faculty and industry experts. Additionally, we started setting up the website structure, which will serve as our central hub for documentation, blog posts, and toolkit resources.
Week 2 was all about exploration, research, and laying the groundwork for the next phase of development. We now have a stronger understanding of rendering, input, audio, and UI workflows, which will guide us as we move into implementation and refinement. Next week, we will begin building out our first set of tools and interactions, refining our prototypes, and preparing for our first user tests.
Stay tuned for more updates in Week 3!
