Welcome back to our Week 2 blog post! This week, our focus was on learning and experimenting with the tools needed for CAVERN, laying the foundation for development moving forward. Since many of the features we aim to implement require a deep understanding of existing systems, this week was all about researching, testing, and iterating on our ideas before committing to long-term solutions. In addition, we set up our GitHub repository for our package, and onboarded everyone (including artists) to use git commands.
Rendering – Understanding CAVERN’s Projection System
Rendering in CAVERN presents a unique challenge due to its curved display system, requiring a fundamentally different approach from traditional game rendering. Terri dedicated much of this week to learning Unity’s ShaderLab and HLSL, as well as understanding the updates to URP in Unity 6. With major changes introduced in this version, existing documentation is limited, making reverse engineering and experimentation essential in finding a viable solution.
Notes on rendering solutions on the original API
Previously, the old camera system relies on a multi-camera system, using over 30 cameras per eye, aligned in a circle, and combined the output from the cameras into a final texture which is projected onto the screen.
While it did work, it had many drawbacks.
- Firstly, it was a complicated system, which a relied on complex hierarchy of GameObjects and cameras to function, making working with the system difficult.
- Secondly, the camera could not be rotated in the Unity editor, and required transformations to be done via code.
- Lastly, having so many separate cameras meant that the render pipeline has to be run through many times, once for each camera. Finally, the output from each camera had to be stitched together to form the final output. This resulted in heavy rendering performance penalty and severely limited the densities of objects developers could place in their scene.
While there was a single-camera version in the old system, it was still a work in progress and incomplete, and was using Unity’s deprecated Built-In Rendering Pipeline (BIRP), which is deprecated in Unity 6.
Alongside this research, Terri began working on reverse engineering the old single-camera. This process was initially broken down into two steps:
- Render the world view into a cubemap and convert it into an equirectangular texture.
- Sample from the equirectangler using a custom texture and project it onto the CAVERN display.
However, as the old single-camera system was a work in progress, the projection of the world onto the CAVERN display still resulted in cropping errors and warping.
Taking inspiration from part of the old single-camera, rather than to convert the cubemap into a equirectangular texture, the approach was to directly sample from the cubemap. This proved to be a viable option, as it was relatively trivial to calculate the direction of a point on the physical screen from the centre of the CAVERN.
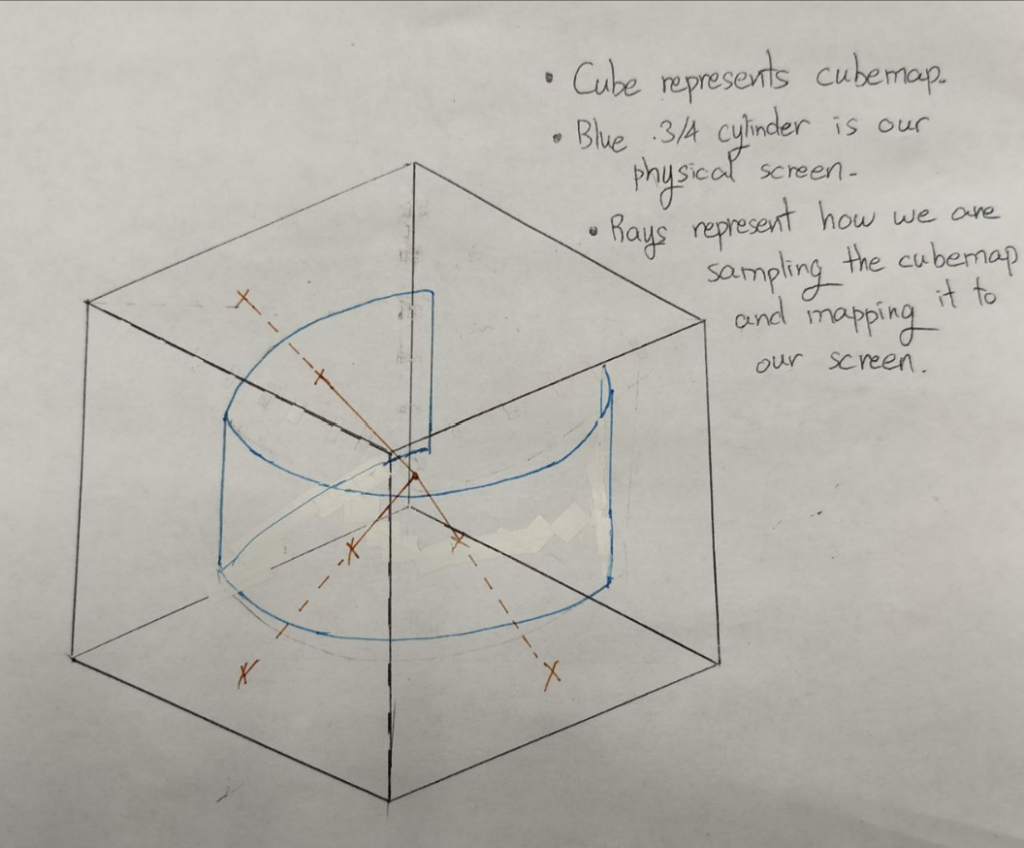
With this new approach, not only was the system simplified from over 30 cameras to just 1, it also improved rendering performance significantly, as we now only need to sample the output from a single camera rendering into a cubemap. From our tests, the performance increase ranged from 100% to 200%, depending on the output resolution.
Input – Exploring Vive Tracker Integration
Being a non-traditional immersive platform, creators making experiences for the CAVERN tend to gravitate towards non-traditional, immersive controls. In the past, teams have used the Orbbec Femto Bolt body trackers and the HTC Vive position trackers. These both allow creators to get information about where people and objects are located within the CAVERN. The existing CAVERN API had no built-in input functionality, so each team in the past had to figure it out on their own.
Our first goal is to integrate Vive Trackers, as its use cases seemed to come into mind most naturally. Previously, teams ran into many issues with the trackers not working or crashing, and they had to hardcode the device IDs into their code, making it difficult to switch to a different Vive tracker if one stopped working. Our initial goal was to simplify this process.
Difficulties
- Originally designed to be used with a virtual reality headset (head mounted display, or HMD), using Vive Trackers in the CAVERN emerged as our main challenge. This usage of Vive Trackers was unsupported, undocumented, and relatively unknown, so research and lots of debugging was required. It seems the current best practice that other people have found to work is to use SteamVR installed on the PC with a “null driver” which pretends to be a headset.
- Getting the position, rotation, and pin input data into Unity. While past teams used OpenXR + OpenVR + SteamVR to solve this, because SteamVR contains a lot of VR specific code irrelevant to CAVERN, crashes often, and causes issues with Unity6, we decided to use another package on GitHub called unity-openvr-tracking instead.
Editor Tools – Prototyping a User-Friendly Unity Workflow
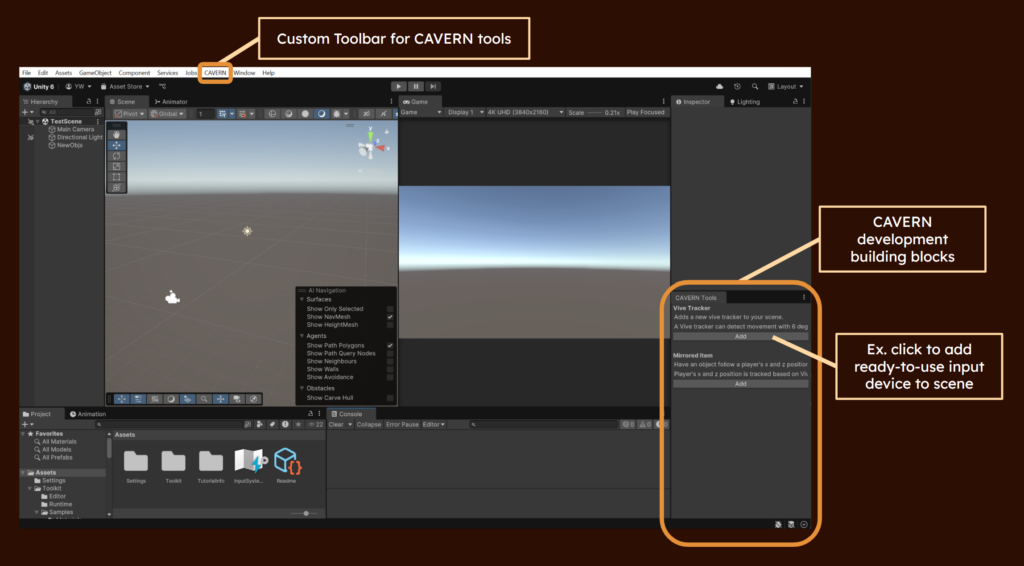
Beyond the core technology, we also need to ensure that our toolkit is user-friendly and accessible. This week, Yingjie focused on prototyping a custom Unity Editor panel that will eventually house our CAVERN development tools.
As a proof of concept, she developed an early prototype that allows users to click a button and change an object’s color to green—a simple but crucial first step toward a fully functional toolkit UI. This work provided insights into how we can integrate CAVERN-specific settings into Unity’s Editor workflow, making it easier for developers to set up and modify their projects without extensive manual adjustments. Additionally, Yingjie explored Unity’s package system, which will be important when we distribute the toolkit for future use.
Art & Scene Experimentation – Understanding How CAVERN Renders Visuals
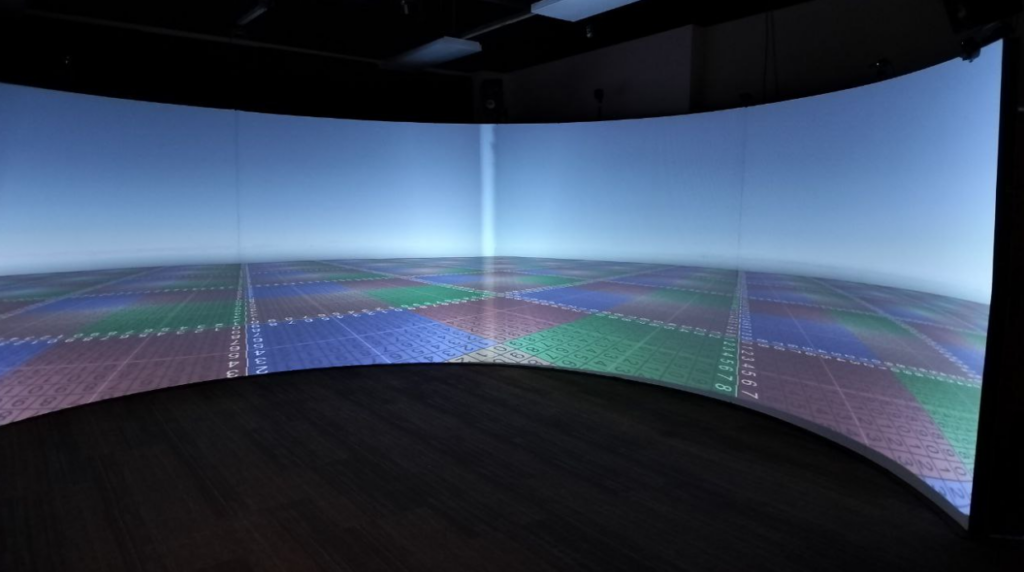
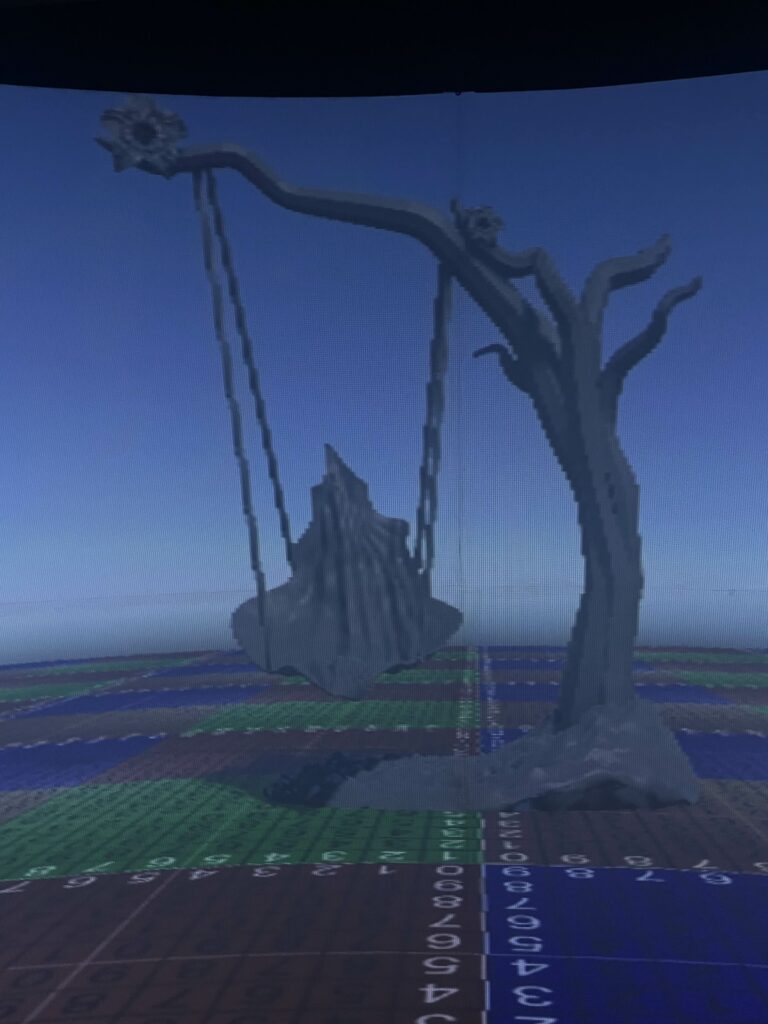
Visual design for CAVERN is unique, given its curved projection and stereoscopic rendering. Ling & Mia spent the week experimenting with how different types of assets look when rendered inside CAVERN.
To understand how models behave in CAVERN, Ling tested with a swing asset to be used in our sample scene, discovering that because of the rendering resolution of CAVERN, diagonal visuals will be pixelated. Additionally, lower-poly models appear smoother, as crucial details of high fidelity models tend to disappear, making the visuals harder to identify and therefore not as high as a priority when making assets in the CAVERN. These findings will help optimize future models or textures, and inform how rendering technology can possibly be improved.
Meanwhile, Mia focused on particle effects, exploring how they behave in a projection-based environment. She also worked on the initial logo concepts, creating four draft versions that will be refined in the coming weeks.
Audio – Researching Spatial & Directional Sound Solutions
Sound is a crucial part of immersion but is often overlooked until late in development. With CAVERN’s 4.1 speaker setup (front left, front right, rear left, rear right, and a subwoofer), Winnie focused this week on optimizing its use to create directional audio cues. Unlike traditional VR audio, which relies on headphones, CAVERN’s physical speakers require a different approach to spatialization.
She categorized three key types of spatial sound:
- Surround Sound – Uses speaker placement for horizontal positioning.
- Spatial Audio – Software-driven 3D soundscapes, common in VR and headphones.
- Directional Audio – Achieved with beam-forming speakers, allowing sound to be heard only in specific locations.
Currently, CAVERN supports standard surround sound, with its middle speaker virtualized by balancing front left and right channels at half volume. Winnie tested Unity’s 5.1 surround sound settings, finding them to be the most natural spatialization option so far. She also explored how the previous API handled moving sound sources, discovering that objects placed in the scene automatically rendered to the correct speaker. Additionally, while investigating the API, she and other team members identified an issue where the camera was flipped, causing opposite sound rendering, which has now been corrected.

User Research & Transformational Framework
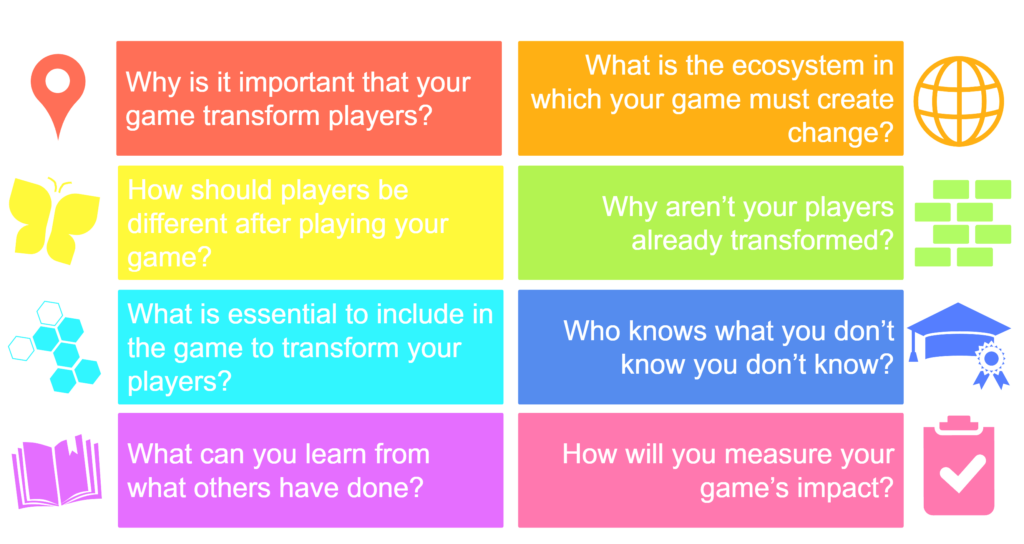
While most of our research focused on technical aspects, we also explored how our toolkit can inspire and empower users. As part of this effort, we sent out a questionnaire to past CAVERN teams to gather insights on their experiences, challenges, and best practices. While we are still awaiting responses, we plan to follow up individually to ensure we collect useful data.
Additionally, Josh & Winnie attended a Transformational Framework workshop, which focused on designing experiences that create a lasting impact on users. While we are not making a traditional game, we want to empower users to build meaningful experiences in CAVERN. This workshop taught us how to define and evaluate good design and intuitive tools.
Preparing for Quarters & Website Setup
With Quarters coming up soon, we also began structuring our first formal presentation of the semester. Our goal is to clearly communicate our research, challenges, and early implementations while gathering feedback from faculty and industry experts. Additionally, we started setting up the website structure, which will serve as our central hub for documentation, blog posts, and toolkit resources.
Next Steps
Week 2 was all about exploration, research, and laying the groundwork for the next phase of development. We now have a stronger understanding of rendering, input, audio, and UI workflows, which will guide us as we move into implementation and refinement. Next week, we will begin building out our first set of tools and interactions, refining our prototypes, and preparing for our first user tests.
Stay tuned for more updates in Week 3!
Gallery
