Welcome back to our last week before IAAPA! This week saw some unpleasant weather and very long days for us. With Lori leaving on Wednesday for the Toronto Metropolitan University Thrill Design Invitational, and the rest of us flying out over the weekend, we had a ton that had to get done!
Technology
This week, the egg cage design made by Nolan was finally able to be cut and constructed! We are very excited about this design, which is both aesthetically pleasing and low budget. They are designed with solenoid locks, which will stay locked until the puzzle is solved. We had to iterate on the design of the door this week, because when laser cut, it was not the correct size for the solenoid lock placement, but that was fixed very easily. They are lit from the bottom with LED strips, and from the back with the ETC’s RGB DMX lights.
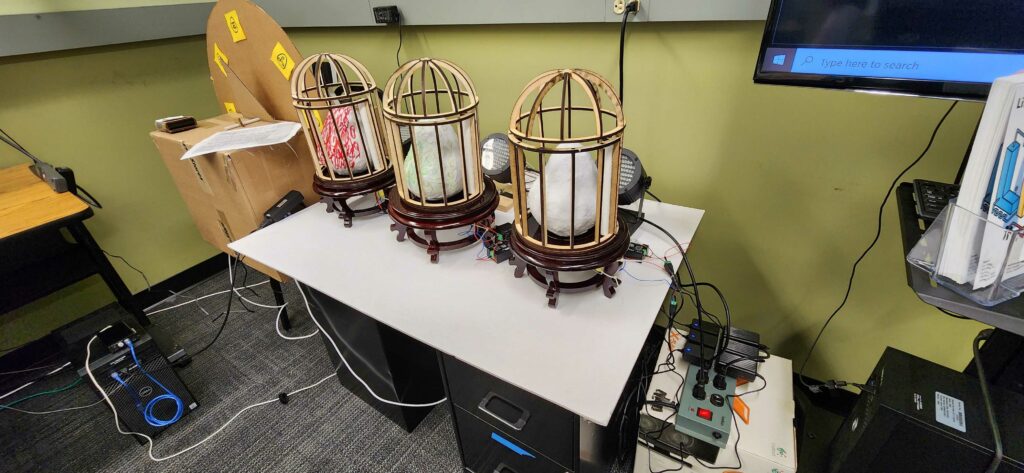
Nolan and Cleo spent Thursday and Friday getting everything set up with them so we could playtest with the puzzle on Friday! We then promptly disassembled them, so that Louise Cutter from the School of Drama will be able to paint them while we go to IAAPA. When we return, we will be able to reassemble them in the place in the room where the puzzle will eventually live!
Costumes
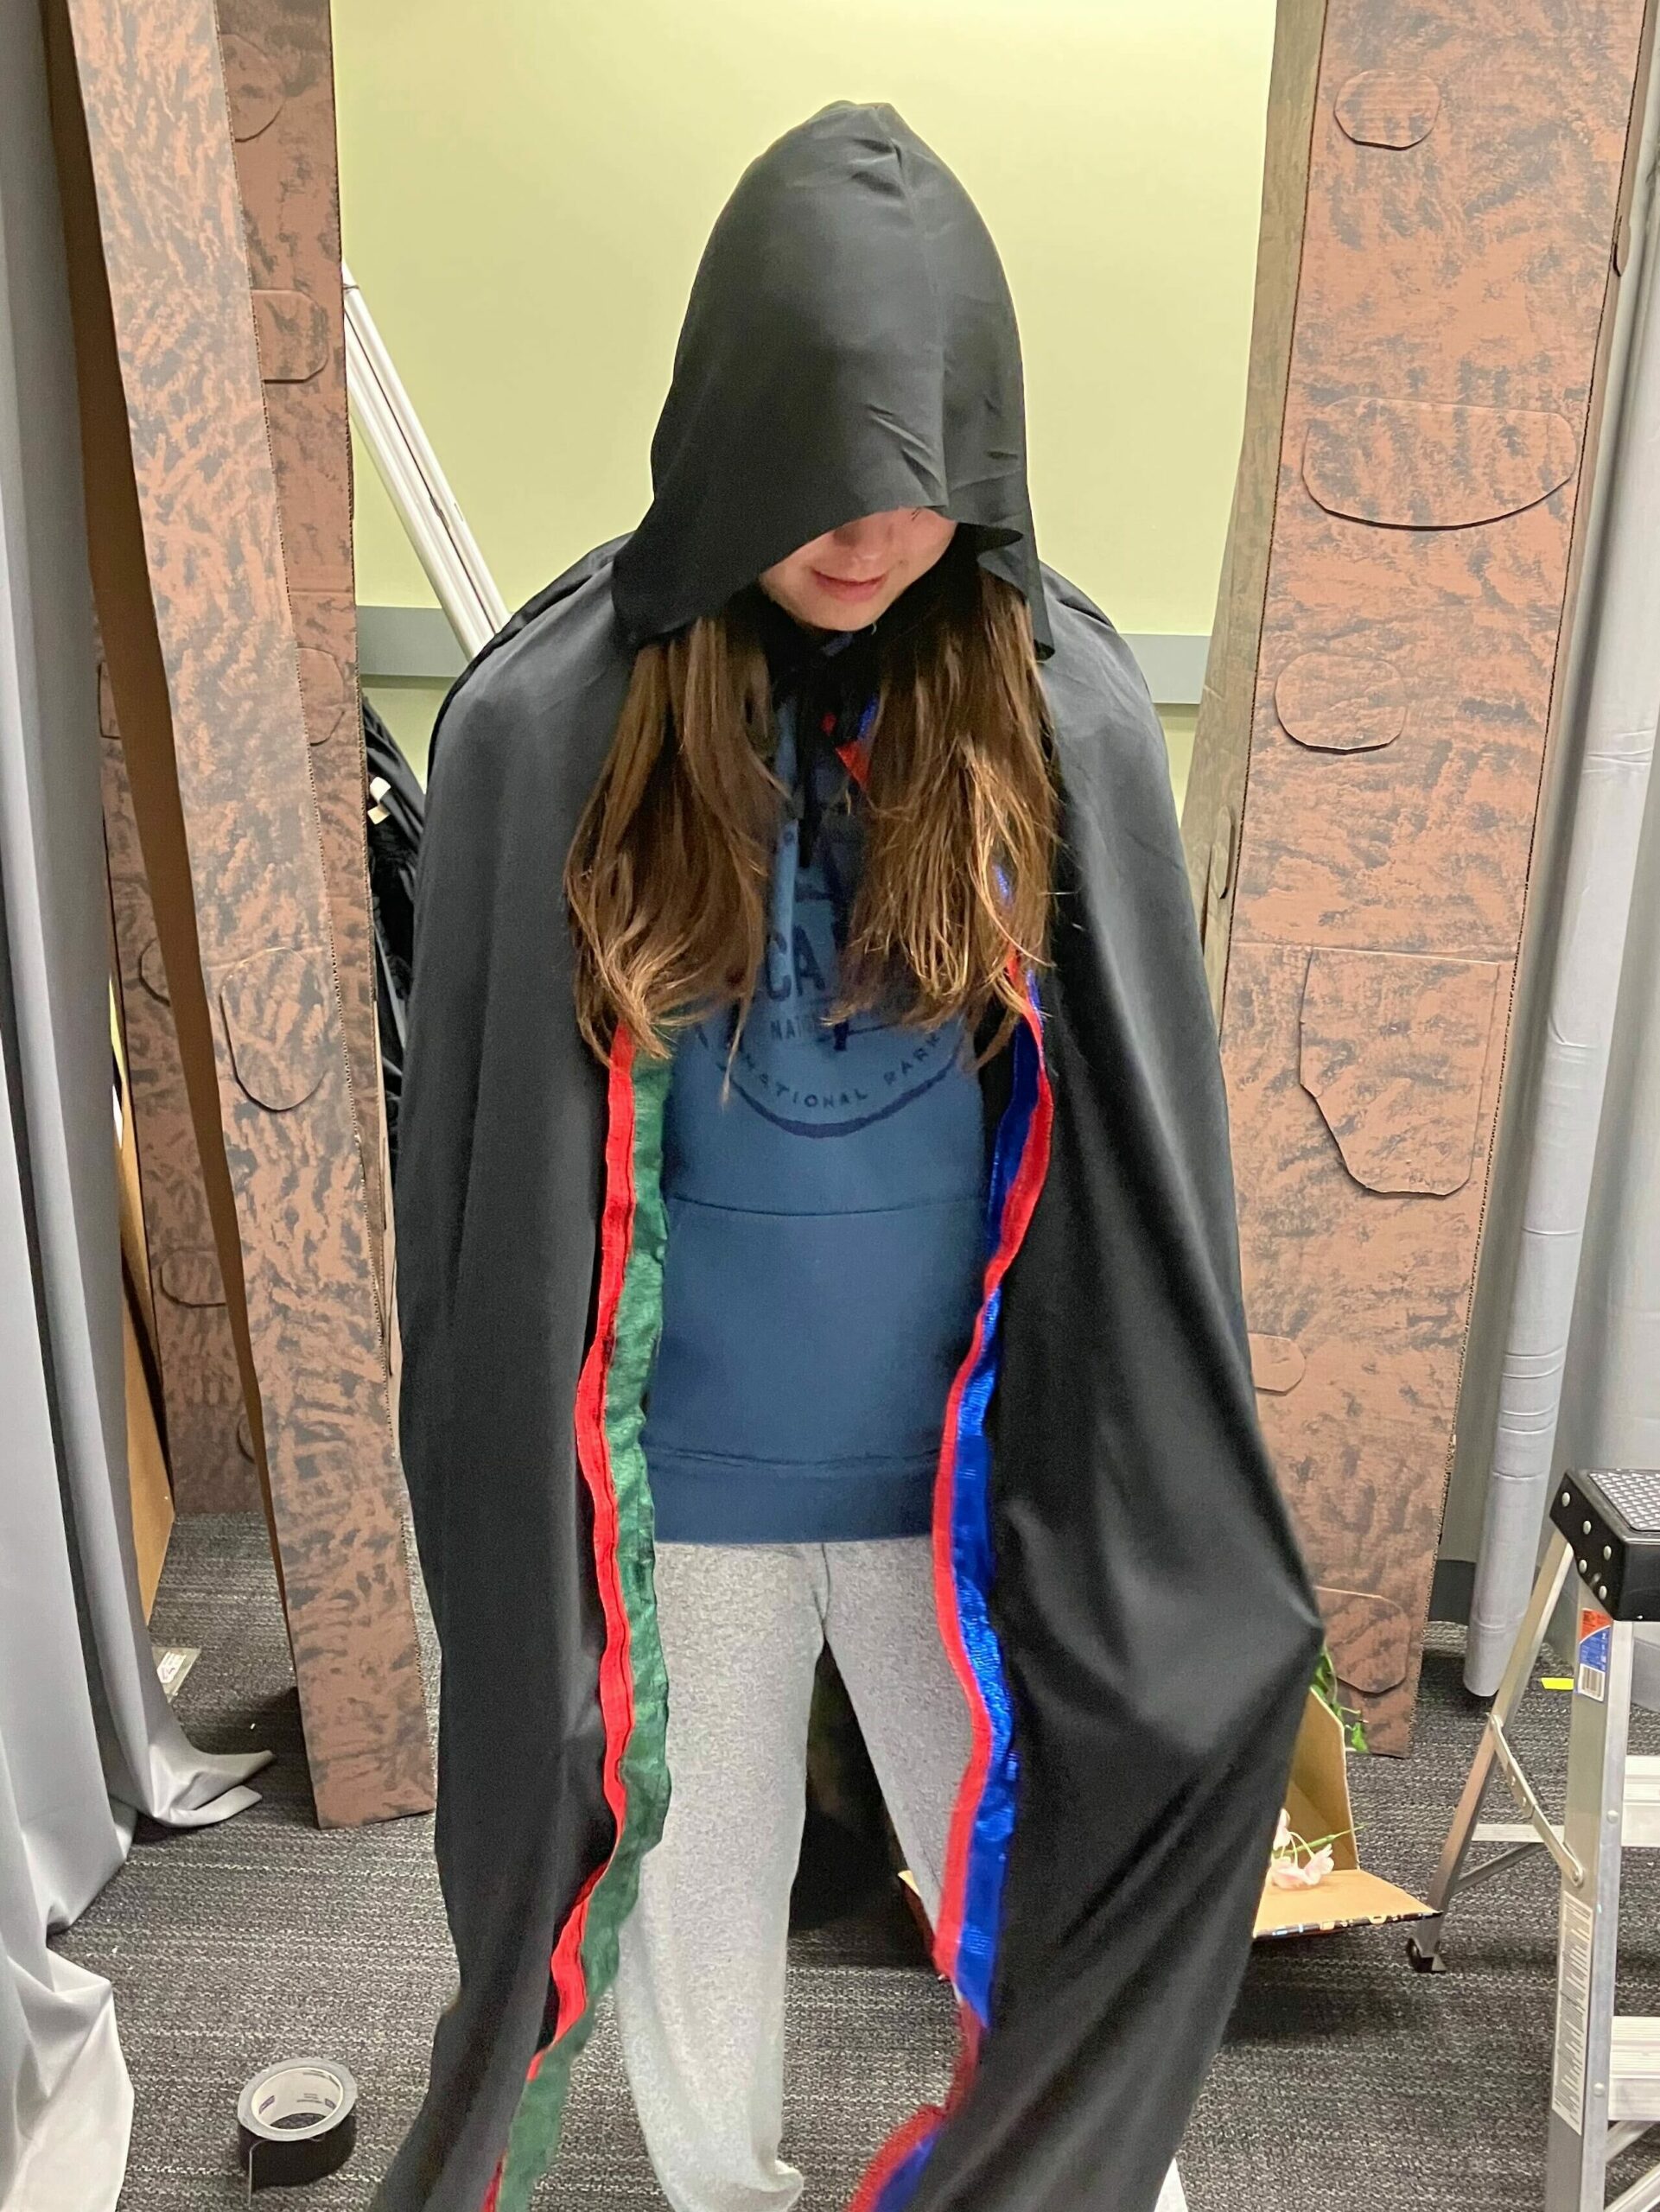
Kat was finally able to execute her costume design from last week! Because we went shopping for costume pieces on November 1, everything at Spirit Halloween was 25% off, so the total cost per costume is less than half of our planned budget. It was a bit of a risk, because cloaks could have been completely sold out, but luckily everything worked out.
We experimented with laser cutting our magic symbol out of polyester felt, and with the help of Bryan Maher, we found settings that allow raster engraving that won’t completely cut through the felt. However, we weren’t able to finish assembling the magic symbols, because we ran out of black felt. After IAAPA, we will try this again, or explore other options.
Dragon Puppet
The dragon saw a ton of progress this week! She’s almost unrecognizable compared to the start of the week.
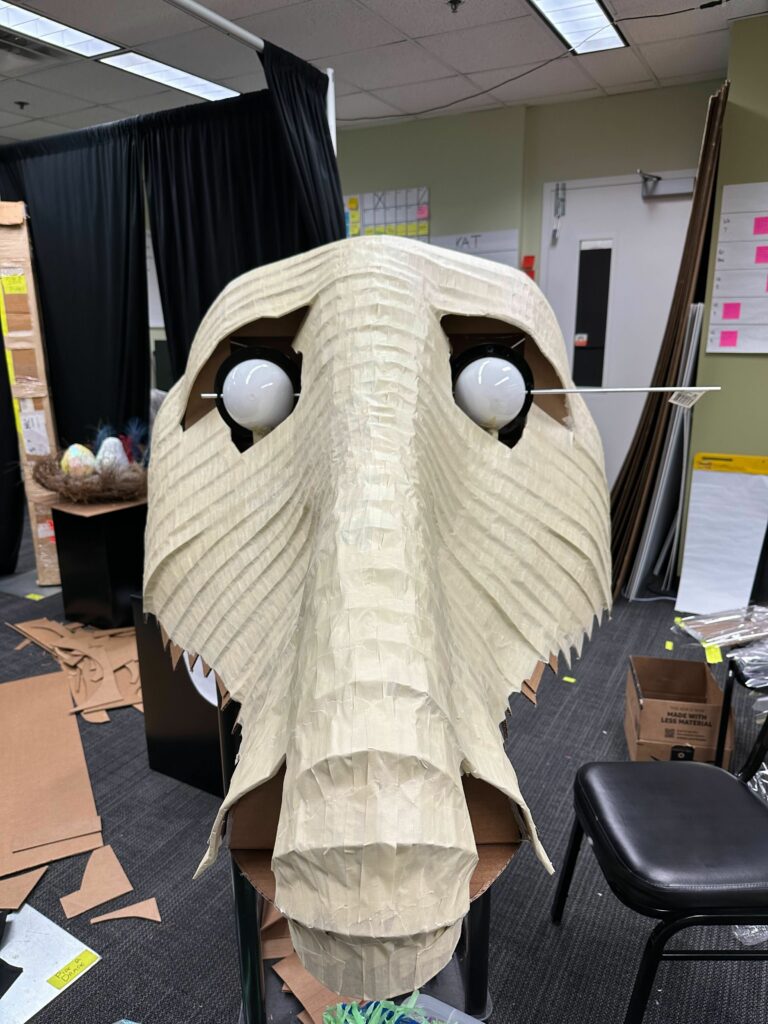
The dragon’s top jaw was fully covered in cardboard by Monday, and we began texturing her by putting on a masking tape skin. We decided on masking tape over papier-mache to avoid drying times and allow the natural ridges of our cardboard design to be preserved. Here is a short timelapse of our progress on taping!
We ran the ETC out of masking tape (oops) and had to go out to buy more. In the end, we covered the entire top jaw of the dragon in two full layers of masking tape. We are pretty happy with the fact that it looks so uniform, as if in rows of nearly identical scales.
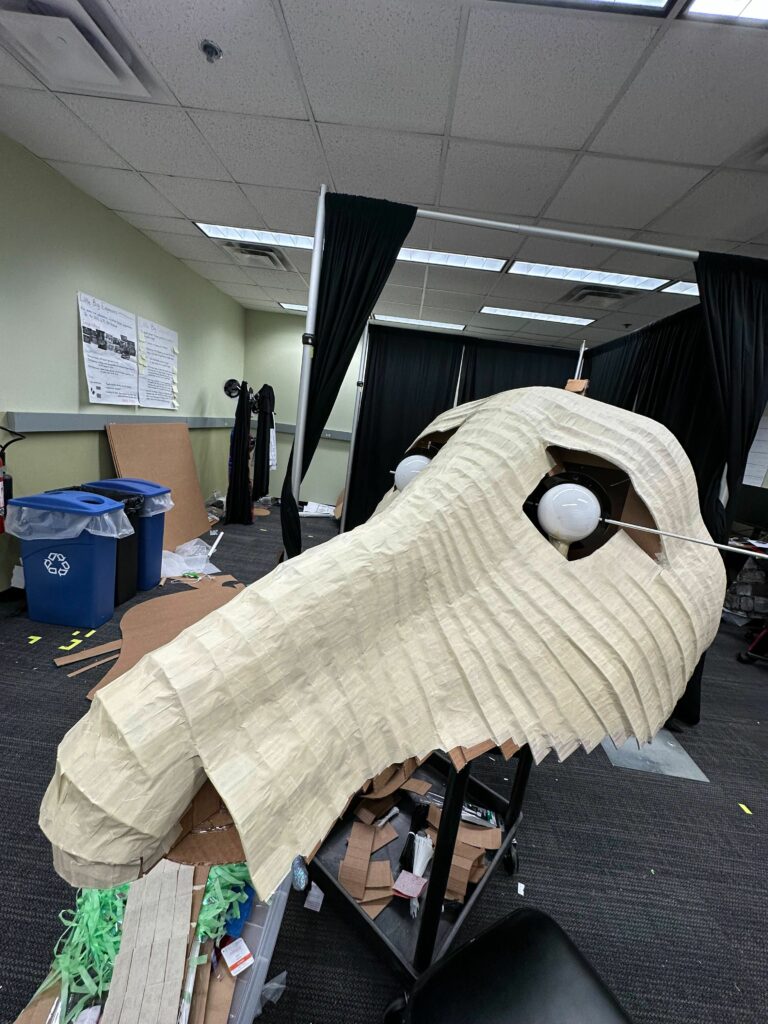
The dragon’s bottom jaw is also underway, using the same method. The ribbing is complete and the cardboard strips are all cut out, but they will have to wait until after IAAPA to be glued and taped.
Because masking tape isn’t quite a skinlike or scale-like texture, we ordered liquid latex as a layer between the masking tape and paint. Kat spent the latter half of her week putting on the liquid latex and experimenting with paint colors and textures. The following things didn’t particularly work:
- High viscosity liquid latex + cotton balls: too bumpy and dinosaur-like
- High viscosity liquid latex + ripped up cotton shreds: too labor intensive for such a high surface area
- High viscosity liquid latex + flour: works extremely differently from the same formula makeup-grade liquid latex, in that it dries up much faster and lumpier, even with minimal amounts of flour. Because we had such limited liquid latex to work with (just 32 ounces) this was not worth further perfecting the formula and wasting more latex.
So, we decided to embrace the natural texture of the cardboard ridges and the masking tape lines, and create texture differences primarily with color. While it does feel like an entire day and a half of Kat’s time was wasted on things that didn’t work, the bottom jaw should come together much, much faster because of all this experimentation. Plus, now we know a lot about a brand new material!
We ultimately ended up with the following paint color scheme:
- 1:1 High viscosity liquid latex + white satin latex paint mixture, stippled on in 3 thin coats
- Very pale pink latex paint, brushed on in 1 thin, bristly coat for texture
- Very pale purple latex paint, stippled on in shadow areas
- Very pale yellow latex paint, stippled on in highlight areas
- 3:1 water and white latex paint mixture, brushed all over to blend
- Dragonfly brand iridescent red-violet-blue acrylic paint, 2 coats
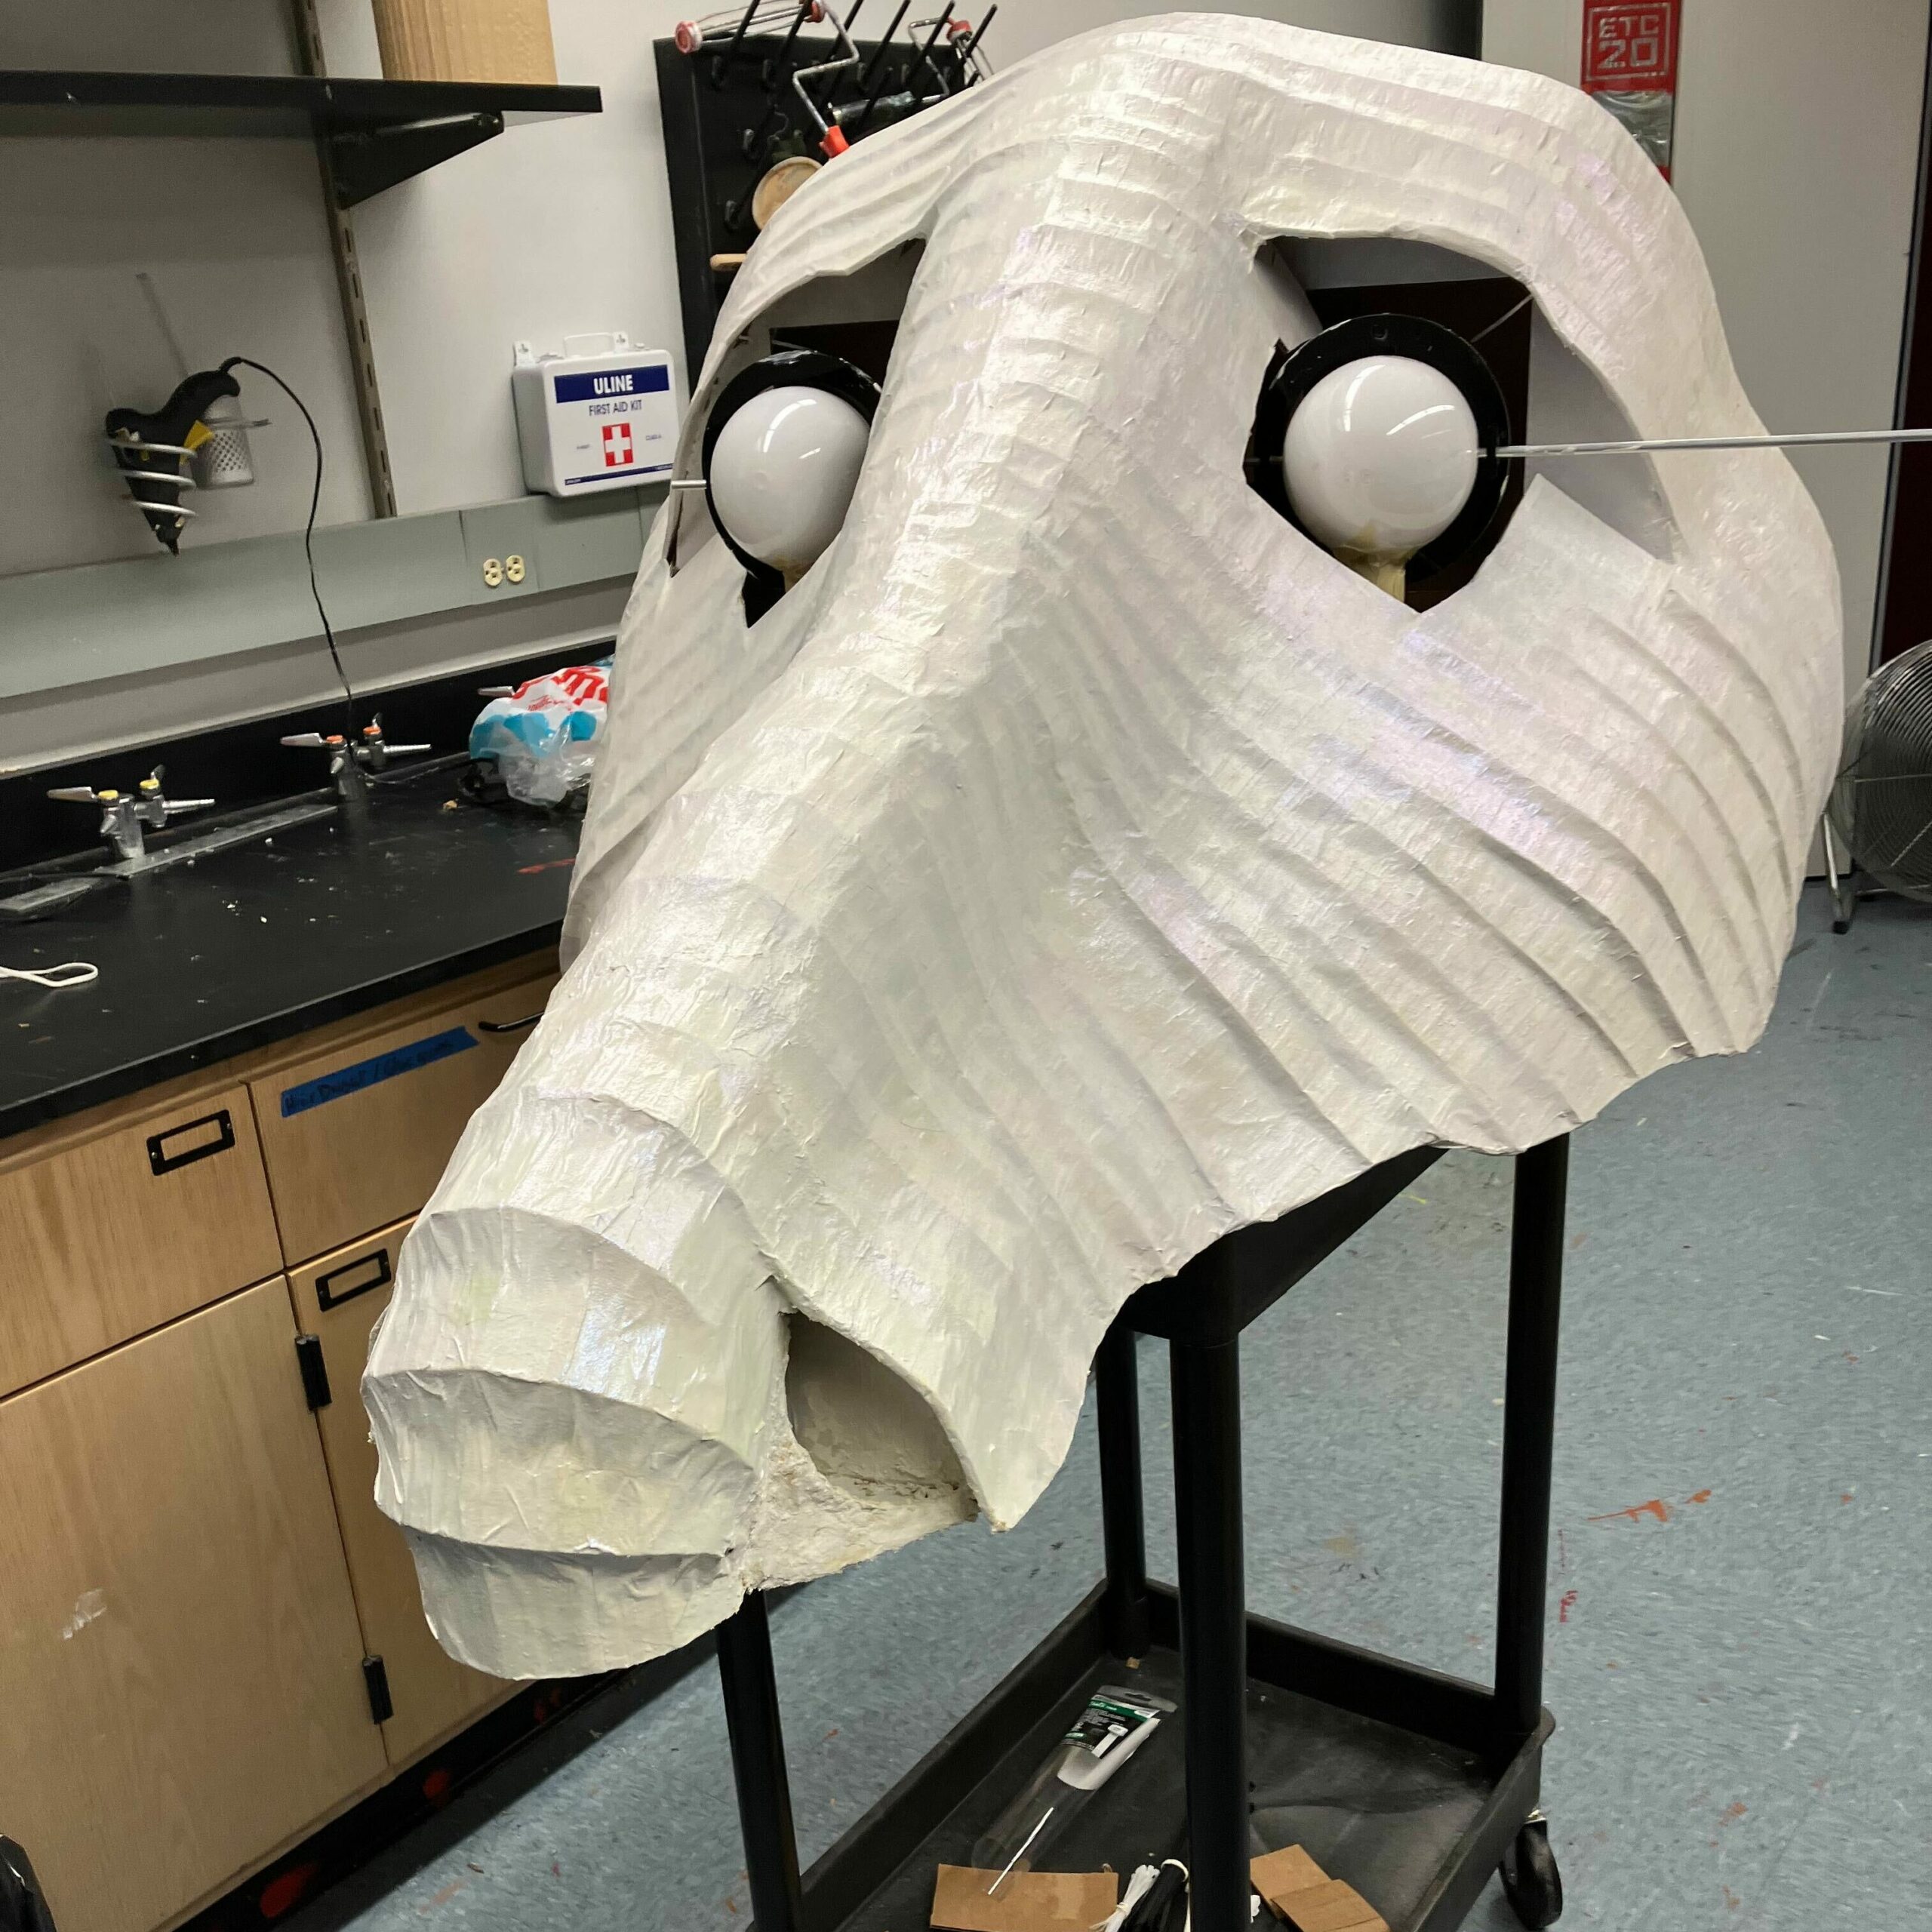
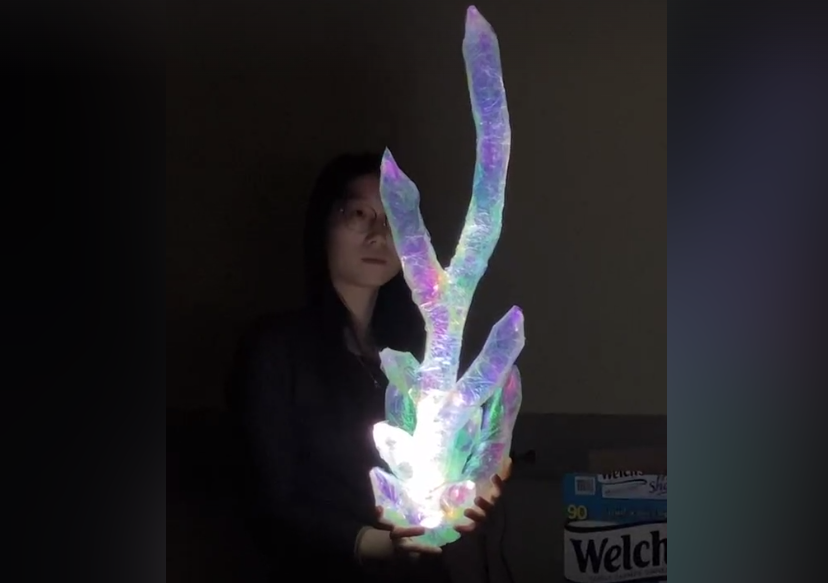
It’s a lot of work, but the effect in person is very effective! Also, because all the coats are quite thin and the dragon is massive. there is extremely minimal drying time between coats, and the bottom jaw should therefore be finished very quickly. The white color will also be great to reflect colors from the inside of the eyes and the horns, as seen in this quick lighting test with Dave Purta.
Lighting
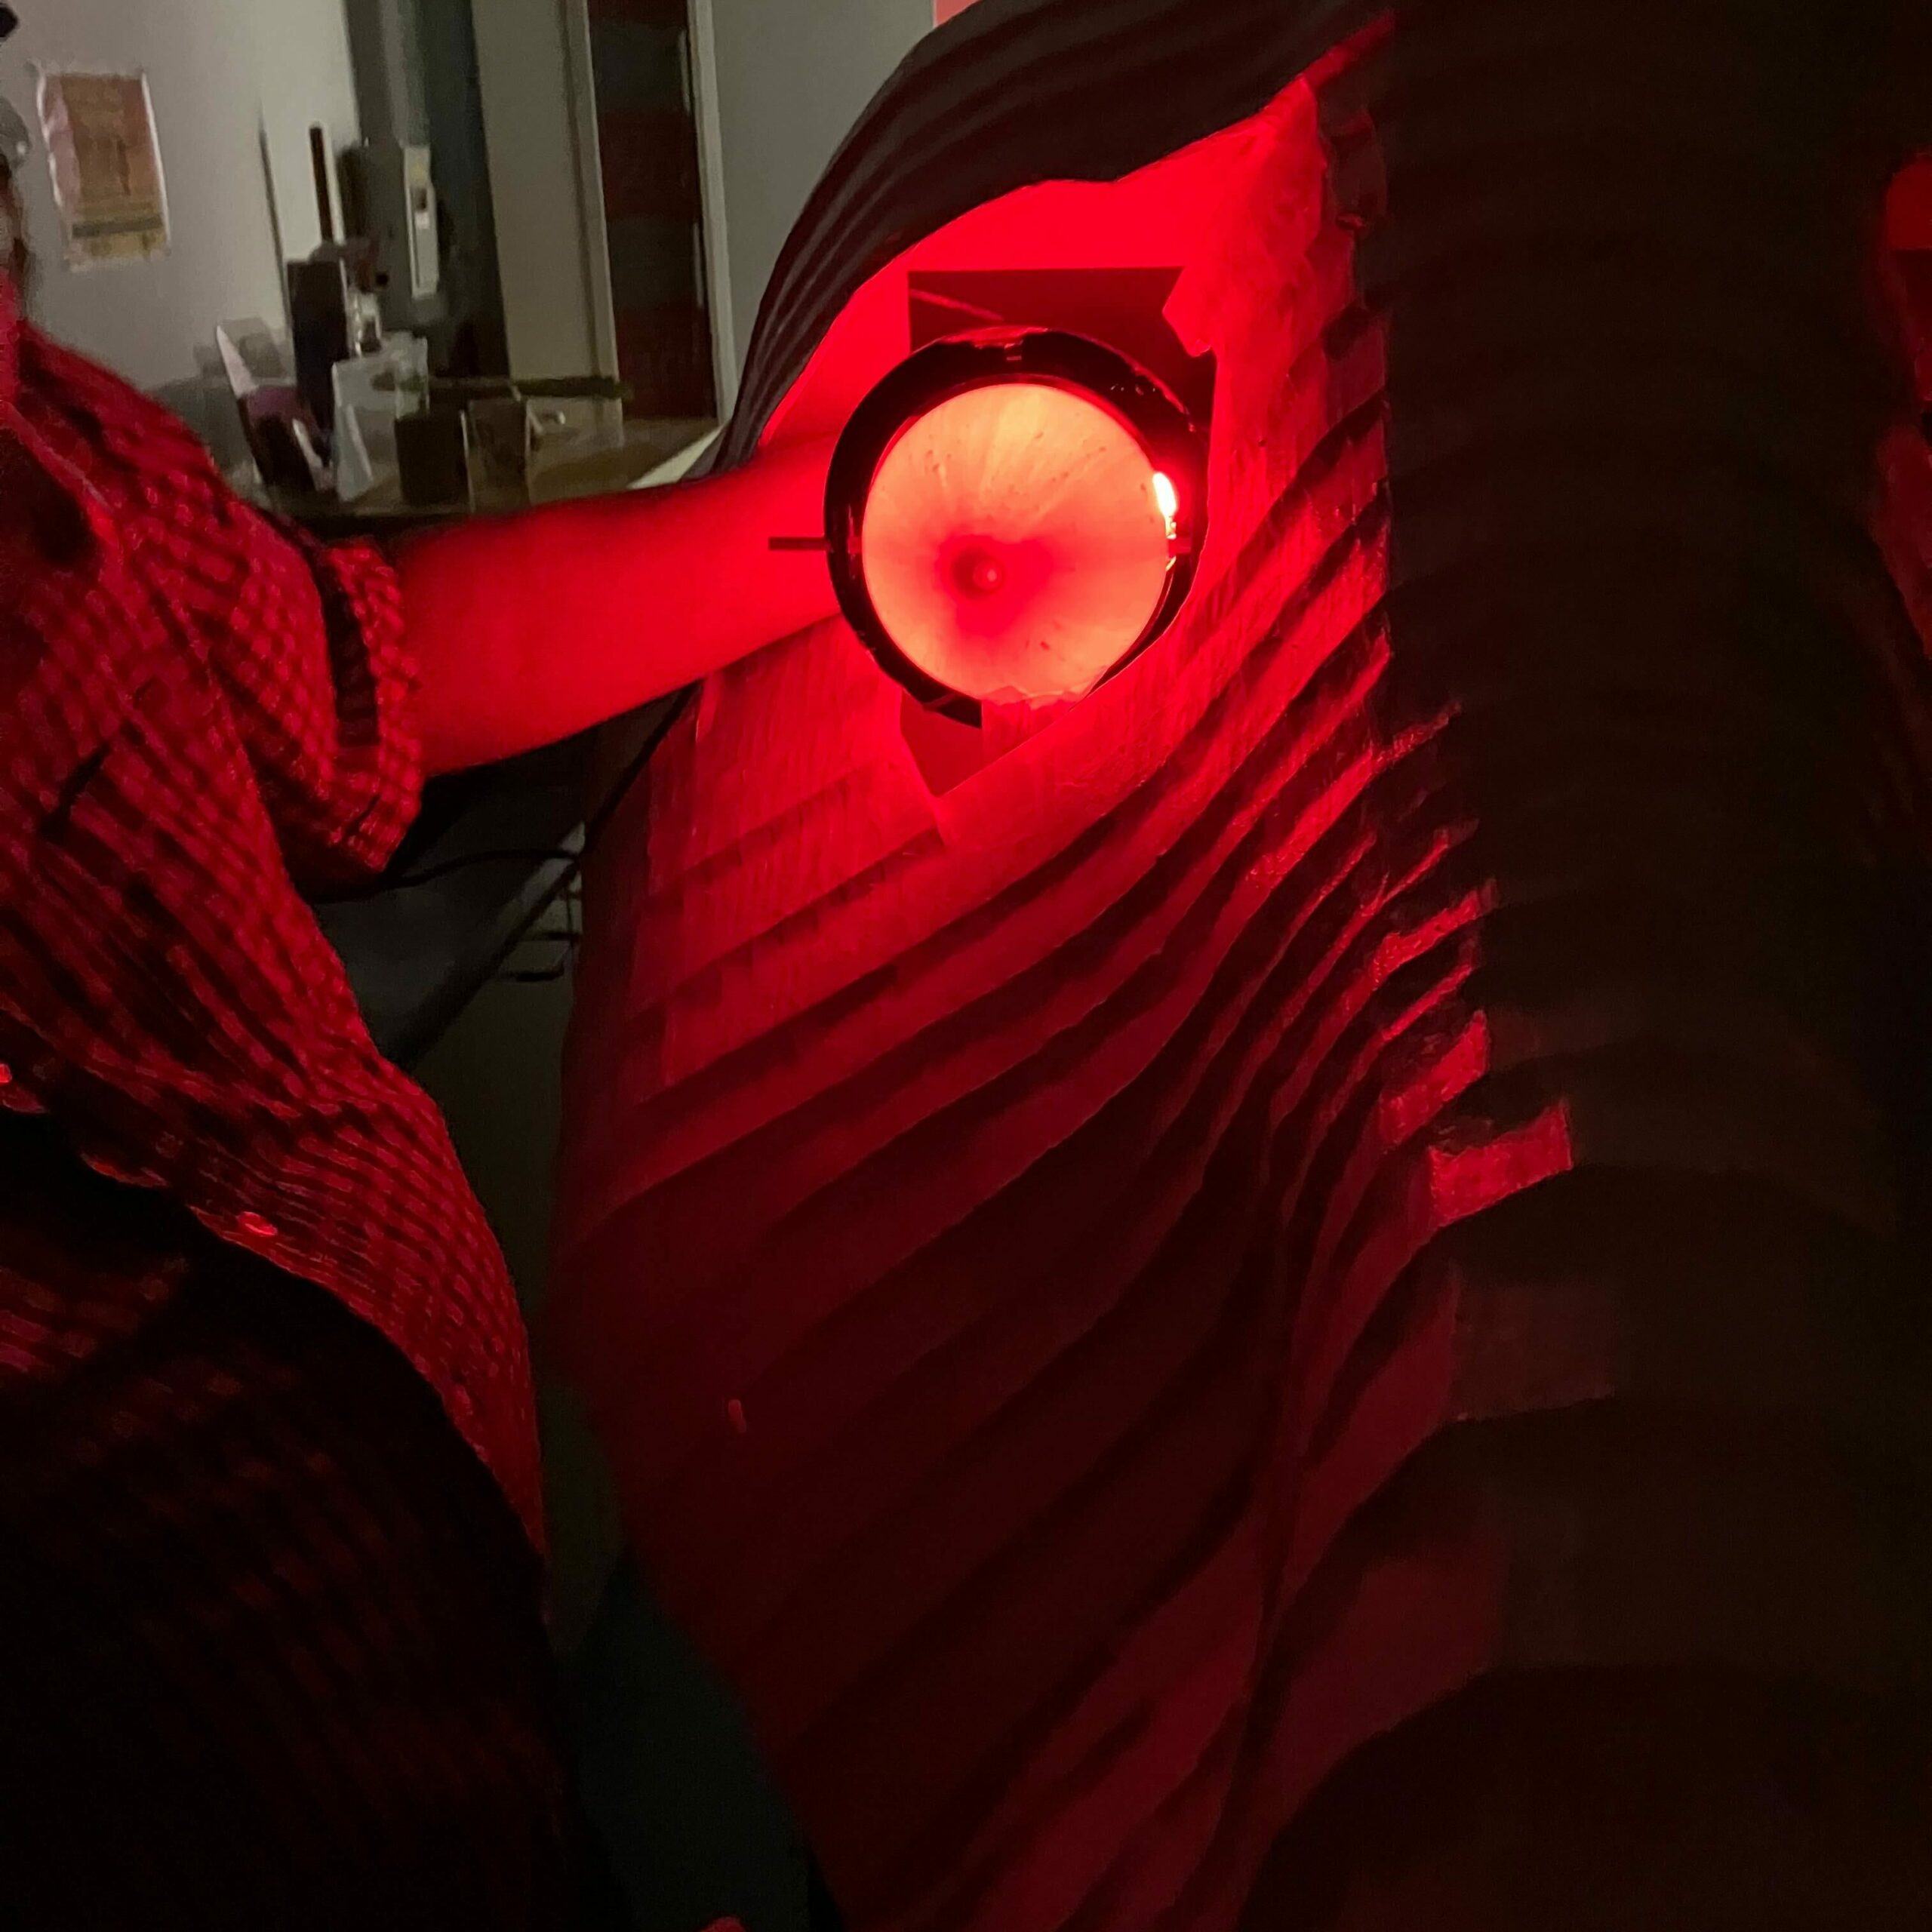
We picked up lighting kits from Todd Brown, CMU School of Drama lighting professor! These kits were already put together, and coincidentally are perfect for our purposes– they were originally put together for drama students to do at-home lighting assignments during the 2020 cancellation of in-person classes. These lights, Gantom RGBW DMX lights as well as a few small white spotlights, are much smaller and lighter than ones that the ETC owns, and this is great news for mounting them inside the dragon’s horns and eyes. We tested this on Thursday, with lights just below the dragon’s eyes instead of inside them, and we really like the effect. A simple cardboard tube reduces light bleed into the eye socket.
Dave Purta is also continuing to help us perfect the rig for the fog machine and corresponding lighting. We have created a jig with a copper hose and radiator hose to help mitigate the heat of the fog as it comes out of the machine, and we were able to attach a small red light to the end of the hose and test it. Now the challenge will be attaching this to the dragon.
We also were able to test the lights with the horns, and in a stroke of pure luck, the RGBW lights are the perfect circumference for the plastic tubing we used to make the horns. With the iridescent paper overlay, the effect is quite stunning!
Playtesting
We ran a small playtest with 3 groups of ETC students on Friday. The primary purpose of this playtest was as a milestone for the updated fabrication of our puzzle, but it also allowed us to test what we believe is the final version of our puzzle riddle.
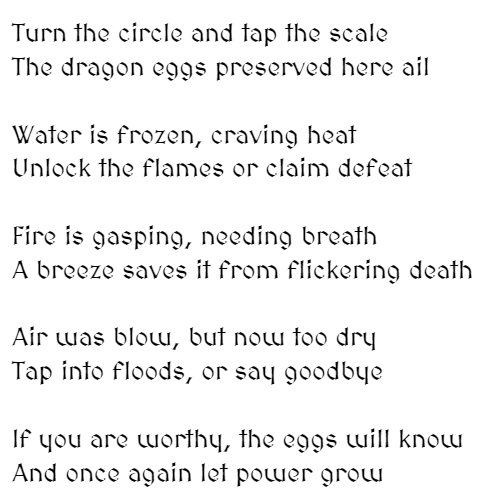
In this version, the answer is still nontrivial, in that it involves matching two different elements from the wheel and the RFID tap point. However, by saying “fire needs” instead of “this egg needs,” and rewording the clues, we were able to reduce the average solve time down to the exact ideal time of 2 and a half minutes. One team did solve it in a concerningly low amount of time (1 minute 10 seconds), but we will be able to use performance to augment the time if needed by having the actor make a huge deal out of getting the eggs out of their cages.
Goals for next week
Next week is IAAPA, so our goals for that will be networking and getting to know people in the themed entertainment industry! The following week is Thanksgiving, but only two of us are traveling out of town, so we will be able to work a few days over that break. We hope to finish the dragon’s lower jaw, create the wooden, final version of the puzzle wheel, rewire the wheel and the eggs, start moving furniture out of the room, and finish the new version of the intro video.
TL;DR
This week was all about the dragon puppet’s texture, the egg cages, and the lighting, all of which are much closer to final versions than the temporary versions we have been using for testing. Now, we are heading off to IAAPA with a huge to-do list for when we get back!